An optional ID of the exact multi-site license prices that will load once the checkout opened. `billing_cycle`[](#billing_cycle "Direct link to billing_cycle") string OPTIONAL Default: `'annual'` Allowed Values: `'monthly'` | `'annual'` | `'lifetime'` An optional billing cycle that will be auto selected when the checkout is opened. `currency`[](#currency "Direct link to currency") string OPTIONAL Allowed Values: `'usd'` | `'eur'` | `'gbp'` | `'auto'` `auto` lets the checkout automatically choose the currency based on the geolocation of the user. With the `auto` option, you may also want to dynamically show the prices on your pricing page according to the user’s geo. Therefore, we created [checkout.freemius.com/geo.json](https://checkout.freemius.com/geo.json) to allow you to identify the browser’s geo and currency that the checkout will use by default. `default_currency`[](#default_currency "Direct link to default_currency") string OPTIONAL Default: `usd` You could use this when the `currency` param is set to `auto`. In this case, if the auto-detected currency is not associated with any pricing, this will be the fallback currency. To set the default currency of the pricing page and checkout within the WP Admin dashboard, use the [default\_currency](https://freemius.com/help/help/documentation/wordpress-sdk/filters-actions-hooks/.md#default_currency) filter. `coupon`[](#coupon "Direct link to coupon") string OPTIONAL An optional coupon code to be automatically applied on the checkout immediately when opened. `hide_coupon`[](#hide_coupon "Direct link to hide_coupon") boolean OPTIONAL Default: `false` Set this param to `true` if you pre-populate a coupon and like to hide the coupon code and coupon input field from the user. `maximize_discounts`[](#maximize_discounts "Direct link to maximize_discounts") boolean OPTIONAL DEPRECATED Default: `true` *This has been deprecated in favor of [bundle\_discount](#bundle_discount).* Set this param to `false` when selling a bundle and you want the discounts to be based on the closest licenses quota and billing cycle from the child products. Unlike the default discounts calculation which is maximized by basing the discounts on the child products single-site prices. Learn [how the automatic discounts work](https://freemius.com/help/help/documentation/checkout/automatic-discounts-in-checkout/.md#annual_discount) `trial`[](#trial "Direct link to trial") boolean|string OPTIONAL Default: `false` Allowed Values: `true` | `false` | `'free'` | `'paid'` When set to `true`, it will open the checkout in a trial mode and the trial type (free vs. paid) will be based on the plan’s configuration. This will only work if you’ve activated the [Free Trial functionality](https://freemius.com/help/help/documentation/selling-with-freemius/set-up-trials/.md) in the plan configuration. If you configured the plan to support a trial that doesn’t require a payment method, you can also open the checkout in a trial mode that requires a payment method by setting the value to `'paid'`. `license_key`[](#license_key "Direct link to license_key") string OPTIONAL An optional param to pre-populate a license key for license renewal, license extension and more. `hide_license_key`[](#hide_license_key "Direct link to hide_license_key") boolean OPTIONAL Default: `false` Set this param to `true` if you like to hide the option to manually enter a license key during checkout for existing license renewal. `is_payment_method_update`[](#is_payment_method_update "Direct link to is_payment_method_update") boolean OPTIONAL Default: `false` An optional param to load the checkout for a payment method update. When set to `true`, the `license_key` params must be set and associated with a non-canceled subscription. Generating Payment Method Update Flow from the API Instead of generating the configuration manually you can check our [API documentation](https://docs.freemius.com/api/licenses/generate-upgrade-link) or [JS SDK documentation](https://freemius.com/help/help/documentation/saas-sdk/js-sdk/checkout/.md#handling-upgrade-flow) to automate the flow. `user_email`[](#user_email "Direct link to user_email") string OPTIONAL An optional string to prefill the buyer’s email address. `user_firstname`[](#user_firstname "Direct link to user_firstname") string OPTIONAL An optional string to prefill the buyer’s first name. `user_lastname`[](#user_lastname "Direct link to user_lastname") string OPTIONAL An optional string to prefill the buyer’s last name. `readonly_user`[](#readonly_user "Direct link to readonly_user") boolean OPTIONAL Set this parameter to `true` to make the user details (name and email) readonly. This is useful for SaaS integration where you are loading the user email and their first and last name from your own DB. `affiliate_user_id`[](#affiliate_user_id "Direct link to affiliate_user_id") number OPTIONAL An optional user ID to associate purchases generated through the checkout with their affiliate account. `language | locale`[](<#language | locale> "Direct link to language | locale") string OPTIONAL If given the Checkout will load in the selected language and would also show an UI for the user to switch language. The value of the `language` or `locale` parameter could be one of the followings: * **locale**: It can be a fully qualified locale code, for example: `en_US`, `de_DE` etc. * **language**: It can be just the language code, for example: `en`, `de` or `fr` etc. If we have more than two locales available for a language, then we have a system in place where we define the preferred language by popularity. If you are unsure about it, then please use the fully qualified locale code instead. * **auto** (recommended): The system will try to guess the language of your user by looking into the browser and then the geo-location respectively. However, this won’t select languages that are marked as AI-translated or beta for the time being. If we identify a locale that we don’t support right now, we’ll keep showing the English language. However we will still show the language selector UI. * **auto-beta**: Same as above, but will also select a language marked as beta. When a language marked as beta is selected, the UI will also show a “BETA” tag near it. tip Our Checkout will always display the language selector UI to the buyer. If you wish to automatically load the Checkout in the buyer’s preferred language, please use the `auto` value. `user_token`[](#user_token "Direct link to user_token") string OPTIONAL An optional token which if present, would pre-populate the checkout with user’s personal and billing data (for example, the name, email, country, vat ID etc). [Learn more…](#user_token_in_checkout) `layout`[](#layout "Direct link to layout") string OPTIONAL Default: `null` Allowed Values: `'vertical'` | `'horizontal'` | `'null'` Specify the layout of the form on a larger screen. This cannot be horizontal in cases like payment method updates or free plans. If set to `null` the system will automatically choose the best default for the current checkout mode. `form_position`[](#form_position "Direct link to form_position") string OPTIONAL Default: `left` Allowed Values: `'left'` | `'right'` Specifies the position of the form in horizontal layout. `fullscreen`[](#fullscreen "Direct link to fullscreen") boolean OPTIONAL Default: `false` If set to `true`, the Checkout dialog will take the entire screen when opened. `show_upsells`[](#show_upsells "Direct link to show_upsells") boolean OPTIONAL Default: `false` Whether or not to show the upsell toggles. `show_reviews`[](#show_reviews "Direct link to show_reviews") boolean OPTIONAL Default: `false` Whether or not to show the featured reviews in the checkout. By default it will be shown if the checkout page is loaded directly, without any JS snippet (iFrame) integration call. `review_id`[](#review_id "Direct link to review_id") number OPTIONAL When showing the review UI in the checkout, you can specify which review you want to show with its ID. By default the latest featured review will be shown. `show_refund_badge`[](#show_refund_badge "Direct link to show_refund_badge") boolean OPTIONAL Default: `false` Whether or not to show the Refund Policy UI in the checkout. By default it will be shown if the checkout page is loaded directly, without any JS snippet (iFrame) integration call. `refund_policy_position`[](#refund_policy_position "Direct link to refund_policy_position") string OPTIONAL Default: `dynamic` Allowed Values: `'below_form'` | `'below_breakdown'` | `'dynamic'` Use the parameter to position the refund policy badge when showing the form in horizontal layout. By default with the `'dynamic'` value, it will be positioned either below the form or the breakdown column. `annual_discount`[](#annual_discount "Direct link to annual_discount") boolean OPTIONAL Default: `true` Determines whether the annual discount will be shown in the checkout. Learn [how the automatic discounts work](https://freemius.com/help/help/documentation/checkout/automatic-discounts-in-checkout/.md) `show_monthly`[](#show_monthly "Direct link to show_monthly") boolean OPTIONAL Default: `false` Switching to the monthly billing cycle is disabled when the Checkout is loaded with annual billing cycle. Use this parameter to show it. * Having a `true` value may not show the upsell toggle UI. It will show up only if the annual pricing has some discount associated with it. In case your single unit pricing doesn’t have a monthly price set, you would need to disable the multisite discount by using `multisite_discount=false` for the system to calculate the annual discount from currently selected license units instead of the single license unit . * If you are using the `billing_cycle_selector` UI then `show_monthy` will always show the monthly option regardless of any discount associated with it. Learn [how the automatic discounts work](https://freemius.com/help/help/documentation/checkout/automatic-discounts-in-checkout/.md) `multisite_discount`[](#multisite_discount "Direct link to multisite_discount") boolean|string OPTIONAL Default: `'auto'` Allowed Values: `true` | `false` | `'auto'` Determines whether the multi-site discount will be shown. When the value is `'auto'`, the discount will only be shown if the single license pricing difference does not exceed 10 times more than the current pricing. Learn [how the automatic discounts work](https://freemius.com/help/help/documentation/checkout/automatic-discounts-in-checkout/.md#multi_unit_discount) `bundle_discount`[](#bundle_discount "Direct link to bundle_discount") boolean|string OPTIONAL Default: `'maximize'` Allowed Values: `true` | `false` | `'maximize'` Determines whether the bundle discount will be shown. The bundle discount itself depends on the compound price of its children. By default with maximize, we try to take the compound price from the lowest billing cycle and license. But with the value of true, we take it from the closest billing cycle and licenses. Learn [how the automatic discounts work](https://freemius.com/help/help/documentation/checkout/automatic-discounts-in-checkout/.md#bundle_discount) `show_inline_currency_selector`[](#show_inline_currency_selector "Direct link to show_inline_currency_selector") boolean OPTIONAL Default: `true` Set it to `false` to hide the inline currency selector from the "Today’s Total" line. `cancel_url`[](#cancel_url "Direct link to cancel_url") string OPTIONAL When the checkout is loaded in `page` you can specify a cancel URL to be used for the back button. By default if you link Freemius Checkout from your website, it will be picked up from the `Referer` header (if present). Using this option you can override the URL as needed. `cancel_icon`[](#cancel_icon "Direct link to cancel_icon") string OPTIONAL By default the website icon (also known as favicon) will be rendered alongside the cancel button. If you want to use any other icon image, please specify the link to the icon using this parameter. `always_show_renewals_amount`[](#always_show_renewals_amount "Direct link to always_show_renewals_amount") boolean OPTIONAL Default: `false` When set to `true`, a small line mentioning the total renewal price per billing cycle will shown below the total. By default, it only shows up when there is a renewal discount involved. `is_bundle_collapsed`[](#is_bundle_collapsed "Direct link to is_bundle_collapsed") boolean OPTIONAL Default: `true` Determines whether the products in a bundle appear as hidden by default. Is applicable only to bundles. `billing_cycle_selector`[](#billing_cycle_selector "Direct link to billing_cycle_selector") string OPTIONAL Default: `null` Allowed Values: `'list'` | `'responsive_list'` | `'dropdown'` If present, it will show the billing cycle selector UI in the Checkout. Read more about it [here](https://freemius.com/help/help/documentation/checkout/billing-cycle-selector-ui/.md). `show_confirmation_dialog`[](#show_confirmation_dialog "Direct link to show_confirmation_dialog") boolean OPTIONAL Default: `true` Determines whether or not to show the confirmation dialog after a successful purchase. Learn more about it [here](https://freemius.com/help/help/documentation/checkout/customizing-confirmation-dialog/.md). `sandbox`[](#sandbox "Direct link to sandbox") {token: string; ctx: string;} OPTIONAL Default: `1` If you want to test the checkout in the sandbox environment, you need to provide a `sandbox` object with the `token` and `ctx` values. You can generate these values from the Freemius Dashboard. Learn more about it [here](https://freemius.com/help/help/documentation/saas-sdk/checkout-js-sdk/usage/.md#sandbox-testing). `gdpr`[](#gdpr "Direct link to gdpr") string OPTIONAL Default: `default` Allowed Values: `'default'` | `'opt_out'` | `'hidden'` Determines whether to show the marketing consent UI in the checkout and, if shown, its default state. Learn more [here](https://freemius.com/help/help/documentation/checkout/gdpr/.md). tip All the parameters can be preset when creating the checkout using `new FS.Checkout({ /* options */ })`. If you need to set different param values based on the user's selection, you can set all the params except `product_id` when executing the `checkout.open()` method. ### Callbacks[](#callbacks "Direct link to Callbacks") `cancel`[](#cancel "Direct link to cancel") callable OPTIONAL A callback handler that will execute once a user closes the checkout by clicking the close icon. This handler only executes when the checkout is running in a `dialog` mode. `purchaseCompleted`[](#purchaseCompleted "Direct link to purchaseCompleted") callable(data: Object) OPTIONAL An after successful purchase/subscription completion callback handler. The structure of the argument is detailed [here](#user--purchase-data-in-callbacks). **Notice:** When the user subscribes to a recurring billing plan, this method will execute upon a successful subscription creation. It doesn’t guarantee that the subscription’s initial payment was processed successfully as well. If you’d like to leverage this method for the in-dashboard/WP-Admin checkout, you’ll need to utilize a special filter named `checkout/purchaseCompleted` as in [this example](https://gist.github.com/vovafeldman/a19a6c92838dcaa416ec7063a01dc6c9). `success`[](#success "Direct link to success") callable(data: Object) OPTIONAL An optional callback handler, similar to `purchaseCompleted` but only triggered after the [confirmation dialog](https://freemius.com/help/help/documentation/checkout/customizing-confirmation-dialog/.md) is closed. The structure of the argument is detailed [here](#user_purchase_data_in_callbacks). The main difference is that this callback will only execute after the user clicks the **"Got It"** button that appears in the after purchase screen as a declaration that they successfully received the after purchase email. This callback is obsolete when the checkout is running in a `dashboard` mode. `track`[](#track "Direct link to track") callable(event: String, data: Object) OPTIONAL An optional callback handler for advanced tracking, which will be called on multiple checkout events such as updates in the currency, billing cycle, licenses #, etc. ## User & Purchase Data in Callbacks[](#user--purchase-data-in-callbacks "Direct link to User & Purchase Data in Callbacks") If you're hooking into the `success` or `purchaseCompleted` callbacks for advanced integrations, you can retrieve purchase and user information from the first argument passed to your callback. For example: ``` checkout.open({ success(data) { // Get the user console.log(data.user); // Get the purchase console.log(data.purchase); // Get the free trial console.log(data.trial); }, }); ``` ### The `user` Object[](#the-user-object "Direct link to the-user-object") Contains details about the user who completed the purchase: * `email`: Buyer's email address * `first`: First name * `last`: Last name * `id`: Freemius user ID ### The `purchase` Object[](#the-purchase-object "Direct link to the-purchase-object") The `purchase` object differs depending on whether the transaction is a subscription or a one-off payment. Key properties include: * `plan_id`: ID of the purchased plan * `license_id`: ID of the license created or updated * `subscription_id`: ID of the subscription (only present for subscriptions) * `billing_cycle`: Subscription billing frequency (only present for subscriptions) The full structure is documented in our [repository](https://github.com/Freemius/freemius-checkout-js/blob/main/src/lib/contracts/CheckoutResponse.ts). If you're using the [@freemius/checkout](https://www.npmjs.com/package/@freemius/checkout) package, you'll get full IDE type intellisense support. ### The `trial` Object[](#the-trial-object "Direct link to the-trial-object") The `trial` object is only present if the purchase includes a free trial. It contains the following important properties: * `license_id`: The ID of the license associated with the trial * `trial_ends_at`: The date-time indicating when the trial period ends Just like the `purchase` object, the full structure of the `trial` object is documented in our [repository](https://github.com/Freemius/freemius-checkout-js/blob/main/src/lib/contracts/CheckoutResponse.ts). ## Tracking purchases with Google Analytics and Facebook[](#tracking-purchases-with-google-analytics-and-facebook "Direct link to Tracking purchases with Google Analytics and Facebook") The easiest way to track purchase conversions with external analytics and conversion tracking tools like Google Analytics is by leveraging the `purchaseCompleted` callback. Here is an implementation example: ``` checkout.open({ // ... purchaseCompleted: function (response) { // This code is for paid trial only. To track free trials, you can check for response.trial object. var isTrial = null != response.purchase.trial_ends, isSubscription = null != response.purchase.initial_amount, total = isTrial ? 0 : (isSubscription ? response.purchase.initial_amount : response.purchase.gross ).toString(), productName = 'Product Name', storeUrl = 'https://your-site.com', storeName = 'Store Name'; // Facebook Pixel tracking code. if (typeof fbq !== 'undefined') { fbq('track', 'Purchase', { currency: response.purchase.currency.toUpperCase(), value: total, }); } // The new GA4 gtag based tracking code. if (typeof gtag !== 'undefined') { gtag('event', 'purchase', { transaction_id: response.purchase.id.toString(), // Transaction ID. Required. affiliation: storeName, // Affiliation or store name. value: total, // Grand Total. shipping: 0, // Shipping. tax: 0, // Tax. currency: response.purchase.currency.toUpperCase(), // Currency. items: [ { item_id: response.purchase.plugin_id.toString(), // SKU/code. item_variant: response.purchase.plan_id.toString(), // SKU/code. item_name: productName, // Product name. Required. item_category: 'Plugin', // Category or variation. price: total, // Unit price. quantity: 1, // Quantity currency: response.purchase.currency.toUpperCase(), // Currency. }, ], }); gtag('event', 'page_view', { page_title: '/purchase-completed/', page_location: storeUrl + '/purchase-completed/', }); } }, // ... }); ``` tip If you’d like to leverage this method for the in-dashboard/WP-Admin checkout, you’ll need to utilize a special filter named checkout/purchaseCompleted as in [this example](https://gist.github.com/vovafeldman/a19a6c92838dcaa416ec7063a01dc6c9). ## Advanced Event Tracking[](#advanced-event-tracking "Direct link to Advanced Event Tracking") You can leverage the `track` callback handler to act upon different checkout actions taken by the user. Here's how you can use it including the list of the currently supported events: ``` checkout.open({ // ... track: function( event, data ) { const product = data.product; const user = data.user; switch (event) { case 'load': // Checkout loaded. break; case 'currency-changed': // Currency changed. break; case 'licenses-inc': // Licenses # increased. break; case 'licenses-dec': // Licenses # decreased. break; case 'billing-cycle-updated': // Billing cycle update. break; case 'email-updated': // Email address set or updated. break; case 'coupon-updated': // Coupon set or updated. break; case 'paypal-express-checkout': // PayPal express checkout started. break; case 'review-order': // User moved to review mode, i.e., they already filled up their payment method details and ready to confirm the purchase. break; case 'cooling-off-waiver-toggled': // Cooling-off waiver toggled (only relevant for EU buyers). break; case 'complete': // Purchase completed. break; case 'exit-intent-shown': // Exit intent shown. break; case 'exit-intent-promotion-ended': // Exit intent promotion ended. break; case 'exit-intent-discount-applied': // Exit intent discount applied. break; case 'exit-intent-discount-canceled': // Exit intent discount denied. break; } }, // ... }); ``` ## User Token in Checkout[](#user-token-in-checkout "Direct link to User Token in Checkout") This feature lets you load the Freemius Checkout app where the user's name, email, VAT, country, Zip Code/Postal Code etc are already prepopulated, in a safe and secure way. The pre-requisites are: 1. You must know the Freemius User ID of the user going through the checkout. 2. You must make a Freemius API call in the context of the same plugin/product for which you are loading the checkout. 3. The token must be used immediately while loading the checkout. The lifespan of the token is 1 minutes. #### High-level process[](#high-level-process "Direct link to High-level process") 1. When the user clicks on the purchase button, make a call to YOUR backend. 2. Your backend will figure out the ID of the user and the ID of the product they are trying to purchase. 3. The backend will call Freemius API to generate a token. 4. The token would be given back to the JavaScript application which intercepted the "click". 5. The JavaScript application will then `open` the Freemius checkout while passing in the generated token as `user_token` in the configuration. Code example is given for both your backend (using PHP and [Freemius PHP SDK](https://github.com/Freemius/freemius-php-sdk)) and JavaScript app. **checkout-app.js** This is a sample JavaScript code that you can use to initialize the checkout on your website. ``` ``` **generate-user-token.php** This is a sample backend code to which the JS code would make a request to get the token. ``` Api("plugins/{$plugin_id}/users/{$user_id}/tokens/checkout.json"); // Send the token back to your JS application. echo json_encode(array( 'token' => $result['token'], )); ``` warning Please generate the `user_token` right before opening the checkout and open the checkout as soon as the token is generated. The token has a short life-span and you must not generate it before hand. --- # Freemius Checkout GDPR and Privacy-Related Compliance As a [Merchant of Record](https://freemius.com/merchant-of-record/), we (Freemius) take GDPR and privacy compliance seriously. The Freemius Checkout exposes the following user interfaces (UI) to help you comply with applicable regulations when using our services. note Please note that the UIs will display only when required based on the buyer's location or billing details. ## Marketing Consent UI[](#marketing-consent-ui "Direct link to Marketing Consent UI")  This interface is designed to obtain explicit consent from users for marketing communications. The information is saved in Freemius, and you can view it in the Developer Dashboard under the specific user's profile.  By default, the UI will be shown to all EU-based buyers and buyers from other countries where similar privacy regulations are in place. The UI does not include any default selection, meaning all new users must explicitly opt in to receive marketing communications. For existing buyers, we populate the radio button based on their previous consent status. If the buyer has already opted in, we do not display the UI to streamline the checkout process. The behavior of this UI can be customized using the [`gdpr`](https://freemius.com/help/help/documentation/checkout/freemius-checkout-buy-button/.md#gdpr) parameter of the Checkout. It supports the following values: * `default`: Show the UI only to new buyers from applicable regions. The radio button will have no default value. * `opt_out`: Same as `default`, but the radio button will be pre-selected to `No` for new buyers. This helps reduce friction during checkout while still complying with regulations. The trade-off is that you will likely see lower opt-in rates for marketing communications. * `hidden`: Hide the UI completely; for new buyers, their marketing consent will not have any value (set to `null`). Use this option when you do ***not*** want Freemius to collect marketing consent from your buyers at all. Example of Customizing the GDPR Parameter ``` checkout.open({ gdpr: 'hidden', }); ``` ## EU 14-Day Cooling-Off Waiver UI[](#eu-14-day-cooling-off-waiver-ui "Direct link to EU 14-Day Cooling-Off Waiver UI")  This interface informs EU-based buyers about the [14-day cooling-off period](https://en.wikipedia.org/wiki/Cooling-off_period_\(consumer_rights\)) waiver for digital products (both SaaS and downloadable software such as WordPress products). It ensures that buyers are aware of their rights and the implications of purchasing digital goods. Due to regulatory requirements, this UI cannot be customized and will show up automatically for EU-based buyers unless your product's refund policy exceeds the regulatory requirement. How Refund Policy Affects This UI The text automatically adjusts based on your product type and configured [refund policy](https://freemius.com/help/help/documentation/selling-with-freemius/refund-policy/.md). Specifically, if you have configured a [Double Guarantee](https://freemius.com/help/help/documentation/selling-with-freemius/refund-policy/.md#flexible---double-guarantee) refund policy for more than 14 days, this UI will be automatically hidden since your policy provides buyers with greater protection than the 14-day minimum. ## Cart Reminder Notice UI[](#cart-reminder-notice-ui "Direct link to Cart Reminder Notice UI")  This interface is shown to buyers from regulatory regions and allows them to opt out of [cart reminder emails](https://freemius.com/help/help/documentation/marketing-automation/cart-abandonment-recovery/.md) sent by Freemius on behalf of merchants. In certain locations, depending on local regulations, the cart is disabled by default and buyers must explicitly opt in to enable it. --- # Generating License Renewal & Payment Method Update Links Our platform provides a [Customer Portal](https://freemius.com/help/help/documentation/users-account-management/.md) from where your customers can self-serve to renew expired licenses or update billing methods.  However, sometimes sharing a direct link helps in quicker conversion. ## No Code Link Generation[](#no-code-link-generation "Direct link to No Code Link Generation") To help you quickly generate such links without any code: 1. Log in to the [Freemius Developer Dashboard](https://dashboard.freemius.com/). 2. Navigate to the **Products** tab and select your product. 3. Go to the ***Licenses*** section. 4. Search for the relevant license using the customer's license ID or key. 5. Scroll horizontally to license row and click the 3-dot option icon to expose the available actions. 6. Click on the **Copy Renewal Link** button that will copied to your clipboard. 7. Share the link with your customer.  When the customer clicks the link, a secure page will open the checkout with the license key prefilled for the customer to renew their license or update their payment method. ## Generate Links with API[](#generate-links-with-api "Direct link to Generate Links with API") You can automate the link generation using the API. There are a variety of parameters with which you can specify new plans, quota or billing cycles (See the [API endpoint](https://docs.freemius.com/api/licenses/generate-upgrade-link) documentation). If you skip all those parameters, then a manual renewal link will be generated instead. Using our JS SDK? If you're using our [JS SDK](https://freemius.com/help/help/documentation/saas-sdk/js-sdk/.md), please check the [retrieving upgrade authorization](https://freemius.com/help/help/documentation/saas-sdk/js-sdk/api/.md#retrieving-upgrade-authorization) method. --- # Freemius Hosted Checkout If you want your customers to be redirected to a specific URL to complete their purchase, Freemius Hosted Checkout makes this possible. In addition to the [JavaScript Buy Button API](https://freemius.com/help/help/documentation/checkout/freemius-checkout-buy-button/.md), this features makes your Checkout more robust with simple links that you can share anywhere, including: * Your own website * Social media platforms * Emails and in-app notifications Here is an [example](https://checkout.freemius.com/product/16423/plan/27409/?hide_licenses=true\&billing_cycle=monthly\&title=My%20Software\&show_reviews=true\&show_refund_badge=true\&s_ctx_ts=1736411534\&sandbox=ffb191fd7ac2dd20bf29a717ffc13d06\&cancel_url=https%3A%2F%2Ffreemius.com%2Fcheckout%2F).  ## Setting Up Hosted Checkout[](#setting-up-hosted-checkout "Direct link to Setting Up Hosted Checkout") The redirection URL is required for this feature to work properly. It determines where customers are taken after completing a successful purchase. ### Generating Checkout Links[](#generating-checkout-links "Direct link to Generating Checkout Links") 1. Start by going to the ***Plans*** page. 2. Click the **Get Checkout Code** button. 3. Click the **Overlay Code** button. 4. Hover over the **No-code Production Link**. You'll find several links depending on how you've configured your plan.  #### Generate Freemius Checkout Links for Pricing Options[](#generate-freemius-checkout-links-for-pricing-options "Direct link to Generate Freemius Checkout Links for Pricing Options") You can also set different pricing options inside an individual plan page. If you want a link to a specific pricing option: 1. Under the ***Plans*** page. Select the desired plan by clicking its name under the *Title* column. 2. Scroll down to the **Pricing** section. 3. Click the **Checkout Link** button on the specific pricing box.  #### Hosted Checkout URL Schema[](#hosted-checkout-url-schema "Direct link to Hosted Checkout URL Schema") If you want to programmatically generate Checkout URLs for your product, here is the URL schema ``` https://checkout.freemius.com/product/{product_id}/plan/{plan_id}/[licenses/{number|'unlimited'}]/[currency/{'usd'|'eur'|'gbp'}] ``` Given your product ID is `1234` and plan ID is `5678`, here are some valid examples: * Pre-select the single license pricing: ``` https://checkout.freemius.com/product/1234/plan/5678/ ``` * Preselect the 10 licenses pricing: ``` https://checkout.freemius.com/product/1234/plan/5678/licenses/10/ ``` * Preselect the EUR pricing of single license: ``` https://checkout.freemius.com/product/1234/plan/5678/currency/eur/ ``` * Preselect the EUR pricing of 10 licenses: ``` https://checkout.freemius.com/product/1234/plan/5678/licenses/10/currency/eur/ ``` Additionally every configuration you see in the [Buy Button API](https://freemius.com/help/help/documentation/checkout/freemius-checkout-buy-button/.md) can be passed as URL query parameters. For example: ``` https://checkout.freemius.com/product/1234/plan/5678/?title=Awesome%20Product ``` warning Make sure to url-encode the parameter values. tip To add a coupon to a URL, so your customers automatically arrive to the Freemius Checkout page with a coupon activated, all you need to do is add `?coupon=12345` to the end of the URL. `12345` should be replaced with the coupon code. ### Configuring the Back Button[](#configuring-the-back-button "Direct link to Configuring the Back Button")  A back button can be shown to a hosted Checkout. Here's how it works: * If a valid `cancel_url=...` is set in the URL query parameters, Checkout will use that URL. * If the above is not present but there’s a valid HTTP referrer, it will be used. * If neither of the above is available and you've set a **Website / Marketing Page URL** under your product settings, that URL will be used instead.  The button's icon is generated automatically from the favicon of the website. However, you can customize it by passing a valid image URL using the `cancel_icon` parameter. Here’s an example of a Checkout URL with both parameters: ``` https://checkout.freemius.com/product/{product_id}/plan/{plan_id}/?cancel_url=https%3A%2F%2Fexample.com&cancel_icon=https%3A%2F%2Fexample.com%2Flogo.png ``` ## Redirection After a Successful Purchase[](#redirection-after-a-successful-purchase "Direct link to Redirection After a Successful Purchase") You can configure a redirection URL after a successful purchase via the Developer Dashboard. 1. Go to **Plans → Customization**. 2. Enable the **Redirect Checkout to a custom URL** toggle. 3. Then, enter a valid HTTPS URL in the input field.  After a successful purchase (including license or payment method updates), buyers will be redirected to the specified URL. The following purchase data will be appended as query parameters: * `user_id` – The ID of the buyer. * `plan_id` – The ID of the purchased plan. * `email` – The buyer's email address. * `pricing_id` – The ID of the pricing (not present for one-off purchases). * `currency` – The currency code associated with payment (e.g., `usd`, `eur`, `gbp`). * `subscription_id` – The ID of the subscription (not present for one-off purchases). * `billing_cycle` – The subscription billing frequency (not present for one-off purchases). * `amount` – The net amount paid by buyer. * `tax` – The tax amount paid by buyer. * `payment_id` – The ID of the one-time payment (only for one-off purchases). * `license_id` – The ID of the associated license. * `expiration` – The license expiration date (not present for one-off purchases). * `quota` – The quota associated with the license. * `action` – The type of action that was performed. It can be `purchase`, `license_update`, `payment_method_update` or `trial` . * `trial` – In case of a trial, this will have value either `free` or `paid` explaining the type of the trial. * `trial_ends_at` – In case of a trial, this will have a `YYYY-MM-DD HH:MM:SS` date explaining when the trial ends. * `signature` – A hashed value to verify the authenticity of the request (see the [verification instructions below](#verifying-the-data)). ### Verifying the Data[](#verifying-the-data "Direct link to Verifying the Data") When redirecting to the success URL, Freemius Checkout appends a `signature` query parameter that allows you to verify the authenticity of the request. **Here's the algorithm to verify the signature:** 1. Take the full absolute URL. 2. Remove the `&signature=...` from the end of the URL. 3. Calculate the SHA-256 hash of the resulting string. 4. Compare it with the value of the signature parameter. Below you can find examples of how to implement this in different programming languages. * JS SDK * PHP ``` const currentUrl = somehowGetTheCurrentUrl(); // e.g., request.url const redirectInfo = await freemius.checkout.processRedirect(currentUrl); if (redirectInfo) { // Handle successful checkout console.log('Redirect Info:', redirectInfo); } else { // Handle errors or incomplete checkout console.error('Invalid or missing redirect info'); } ``` For more information check our [JavaScript SDK Documentation](https://freemius.com/help/help/documentation/saas-sdk/js-sdk/checkout/.md#processing-redirects). ``` const FS_PRODUCT_SECRET_KEY = 'sk_productSecretKey'; // Get the current absolute URL $protocol = (!empty($_SERVER['HTTPS']) && $_SERVER['HTTPS'] !== 'off') ? "https" : "http"; $host = $_SERVER['HTTP_HOST']; $current_url = $protocol . "://" . $host . $_SERVER['REQUEST_URI']; // Remove the "&signature=..." part using string slicing $signature_pos = strpos($current_url, '&signature='); $clean_url = substr($current_url, 0, $signature_pos); // Calculate the HMAC hash $calculated_signature = hash_hmac('sha256', $clean_url, FS_PRODUCT_SECRET_KEY); // Compare the calculated signature with the provided one $signature = $_GET['signature'] ?? null; if ($signature && hash_equals($calculated_signature, $signature)) { echo "✅ Signature is valid."; } else { echo "❌ Invalid signature."; } ``` warning Please make sure the URL you enter does not redirect in your server. Otherwise the signature validation will fail following the algorithm. Also if you want to redirect to the root of the server, kindly add a `/`, for example `https://example.com/`, as browsers will do that when URL parameters are added. ## Next Steps[](#next-steps "Direct link to Next Steps") You're now ready to start sharing your hosted checkout links! To go further: * Learn how to [customize the Checkout style](https://freemius.com/help/help/documentation/checkout/applying-css-customization/.md) to match with your brand * Integrate the [JavaScript Buy Button](https://freemius.com/help/help/documentation/checkout/freemius-checkout-buy-button/.md) for an embedded purchase flow * Explore [Webhooks](https://freemius.com/help/help/documentation/saas/events-webhooks/.md) for post-purchase automation If you run into any issues or have questions, don't hesitate to contact our support by clicking the Help button on the bottom right of the screen. --- # Providing Prorated Discounts on Upgrades & Downgrades in Freemius Checkout By default, Freemius *prorates* plan updates (upgrades or downgrades).  Unlike the commonly used *prorating* implementations which preserve the renewal payment processing time, Freemius’ *proration* works slightly different and will restart the billing date based on the time of the plan update. This methodology simplifies understanding the discount for the customers and also benefits the sellers who will receive the initial worth of the new plan (minus the discounts) for the full billing period right away. See below for more details on how Freemius *prorates* plan updates. ## Proration from a Subscription (Monthly or Annual)[](#proration-from-a-subscription-monthly-or-annual "Direct link to Proration from a Subscription (Monthly or Annual)") Customers who are updating a plan that was purchased as a subscription will receive a *proration* discount, based on the unused portion of their previous plan: ``` remaining_period = (1 - number_of_days_past_from_the_old_plan_last_payment / number_of_days_in_past_billing_cycle ) ``` ``` proration_discount = max(0, remaining_period x old_plan_last_payment ) ``` **Examples:** * If a user purchased a single-site monthly pro package for $10 per month and after 2 months and 15 days upgrades to the annual billing cycle of the same single-site pro plan for $100 per year - the customer will have already paid $10, and will have used half of their current billing cycle. Therefore, the initial *prorated* amount will be $95 ($100 - $10 / 2). * If a user subscribed to a single-site annual pro license for $100 per year and after 3 months decides to downgrade to a single-site annual starter plan for $80 per year - the customer will already have paid $100, and have used only a quarter of the current billing cycle. Therefore, the *proration* discount for the remaining period will be $75, and the initial price for the single-site annual starter plan will be $5 ($80 - $75). The first renewal payment will be scheduled for a year from the downgrade date and will cost $80. ## Proration from a Lifetime License[](#proration-from-a-lifetime-license "Direct link to Proration from a Lifetime License") Customers who purchased a lifetime plan will be eligible for a *proration* discount only if they update their plan within 30 days from the time of purchase. The *proration* discount is calculated as follows: ``` proration_discount = min(prev_lifetime_payment, new_lifetime_price) ``` **Examples:** * If a user purchased a single-site lifetime pro license for $300 and after 3 days upgrades to a 5-site lifetime pro license for $600, they are only charged $300 for the upgrade. * If a user purchased a single-site lifetime starter license for $150 and after 6 days upgrades to a single-site lifetime business plan for $400, they are only charged $250 for the upgrade. * If a user purchased a single-site lifetime pro license for $300 and after 2 months upgrades to a 5-site lifetime pro plan for $600, they are charged the full $600. To understand why lifetime upgrades aren't just calculated as the difference in price, regardless of how long ago the original purchase was, the following two scenarios may help: Long-Term Lifetime Upgrade Fairness A customer purchases a lifetime license for $300. Then, after 5 years (intentionally exaggerated time for emphasis) decides to upgrade for a higher $500 plan. If you discount them with $300 it basically means that they’ve used your product/license/support for free for 5 years. If a different customer purchase that same lifetime plan for $500 at the same time the other user upgrades from the $300 to the $500 plan, they both end up paying the exact same amount in total ($500), yet, the 1st customer already been using the product for 5 years. Car Upgrade Analogy Or another example, to drive it home (pun intended!). Let’s say you buy a car and then after 5 years decide to buy a more expensive one from the same brand. Would you expect to get your money back? No, because you’ve already used the product, which is analogous to receiving support (aka warranty). Therefore, we have the 30-day time limit in place to protect from this edge case. ### Customizing the 30-Day Period for Lifetime Licenses[](#customizing-the-30-day-period-for-lifetime-licenses "Direct link to Customizing the 30-Day Period for Lifetime Licenses") While we recommend keeping the 30-day period as is, you can customize it in the [Developer Dashboard](https://dashboard.freemius.com/). 1. Navigate to the desired product. 2. Go to the **Plans** → **Prorated Discount** tab. 3. Update the **Lifetime License Proration Period** to your desired number of days. You can also set it to **Unlimited** to always provide a proration discount for lifetime plan updates.  ## Proration with Coupons[](#proration-with-coupons "Direct link to Proration with Coupons") When updating a plan with a percentage-based coupon, the *proration* discount will be calculated first, and the coupon discount will apply to the discounted price as the last discount. ## In-Dashboard Plan Update[](#in-dashboard-plan-update "Direct link to In-Dashboard Plan Update") When a customer updates their plan within their WP Admin on a website where they’ve already activated it, the license will automatically be recognized by the checkout, and the user will be presented with the following options:  If the 1st option is selected, the purchase will be *prorated*, as described in the *proration* algorithm above. warning If the account owner of the installed product is different than the license owner, there’s no way to update the plan and the only option is to purchase another license! ## Freemius Checkout Plan Update[](#freemius-checkout-plan-update "Direct link to Freemius Checkout Plan Update") When a customer is trying to update their plan from your website, the loaded checkout will include the following label:  This option will enable the customer to enter their license key. Once the license key is verified, the purchase will be *prorated* as described in the *proration* algorithm above. [](/help/videos/freemius-checkout-license-input.mp4) --- # Showing Reviews and Money-Back Guarantee in the Checkout To improve sales conversion, the checkout includes two social proofing UI components: * **Money-back guarantee**, which displays the product's [refund policy](https://freemius.com/help/help/documentation/selling-with-freemius/refund-policy/.md). * **Featured Review**, which displays a [featured review](https://freemius.com/help/help/documentation/marketing-automation/reviews/.md#how-to-make-featured-reviews).  When the checkout opens as a standalone page or as the [Hosted Checkout](https://freemius.com/help/help/documentation/getting-started/making-your-first-sale/.md#hosted-checkout), both components appear automatically. However, in the [Checkout Overlay](https://freemius.com/help/help/documentation/checkout/freemius-checkout-buy-button/.md), you must explicitly enable them using the [show\_reviews](https://freemius.com/help/help/documentation/checkout/freemius-checkout-buy-button/.md#show_reviews) and [show\_refund\_badge](https://freemius.com/help/help/documentation/checkout/freemius-checkout-buy-button/.md#show_refund_badge) settings. ## Displaying Reviews or Testimonials[](#displaying-reviews-or-testimonials "Direct link to Displaying Reviews or Testimonials") To display reviews or testimonials, ensure that you have at least one review to feature. Here's how to manually add a featured review to your product: 1. Go to your product in the [Freemius Dashboard](https://dashboard.freemius.com/). 2. Click on the **Reviews** tab. 3. Click the **Add Review** button to add a new review, or select an existing review to edit. 4. Fill in the review details, including the reviewer's name, content, rating, and any other relevant information. 5. Select the **Featured** checkbox to mark the review as featured. 6. Click the **Save** button to save your changes.  If you have multiple featured reviews, the most recently added one will display. Showing a specific review You can also specify a particular review to display in the checkout using the [`review_id`](https://freemius.com/help/help/documentation/checkout/freemius-checkout-buy-button/.md#review_id) setting. ## Displaying the Money-Back Guarantee[](#displaying-the-money-back-guarantee "Direct link to Displaying the Money-Back Guarantee") To display the money-back guarantee component, first set up the refund policy in the product "Plans" settings. Here is how to [configure the refund policy](https://freemius.com/help/help/documentation/selling-with-freemius/refund-policy/.md#configure-the-refund-policy). If the refund policy is set to "No Refunds," the money-back guarantee component will not appear in the checkout. In overlay mode, set the [`show_refund_badge`](https://freemius.com/help/help/documentation/checkout/freemius-checkout-buy-button/.md#show_refund_badge) setting to `true` to display the money-back guarantee component in the checkout. --- # Testing the Freemius Checkout via Sandbox You can use the Freemius Checkout in Sandbox mode to test your product's checkout process before going live. This mimics exactly how the live production environment works, allowing you to verify that everything functions as expected without processing real payments. For example, you can use the Overlay Checkout's [callback](https://freemius.com/help/help/documentation/checkout/freemius-checkout-buy-button/.md#callbacks) functions or Hosted Checkout's [redirect](https://freemius.com/help/help/documentation/checkout/hosted-checkout/.md#redirection-after-a-successful-purchase) after a successful purchase to ensure your integration is working correctly. In addition, our system will also create sandbox licenses, subscriptions, and payments and fire relevant [webhooks](https://freemius.com/help/help/documentation/saas/events-webhooks/.md) to help you test your license management and subscription handling processes.  Learn below about the different methods to generate a sandbox environment and how to test payments within it. ## Quick Sandbox Testing[](#quick-sandbox-testing "Direct link to Quick Sandbox Testing") The easiest way to test the Freemius Checkout in Sandbox mode is to use the generated [hosted](https://freemius.com/help/help/documentation/checkout/hosted-checkout/.md) sandbox link from the Freemius Developer Dashboard. 1. Log in to the [Freemius Developer Dashboard](https://dashboard.freemius.com/) for your product. 2. Navigate to the **Plans** page. 3. Click the **Get Checkout** button next to the desired plan.  4. Hover over the **No-code Sandbox Links** option. 5. Select the **Checkout Link** option. Click the copy icon to copy the generated URL, or click the link to open the Checkout in a new tab. warning This generates a link that will work with your login. So you can test this while being logged in to your Freemius account. Others, however, will not be able to access the sandbox environment using this link. To generate a proper sandbox token that can be accessed by anyone, please read on. ## Generating Sandbox Tokens[](#generating-sandbox-tokens "Direct link to Generating Sandbox Tokens") To generate sandbox tokens programmatically you can use the following methods. * JS * PHP See [JS SDK](https://freemius.com/help/help/documentation/saas-sdk/js-sdk/checkout/.md#generating-sandbox-links-or-options) for more details. Here's a quick example: ``` import { Freemius } from '@freemius/sdk'; const freemius = new Freemius({ productId: process.env.FREEMIUS_PRODUCT_ID!, apiKey: process.env.FREEMIUS_API_KEY!, secretKey: process.env.FREEMIUS_SECRET_KEY!, publicKey: process.env.FREEMIUS_PUBLIC_KEY!, }); const sandboxParams = await freemius.checkout.getSandboxParams(); ``` ``` $product_id = getenv('FREEMIUS_PRODUCT_ID'); $product_public_key = getenv('FREEMIUS_PUBLIC_KEY'); $product_secret_key = getenv('FREEMIUS_SECRET_KEY'); $ctx = time(); // Or any random unique string $sandbox_token = md5( $ctx . $product_id . $product_secret_key . $product_public_key . 'checkout' ); $sandbox_params = array( 'token' => $sandbox_token, 'ctx' => $ctx, ); ``` The methods above will generate an object with the following shape: ``` { "token": "generated_sandbox_token", "ctx": "generated_context_string" } ``` Now you can pass this object to the Checkout to open it in Sandbox mode. ### Overlay Checkout[](#overlay-checkout "Direct link to Overlay Checkout") Use the [sandbox](https://freemius.com/help/help/documentation/checkout/freemius-checkout-buy-button/.md#sandbox) option when opening the Overlay Checkout. ``` checkout.open({ sandbox: sandboxParams, }); ``` The object matches the shape returned from the methods above. ### Hosted Checkout[](#hosted-checkout "Direct link to Hosted Checkout") If you're using the Hosted Checkout then you need to pass the generated sandbox parameters in the checkout URL as query parameters. * `sandbox` - The generated sandbox token. * `s_ctx_ts` - The generated context string. Here are some sample code snippets for different languages: * JS * PHP ``` // Build the base checkout URL const baseUrl = `https://checkout.freemius.com/product/${productId}/${planId}/`; // Add sandbox parameters as query strings const sandboxToken = encodeURIComponent(sandboxParams.token); const sandboxContext = encodeURIComponent(sandboxParams.ctx); // Construct the final checkout URL const checkoutUrl = `${baseUrl}?sandbox=${sandboxToken}&s_ctx_ts=${sandboxContext}`; ``` ``` // Build the base checkout URL $base_url = "https://checkout.freemius.com/product/{$product_id}/{$plan_id}/"; // Add sandbox parameters as query strings $sandbox_token = urlencode($sandbox_params['token']); $sandbox_context = urlencode($sandbox_params['ctx']); // Construct the final checkout URL $checkout_url = "{$base_url}?sandbox={$sandbox_token}&s_ctx_ts={$sandbox_context}"; ``` ## Sandbox Payments[](#sandbox-payments "Direct link to Sandbox Payments") When the checkout is opened in Sandbox mode, you can test payments using test credit card numbers and PayPal sandbox accounts.  Clicking the **Prefill Form (Only visible in Sandbox Mode)** link item in the sandbox checkout allows you to quickly populate the checkout form with test data, making it easier to test the checkout process without manually entering information each time. However, you can also manually enter any of the test credit card numbers and PayPal sandbox accounts listed below. ### Testing credit cards[](#testing-credit-cards "Direct link to Testing credit cards") | Card Number | Card Type | | ------------------------ | -------------------- | | 4242 4242 4242 4242 4242 | Visa | | 4000 0566 5566 5556 | Visa (debit) | | 5555 5555 5555 4444 | MasterCard | | 5200 8282 8282 8210 | MasterCard (debit) | | 5105 1051 0510 5100 | MasterCard (prepaid) | | 3782 8224 6310 005 | American Express | | 6011 1111 1111 1117 | Discover | | 3056 9309 0259 04 | Diners Club | | 3530 1113 3330 0000 | JCB | ### Testing PayPal accounts[](#testing-paypal-accounts "Direct link to Testing PayPal accounts") To test PayPal payments in the Freemius Sandbox environment, first you need to choose the PayPal option in the checkout, then click the "Continue to PayPal" button. Use one of the following credentials in the new pop-up to log in: | Type | Email | Password | | -------- | ------------------------------------------- | -------- | | Personal |
Simple Pricing
Choose the plan that works best for you
Starter
from$8.99
per month
- Basic features
- Email support
- Community access
Pro
from$12.99
per month
- Advanced features
- Priority support
- API access
Business
from$30.00
per month
- All features
- 24/7 support
- Dedicated account
No purchase data found.
;
}
return (
Purchase Details
License ID: {data.licenseId}
User Email: {data.email}
{/* Render other purchase details as needed */}
-
);
}
```
Full list of options that can be passed to the `checkout.open()` method can be found [here](https://freemius.com/help/help/documentation/checkout/freemius-checkout-buy-button/.md).
For a more comprehensive example like the screenshot above, refer to this [example implementation](https://github.com/Freemius/freemius-js/blob/main/packages/saas-kit/src/app/custom-checkout/checkout-demo.tsx).
## Customer Portal Component[](#customer-portal-component "Direct link to Customer Portal Component")
The `CustomerPortal` component provides a secure way for your customers to manage their subscriptions and billing information. It offers the following features:
1. Display current active subscriptions.
2. Manage payment methods.
3. Upgrade or downgrade subscriptions.
4. Cancel subscriptions. The mechanism includes a cancellation survey and feedback form, and also provides an option to reduce churn by offering a discount.
5. Manage billing information.
6. Download invoices.
Cancellation Coupon
To reduce churn, we recommend offering a [discount coupon](https://freemius.com/help/help/documentation/marketing-automation/special-coupons-discounts/.md#subscription-cancellation-coupon). The Customer Portal will automatically offer to apply the coupon when a user tries to cancel their subscription.
Using the component is straightforward. It only requires an [`endpoint`](https://freemius.com/help/help/documentation/saas-sdk/react-starter/installation/.md#setting-up-the-required-api-endpoints) prop, which is the API endpoint that serves the Customer Portal data.
```
import { CustomerPortal } from '@/react-starter/components/customer-portal';
import { CheckoutProvider } from '@/react-starter/components/checkout-provider';
import { type CheckoutOptions } from '@freemius/checkout';
const checkoutEndpoint = process.env.PUBLIC_URL + '/api/checkout';
const checkoutOptions: CheckoutOptions = {
product_id: process.env.PUBLIC_FREEMIUS_PRODUCT_ID!,
};
const portalEndpoint = process.env.PUBLIC_URL + '/api/portal';
export default function AccountPage() {
return (
` container as follows:
```
#fs_dashboard_container {
top: {headerDesktopHeight}px;
}
@media screen and(max-width: 600px) {
#fs_dashboard_container {
top: {headerMobileHeight}px;
}
}
```
6. Add the new shortcode to your newly created page.
### Disabling Redirect to WordPress Login Page[](#disabling-redirect-to-wordpress-login-page "Direct link to Disabling Redirect to WordPress Login Page")
A user might be redirected to the default WordPress login page when they log out of the embedded Customer Portal. To disable this behavior, add this code snippet to the bottom of your active theme's `functions.php` file:
```
function my_fs_members_dashboard_config( $config ) {
$config = str_replace( 'window.location.href', '// window.location.href', $config );
return $config;
}
add_filter( 'fs_members_dashboard', 'my_fs_members_dashboard_config' );
```
## Customizing The Customer Portal Appearance[](#customizing-the-customer-portal-appearance "Direct link to Customizing The Customer Portal Appearance")
For up-to-date instructions on customizing the Customer Portal appearance with CSS, see [Applying CSS Customization](https://freemius.com/help/help/documentation/users-account-management/applying-css-customization/.md).
---
# Applying CSS Customization to the Customer Portal
You can customize the appearance of the Freemius Customer Portal with CSS to match your brand and site design. The portal supports custom style sheets and CSS variable overrides for flexible theming.
## How CSS Customization Works[](#how-css-customization-works "Direct link to How CSS Customization Works")
* The Customer Portal is embedded via an iframe or direct link, and you can apply custom CSS by specifying a style sheet URL in the Freemius Developer Dashboard.
* The portal uses CSS variables for colors, typography, and layout. Overriding these variables makes theme adjustments easy.
## Overriding CSS Variables[](#overriding-css-variables "Direct link to Overriding CSS Variables")
Inspect the portal's root element using your browser's developer tools to discover available CSS variables.
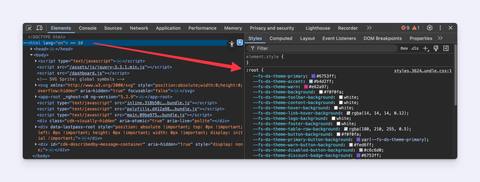
Common variable groups include:
* `--fs-ds-theme-*`: Theme colors for major components
* `--fs-ds-typography-*`: Font families, sizes, and weights
* `--fs-ds-appearance-*`: Border radius, sizing, etc.
For example, to change the primary color and font family, add the following CSS:
```
:root {
--fs-ds-theme-primary: #6753ff;
--fs-ds-typography-font-family: 'Open Sans', sans-serif;
}
```
## Adding Your Custom CSS[](#adding-your-custom-css "Direct link to Adding Your Custom CSS")
1. Host your CSS file on a secure (HTTPS) server.
2. In the Freemius Developer Dashboard, go to **Stores > Settings > Customer Portal**.
3. Paste your stylesheet URL into the **Customer Portal CSS stylesheet** field.
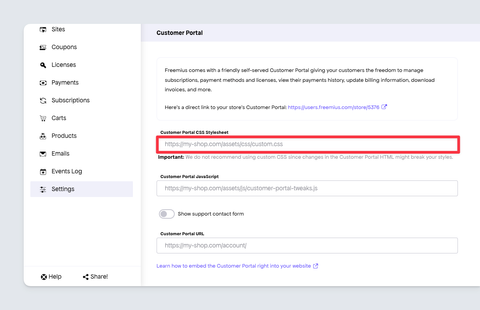
Your styles will then load and apply to the portal.
## Tips[](#tips "Direct link to Tips")
* Always use the `:root` selector for global variable overrides.
* Monitor changes in the Customer Portal HTML to avoid breaking your custom styles.
* For advanced theming, combine variable overrides with custom CSS rules targeting portal elements.
warning
Major portal updates may affect your custom styles; review changes after each update.
If you have questions or need help with advanced customization, contact Freemius Support.
---
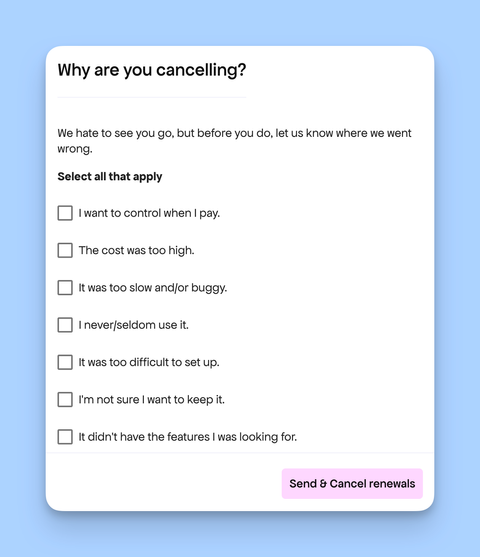
# Cancellation Survey: Collect User Feedback on Subscription Cancellations
Sometimes, users cancel their subscriptions for reasons that can be addressed to improve your product or service. Understanding these reasons helps enhance customer retention and reduce churn.
The Freemius Customer Portal includes a built-in cancellation survey displayed when a customer cancels a subscription. This survey runs as part of the cancellation flow and requires no additional setup, gathering valuable feedback from users.
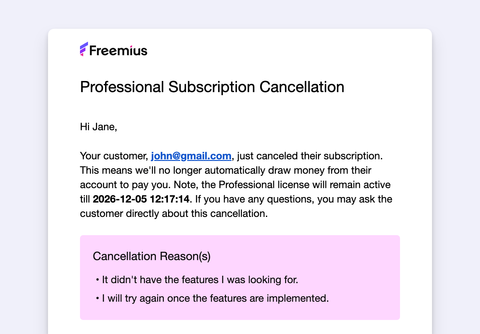
## Accessing the Feedback[](#accessing-the-feedback "Direct link to Accessing the Feedback")
You can access cancellation reasons via [events and webhooks](https://freemius.com/help/help/documentation/saas/events-webhooks/.md#subscription-cancelled) and process the data programmatically using the [API endpoint](https://docs.freemius.com/api/events/retrieve).
Additionally this information is also available in the transactional email sent to you when a subscription is canceled by a customer.
Reducing Cancellations
Freemius has out-of-the-box automation features that help reduce churn. You can also use [special coupons and discounts](https://freemius.com/help/help/documentation/marketing-automation/special-coupons-discounts/.md#subscription_cancellation_coupon) as an additional strategy to combat cancellations
---
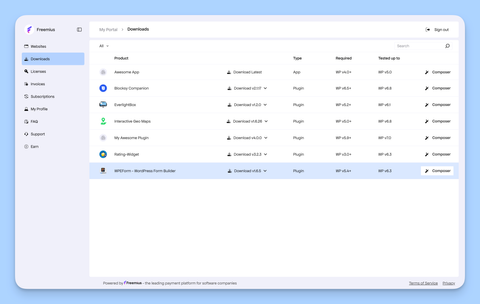
# Downloads
Find all the latest versions of the available downloadable software products on this page. You can get the composer scripts if your prefer to use composer as a package manager for product versioning.
---
# Earn - Becoming an Affiliate
Freemius Makers have an affiliate program out of the box that enables their product users market the products they use and earn sales commission.

note
By default this is disabled for each product. The product maker needs to [activate the Affiliate program](https://freemius.com/help/help/documentation/affiliate-platform/affiliate-program-activation/.md) for their users to earn. If you do not see this section in your dashboard consider talking to the product maker to enable this for you.
## How do you join the program[](#how-do-you-join-the-program "Direct link to How do you join the program")
There are multiple ways to sign up/apply to join the program via:
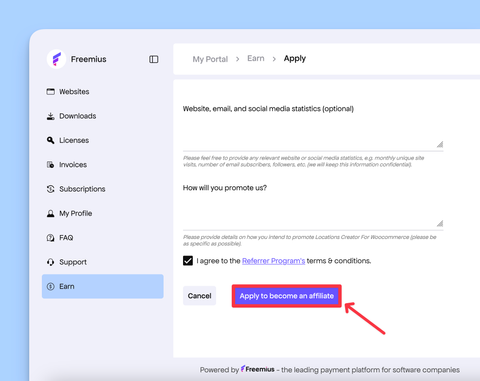
### Customer Portal affiliate application form[](#customer-portal-affiliate-application-form "Direct link to Customer Portal affiliate application form")
* Inside your account dashboard, look for the ***Earn*** section on the side menu on the left.
* Click the **Become an Affiliate** button.
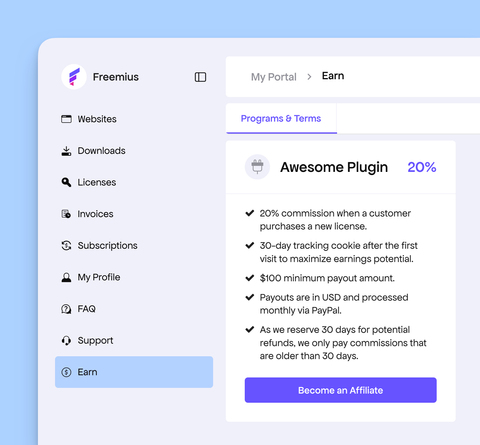
* Submit your application to the program by filling in the required details.
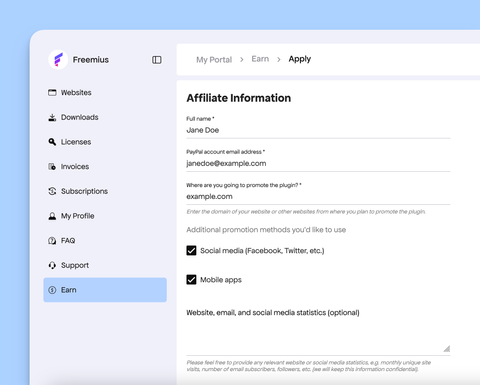
* Agree to the terms.
### The product maker's website affiliate application form[](#the-product-makers-website-affiliate-application-form "Direct link to The product maker's website affiliate application form")
On the product page/website, the maker might have an embedded form which you can use to apply.
### The WP Admin Dashboard Affiliates Application Form[](#the-wp-admin-dashboard-affiliates-application-form "Direct link to The WP Admin Dashboard Affiliates Application Form")
If a product maker has inserted the application form in their product, a form like this might be available.
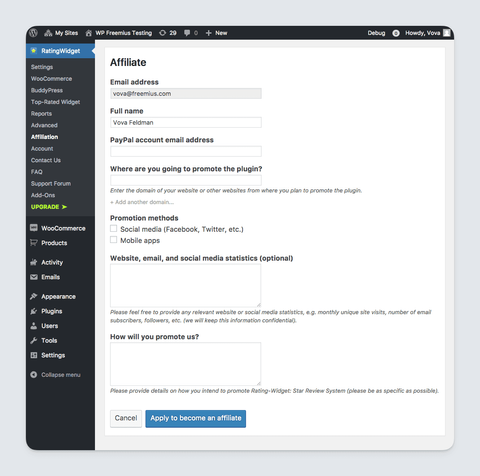
Submit your application to the program by filling in the required details and agree to the terms.
Your application will be reviewed by the product maker and approved if appropriate. You can now start selling as an affiliate.
note
Your commission will be calculated and remitted after the 10th and before the end of the month to the payment email provided.
---
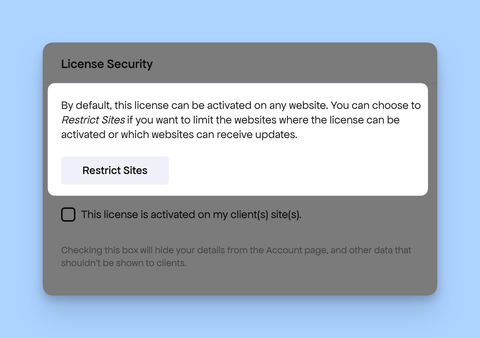
# License Security
The Customer Portal offers builders, like agencies and freelancers, who work on client projects greater protection of their data and license through a special **LICENSE SECURITY** section available for every license.
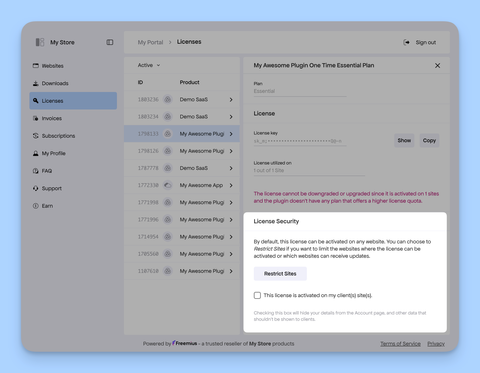
## White Label Mode[](#white-label-mode "Direct link to White Label Mode")
By flagging a license as "White Labeled", license owners can easily hide confidential information about their account and license:
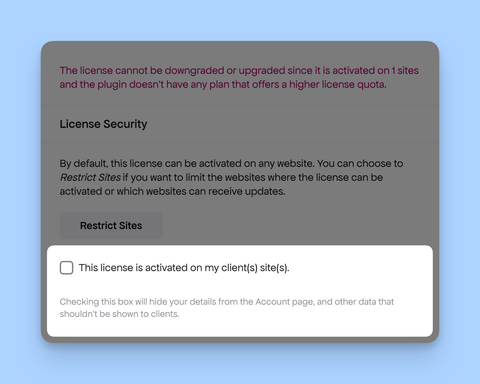
This means that account details normally shown in the *Account* tab in the WP Admin will not appear after checking the “This license is activated on my client(s) site(s)” box.
Here’s what will be hidden when a license is set as white-labeled:
* User information
* Billing details and invoices
* License key
* Pricing page
* Add-on prices (if you sell add-ons)
* Contact Us page
## URL Whitelisting (aka "License Firewall")[](#url-whitelisting-aka-license-firewall "Direct link to URL Whitelisting (aka \"License Firewall\")")
Freemius comes with a License Firewall, empowering license owners to control the websites that can activate their license or continue receiving updates.
[](/help/videos/freemius-customer-portal-license-security-url-whitelisting.mp4)
---
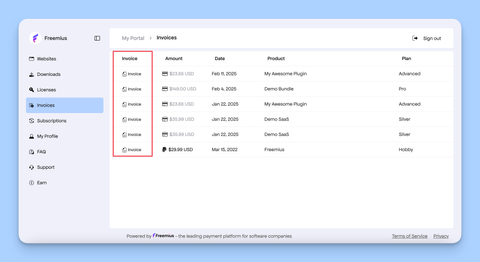
# Orders History
As a product user, this section enables you to see all your previous orders and their details.
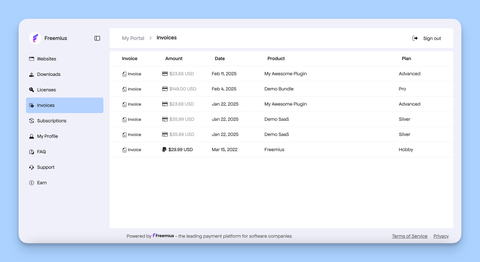
## Generate a printable invoice[](#generate-a-printable-invoice "Direct link to Generate a printable invoice")
Freemius always sends a post-purchase invoice to the customer's email on product makers behalf. However, sometimes users cannot find the purchase email via their inbox.
If the product user desires to get a printable invoice for their accounting purposes at a later time, they can always generate one by clicking on the **Invoice** button to get a downloadable/printable invoice.
---
# Single Sign-On for WordPress
If you are using WordPress to power your website and like to allow users and customers to login to your WordPress with their Freemius credentials, you can use our official [Single Sign-On WordPress Plugin](https://github.com/Freemius/freemius-wordpress-sso).
This plugin bridges the gap between WordPress and the Freemius API. When a user logs in with their Freemius credentials and there is no matching user in WordPress, a new user with the same email address and password will be created in WordPress.
When [embedding the Customer Portal](https://freemius.com/help/help/documentation/users-account-management/.md) on your site using our [Customer Portal WordPress plugin](https://github.com/Freemius/freemius-users-dashboard), a logged-in user will be automatically logged into their Freemius Customer Portal without the need to log in again. This structure offers a much better user experience to your users.
## How to restrict content from non-paying customers?[](#how-to-restrict-content-from-non-paying-customers "Direct link to How to restrict content from non-paying customers?")
The SSO (Single Sign-On) plugin comes with several handy methods to easily allow you control the logic according to the user's state on Freemius.
For example, if you have a contact form page or a forum, which you wish to restrict from users but show it to your customers, you can create a [page template](https://developer.wordpress.org/themes/template-files-section/page-template-files/) that will render different content according to the user's licenses on Freemius as follows:
```
get_freemius_has_any_license();
$has_any_active_license = $sso->get_freemius_has_any_active_license();
}
} ?>
add_action( string $tag, callable $function_to_add, $priority = 10, $accepted_args = 1 );
```
This method signature is similar to WordPress' [add\_action](https://developer.wordpress.org/reference/functions/add_action/) function. The following actions are available:
### `after_license_change`[](#after_license_change "Direct link to after_license_change")
Executed after a license change occurs.
```
my_fs()->add_action( 'after_license_change', 'my_fs_log_after_license_change', 10, 2 );
function my_fs_log_after_license_change( $status, $plan ) {
error_log( print_r( 'License status: ' . $status, true ) );
error_log( print_r( 'Plan:', true ) );
error_log( print_r( $plan, true ) );
}
```
### `after_license_activation`[](#after_license_activation "Direct link to after_license_activation")
Executed after a license activation occurs. Example:
```
my_fs()->add_action( 'after_license_activation', 'my_fs_after_license_activation' );
function my_fs_after_license_activation() {
// Handle successful activation.
}
```
On execution, this hook returns two arguments:
* The status as a string, depending on the license change type (e.g., `changed`).
* The plan object with a schema similar to the [retrieve a plan](https://docs.freemius.com/api/plans/retrieve) API endpoint.
### `after_license_deactivation`[](#after_license_deactivation "Direct link to after_license_deactivation")
Executed after a license deactivation occurs. Example:
```
my_fs()->add_action( 'after_license_deactivation', 'my_fs_after_license_deactivation' );
function my_fs_after_license_deactivation( $license ) {
if ( ! empty( $license->id ) ) {
// Success, do something with the license.
} else {
// Failure, handle the error.
// echo $license->error->code;
// echo $license->error->message;
}
}
```
On execution, the hook provides a license object with a schema similar to the [retrieve a license](https://docs.freemius.com/api/licenses/retrieve) API endpoint.
### `after_plans_sync`[](#after_plans_sync "Direct link to after_plans_sync")
Runs after the product's plans are synchronized with Freemius.
### `after_account_details`[](#after_account_details "Direct link to after_account_details")
Triggered after account details on the “Account” page are outputted (before the billing and payments sections).
### `after_account_user_sync`[](#after_account_user_sync "Direct link to after_account_user_sync")
Executed after user account synchronization.
### `after_account_plan_sync`[](#after_account_plan_sync "Direct link to after_account_plan_sync")
Runs after account plan synchronization.
### `before_account_load`[](#before_account_load "Direct link to before_account_load")
Triggered before an account is loaded.
### `after_account_connection`[](#after_account_connection "Direct link to after_account_connection")
Executed after a successful activation connection (when an account is successfully created).
### `account_email_verified`[](#account_email_verified "Direct link to account_email_verified")
Triggered when an account email address is verified.
### `account_page_load_before_departure`[](#account_page_load_before_departure "Direct link to account_page_load_before_departure")
Executed before finishing the loading of the Account page.
### `before_account_delete`[](#before_account_delete "Direct link to before_account_delete")
Runs before an account is deleted.
### `after_account_delete`[](#after_account_delete "Direct link to after_account_delete")
Executed after an account is deleted.
### `sdk_version_update`[](#sdk_version_update "Direct link to sdk_version_update")
Triggered after the SDK version is updated.
### `plugin_version_update`[](#plugin_version_update "Direct link to plugin_version_update")
Executed after the product version is updated.
### `initiated`[](#initiated "Direct link to initiated")
Runs after the Freemius SDK is initialized.
### `after_init_plugin_registered`[](#after_init_plugin_registered "Direct link to after_init_plugin_registered")
Runs after the Freemius SDK is initialized and the user is registered.
### `after_init_plugin_anonymous`[](#after_init_plugin_anonymous "Direct link to after_init_plugin_anonymous")
Runs after the Freemius SDK is initialized and the user is anonymous.
### `after_init_plugin_pending_activations`[](#after_init_plugin_pending_activations "Direct link to after_init_plugin_pending_activations")
Runs after the Freemius SDK is initialized and the user’s activation is pending confirmation.
### `after_init_addon_registered`[](#after_init_addon_registered "Direct link to after_init_addon_registered")
Runs after the Freemius SDK is initialized for an add-on and the user is registered.
### `after_init_addon_anonymous`[](#after_init_addon_anonymous "Direct link to after_init_addon_anonymous")
Runs after the Freemius SDK is initialized for an add-on and the user is anonymous.
### `after_init_addon_pending_activations`[](#after_init_addon_pending_activations "Direct link to after_init_addon_pending_activations")
Runs after the Freemius SDK is initialized for an add-on and the user’s activation is pending confirmation.
### `after_premium_version_activation`[](#after_premium_version_activation "Direct link to after_premium_version_activation")
Triggered after a premium version of the product is activated.
### `after_free_version_reactivation`[](#after_free_version_reactivation "Direct link to after_free_version_reactivation")
Executed after reactivating the free version of the product.
### `after_uninstall`[](#after_uninstall "Direct link to after_uninstall")
Runs after the product is uninstalled.
### `before_admin_menu_init`[](#before_admin_menu_init "Direct link to before_admin_menu_init")
Runs before the product’s menu and submenus are added.
## More action hooks[](#more-action-hooks "Direct link to More action hooks")
We have more action hooks related to the:
* [Opt-In Screen](https://freemius.com/help/help/documentation/wordpress-sdk/opt-in-message/.md#advanced-opt-in-customization-actions)
## Checking if a hook is registered[](#checking-if-a-hook-is-registered "Direct link to Checking if a hook is registered")
Just like in WordPress core, the Freemius SDK instance provides a `has_filter()` method, which you can use to check whether a specific hook has been registered. This works for both actions and filters. The method signature is:
```
my_fs()->has_filter( string $tag, callable|bool $function_to_check );
```
You can omit the second parameter to check for any registered filter or action.
---
# Contributing to the Freemius SDK
This guide is intended to help new [Freemius SDK](https://github.com/Freemius/wordpress-sdk) developers get up and running quickly. It contains step-by-step instructions on how to effectively contribute to the SDK via the git command line and GitHub.
## Prerequisites[](#prerequisites "Direct link to Prerequisites")
For some aspects of development you may need [npm](https://www.npmjs.com/) and [Node JS](https://nodejs.org/en/) installed on your system in order to run build scripts. The easiest way to do this is via the [Node installer](https://nodejs.org/en/) which installs both npm and Node via a single installation process.
## Who is This Guide For?[](#who-is-this-guide-for "Direct link to Who is This Guide For?")
This guide is primarily intended for both new Freemius developer core team members, and Freemius partners, looking to set up their local development environment for the first time. It's important that this is done correctly to ensure it's inline with recommended best practices.
It's also also useful to refer back to this guide even if you've contributed to the Freemius SDK previously. You may need to review the workflow process from time to time if it's been a while since your last commit, or just to make sure nothing has changed.
## Ways to Contribute[](#ways-to-contribute "Direct link to Ways to Contribute")
To contribute to the Freemius SDK codebase you typically fork the main GitHub repository, and then clone this locally to make the required code changes. The following sections cover the whole process in detail.
There are various types of code edits that can be made, including:
* Adding new features.
* Updating existing features.
* Bug and typo fixes.
* Adding, or updating, comments.
## Workflow Overview[](#workflow-overview "Direct link to Workflow Overview")
Freemius uses the [Gitflow](https://nvie.com/posts/a-successful-git-branching-model/) branching model for managing contributions to the Freemius SDK repository. In this workflow the main development work is done solely via the `develop` branch. Each new development task is created in a 'feature' branch that is branched directly from `develop`.
When a feature branch is ready for review, submit a pull request and wait for feedback. If approved, the pull request will then be merged into the `develop` branch. Otherwise, it is rejected and the feature branch can be modified as required and submitted again, or deleted. Periodically the `develop` branch of the SDK will be merged into the `master` branch and a tag will be created to mark the [release](https://github.com/Freemius/wordpress-sdk/releases).
In this guide we'll only be using the command line to work with the Freemius SDK repository but you can use a Git GUI if you prefer. Popular choices are [Sourcetree](https://www.sourcetreeapp.com/) (free) and [Fork](https://git-fork.com/).
## Setting Up For the First Time[](#setting-up-for-the-first-time "Direct link to Setting Up For the First Time")
Before you can clone the Freemius SDK locally you'll need to decide on the location. You have a couple of choices depending on how you plan on working with the SDK.
The recommended way is to clone the Freemius SDK repository to a local folder on your hard drive, and then either link to it from each of your plugins/themes, or copy it over via an automated script.
To link to the SDK use [symlinks](https://en.wikipedia.org/wiki/Symbolic_link) as these can be used to map any folder to any location on your local computer and are supported via the command line on macOS, Windows, and Linux operating systems.
tip
If you're on Windows and are having issues with setting up symlinks then try using the [Link Shell Extension](https://schinagl.priv.at/nt/hardlinkshellext/linkshellextension.html) utility. Basic usage is described [here](https://www.howtogeek.com/16226/complete-guide-to-symbolic-links-symlinks-on-windows-or-linux/) (see the 'How to Create Symbolic Links with a Graphical Tool' section).
The advantage of using symlinks is that it's very easy to *always* make sure you include the latest version of the SDK with your WordPress products. Every time the local SDK repository is updated it will also be updated (automatically) in each of the plugins/themes that are associated with it (via symlinks).
However, if 'sharing' the SDK among several different plugins/themes via symlinks then don't rely on the plugin icon stored in `/freemius/assets/img`. Instead we recommend using the `'plugin_icon'` [Freemius filter](https://freemius.com/help/help/documentation/wordpress-sdk/opt-in-message/.md#opt-in-icon-customization) to override this with the correct icon path.
You could also just download the [latest release](https://github.com/Freemius/wordpress-sdk/releases) of the SDK, extract it, and add it manually to each plugin/theme. However, this is rather inefficient and the SDK can quickly become out of date as new versions are released.
### Local WordPress Development Setup[](#local-wordpress-development-setup "Direct link to Local WordPress Development Setup")
When developing with the Freemius SDK as part of an existing plugin or theme you'll need to be running a local WordPress site for testing purposes. There are many different ways you can set up a local live WordPress site but perhaps the easiest all round solution is [Local](https://localwp.com/) by Flywheel, which offers a feature-rich free version.
Whatever local WordPress server you use it's recommended that you set it up so that it's easy to debug as follows:
1. Create a **new** WordPress site only for working on the Freemius SDK.
2. Add these PHP constants to your **wp-config.php** file:
```
define( 'WP_DEBUG', true );
define( 'SCRIPT_DEBUG', true );
define( 'COMPRESS_SCRIPTS', false );
define( 'FS_METHOD', 'direct');
define( 'WP_FS__DEV_MODE', true );
```
1. Install and activate the [Query Monitor](https://wordpress.org/plugins/query-monitor/) and [Gutenberg](https://wordpress.org/plugins/gutenberg/) plugins. And if you're developing themes then also install the [Theme Check](https://en-gb.wordpress.org/plugins/theme-check/) plugin.
2. For maximum compatibility always make sure you have the latest version of WordPress, and [Gutenberg](https://en-gb.wordpress.org/plugins/gutenberg/) plugin, installed.
### Cloning the Freemius SDK[](#cloning-the-freemius-sdk "Direct link to Cloning the Freemius SDK")
To be able to submit your own custom contributions you'll need to clone it to a suitable location on your local hard drive:
```
git clone [path to repository]
```
If you don’t have commit permissions to the repository, you'll first need to fork the SDK into a separate repository under your own GitHub account as you won't have write permissions to access the SDK repository directly.
The forked repository is referred to as the main 'remote' repository, and is usually labelled 'origin' by default during the cloning process. You'll also need to add a reference to the original repository that you created the fork from to be able to keep your local repository up-to-date with the latest changes as they are merged into the codebase.
```
git remote add upstream https://github.com/Freemius/wordpress-sdk.git
```
This additional remote is typically given the label 'upstream' to clearly identify it from the forked repository. You should now have two git remotes set up to allow you to push changes to the forked repository (in order to make pull requests), and to pull changes from the upstream repository (to sync with the latest changes).
You can check what remotes are available at any time via the following command:
```
git remote -v
```
### Create a Freemius Product via the Developer Dashboard[](#create-a-freemius-product-via-the-developer-dashboard "Direct link to Create a Freemius Product via the Developer Dashboard")
To fully test all aspects of the SDK you'll need to integrate it into a working WordPress plugin or theme. This can be very basic though as you're only using it to test the SDK codebase. To complete the [integration process](https://freemius.com/help/help/documentation/getting-started/.md) you'll not only need to set up the plugin code locally, you'll also have to create the associated WordPress product in the Freemius [developer dashboard](https://freemius.com/help/help/documentation/getting-started/explore-the-developer-dashboard/.md).
Tip: If you don't have a specific plugin ready to integrate the Freemius SDK with then you can use the Freemius [Hello Dolly](https://github.com/Freemius/hello-dolly) sample plugin as a ready-to-go starter plugin.
## General Workflow Steps[](#general-workflow-steps "Direct link to General Workflow Steps")
This section details the main workflow steps from start-to-finish when contributing to the Freemius SDK.
Before submitting any code please make sure your work adheres to the following requirements:
* All code should conform to WordPress [coding standards](https://make.wordpress.org/core/handbook/best-practices/coding-standards/) and best practices.
* Any development work should always be based off the `develop` branch (via a feature branch).
* After a pull request has been submitted it may be approved, rejected, or approved subject to modifications being made. Each pull request is reviewed and assessed individually.
* **The less code changes a pull request contains, the quicker it will be reviewed and merged (if accepted).**
### General Set Up[](#general-set-up "Direct link to General Set Up")
Let's take a look now at getting the Freemius GitHub repository set up.
1. [Clone Freemius WordPress SDK](#cloning-the-freemius-sdk) locally to a suitable location on your local hard drive.
2. By default you'll be in the `master` branch but you'll be creating feature branches directly from the `develop` branch so do `git branch develop` and `git checkout develop` to create a local branch and switch to it.
### Developing via a Feature Branch[](#developing-via-a-feature-branch "Direct link to Developing via a Feature Branch")
1. Locally create and switch to a new feature branch, created directly off the develop branch, to work on a new feature/issue.
1. `git checkout develop`
2. `git branch features/123-bug-fix` . Prefix the branch name with `feature/` and include the GitHub issue ref. number where relevant.
3. `git checkout features/123-bug-fix`
2. First thing to do is to update the SDK version number in the feature branches */freemius/start.php* file. Base this on the existing version number in *start.php* of the **current [develop branch](https://github.com/Freemius/wordpress-sdk/blob/develop/start.php) on GitHub**. For example, if it’s currently 2.4.1, then the version in the new feature branch should be 2.4.1.1, but the version in your documentation comments should be the next release version number (@since 2.4.2).
3. Make changes in the newly created feature branch. When finished **do not merge back into the develop branch**.
4. Instead, add your changes to the staging area and commit to the feature branch in the local repository. e.g. `git commit -am "new commit message"`
5. Then, push the updated feature branch changes to the remote SDK repository.
1. e.g. `git push -u origin feature/123-bug-fix`
2. Note: The `-u` flag (alias of `--set-upstream`) is important here as it allows the remote GitHub repository to track changes. It makes it very easy to update pull requests and submit changes.
6. **Important:** Before creating a pull request make sure you've included the latest changes that may have been merged into the upstream `develop` branch since the feature branch was first created. This will help to avoid merge conflicts for development branches that have become stale. *(see step 3. in the next section for more details)*
7. Go to the main page of the GitHub repository you just pushed to and **select the feature branch**. You should see a message similar to 'This branch is *x* commit(s) ahead, *x* commits behind Freemius
:master
'.
8. Click either the **Compare & pull request** button or the **Pull request** link and add details about the pull request code changes in the description box on the next page.
9. **Important!** Make sure that you select to merge into the `develop` branch and **not** `master`. Note: If you accidentally select the `master` branch and submit the pull request, you can edit the target branch at any time by opening the pull request in GitHub and clicking the **Edit** button (top right of the pull request).
1. Create the pull request and assign it to Leo on GitHub. Also, select Leo as the reviewer *(you may need elevated permissions to be able to do this)*. Leo or Vova will eventually review and approve/reject the pull request.
2. If the pull request needs more work then make the required [code](https://stackoverflow.com/questions/16748115/how-to-modify-github-pull-request) locally and push again to the remote repository to **automatically update the pull request**. a. To do this, check out the feature branch again locally and make the required changes. b. Commit changes locally and push to the remote repository as before. c. The pull request will automatically update to include the new changes.
3. Once the pull request has been resolved then repeat the steps above to create a new feature branch to work on a new issue/feature. Make sure to delete old feature branches that are no longer needed in both the local and remote repositories to keep your development workspace clutter free.
## Keeping in Sync With the SDK Repository[](#keeping-in-sync-with-the-sdk-repository "Direct link to Keeping in Sync With the SDK Repository")
Whenever a feature branch pull request is approved it's then merged into the `develop` branch of the main SDK repository. In reality this actually happens quite often and means that the `develop` branch (and all feature branches) on your local repository soon become out-of-sync, or stale.
You can always check the status of the `develop` branch on the remote (forked) GitHub repository as a quick way to see if it is behind the upstream `develop` branch.
Follow these steps to keep your local `develop` branch up to date with all recent changes to the `develop` branch of the main SDK repository.
1. In your local repository run these git commands to get the recent changes and update your local repository. Note: If there are no changes received by `git fetch` upstream then there's no need to apply step c.
1. `git checkout develop`
2. `git fetch upstream`
3. `git reset --hard upstream/develop`
2. Whenever the local `develop` branch has been updated with changes to the main GitHub repository then you need to add these changes to each of your **active** feature branches as follows. Old unmaintained (stale) feature branches don't need to be updated.
1. `git checkout feature/123-bug-fix`
2. `git merge develop`
## Making Code Changes[](#making-code-changes "Direct link to Making Code Changes")
When committing code changes make sure to add **meaningful commit messages**. We have a very specific structure for commit messages, specifically:
1. It needs to be English sentences, properly capitalized, with correct grammar and punctuation. Including a dot "." at the end of each sentence.
2. We also have a “tagging” system to give a clear context for the commit. For example, if there's a commit related to the license activation logic the commit should look like:
* "\[license-activation] Explanation goes here."
* If it's a bug fix that is related to license activation: `"[license-activation] [bug-fix] Explanation goes here."`
* If it's a new feature related to license activation: `"[license-activation] [new] Explanation goes here."`
* For enhancement:` "[license-activation] [enhancement] Explanation goes here."`
* For optimization:` "[license-activation] [optimization] Explanation goes here."`
* If it's a minor/major bug fix:` "[license-activation] [bug-fix] [major] Explanation goes here."`
* If the commit is only including documentation:` "[license-activation] [php-doc] Explanation goes here."`
Basically, by looking at the tags the reader should be able to get the context of the logic, the purpose of the commit, and its scope or severity.
There are many different tags used in commit messages but you can get a good idea of the ones we use most frequently by browsing through the [recent commits history](https://github.com/Freemius/wordpress-sdk/network).
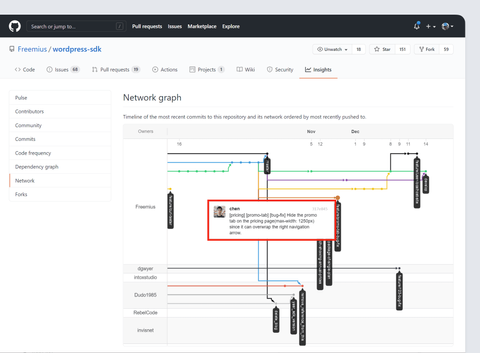
Here are a few more tag examples used in commit messages:
* `[refactor]`
* `[cleanup]`
* `[localization]`
* `[code-convention]`
* `[enrich]`
* `[new]`
* `[revert]`
* `[bug-fix]`
* `[fix]`
* `[ui]`
* `[ux]`
* `[testing]`
* `[debug]`
Always update the associated GitHub issue you're working on to explain recent changes. This will help to keep everyone working on the pull request up-to-date with progress.
Add proper comment blocks for new classes/functions with your name. Always comment new code, and add missing comments to existing code whenever you come across it. If you're not sure what it does then add a placeholder comment such as "@todo Add comment here".
## Discovered a Bug/Issue?[](#discovered-a-bugissue "Direct link to Discovered a Bug/Issue?")
While working on a particular feature you may from time-to-time come across an unrelated bug or issue in the code. If so then create a new issue in GitHub so it can be worked on via a separate feature branch.
## Resources[](#resources "Direct link to Resources")
* [Gitflow in less than 5-minutes](https://www.youtube.com/watch?v=1SXpE08hvGs).
* [Gitflow cheatsheet](https://danielkummer.github.io/git-flow-cheatsheet/).
---
# Misc Gists
## Adding new permission to the opt-in[](#adding-new-permission-to-the-opt-in "Direct link to Adding new permission to the opt-in")
```
'helpscout', // Unique permission id.
'icon-class' => 'dashicons ',
'label' => __( 'Help Scout', 'my_plugin_slug' ),
'tooltip' => __( 'Get easy access to our support via Help Scout Beacon.', 'my_plugin_slug' ), // Optional tooltip.
'desc' => __( 'Rendering Help Scout\'s beacon for easy support access', 'my_plugin_slug' ),
'priority' => 16,
/**
* The permission layer is currently only persistent with built-in permissions.
* So if you make this permission optional, you won't be able to determine if the user switched it on or off.
*/
'is_optional' => false,
'default' => true,
);
return $permissions;
}
my_fs()->add_filter( 'permission_list', 'add_helpscount_permission' );
```
```
is_registered() &&
// Checks if user didn't opt out from tracking.
my_fs()->is_tracking_allowed()
) {
// Render Help Scout Beacon.
require_once( '../path/to/help-scout-beacon.php' );
}
```
## Customizing the support forum URL for the premium code version[](#customizing-the-support-forum-url-for-the-premium-code-version "Direct link to Customizing the support forum URL for the premium code version")
```
is_premium() ) {
my_fs()->add_filter( 'support_forum_url', 'my_premium_support_forum_url' );
}
```
## Show the contact submenu item only when the user have a valid non-expired license[](#show-the-contact-submenu-item-only-when-the-user-have-a-valid-non-expired-license "Direct link to Show the contact submenu item only when the user have a valid non-expired license")
```
can_use_premium_code();
}
my_fs()->add_filter( 'is_submenu_visible', 'my_custom_is_submenu_visible', 10, 2 );
```
## Add permission for adding Help Scout Beacon[](#add-permission-for-adding-help-scout-beacon "Direct link to Add permission for adding Help Scout Beacon")
```
'helpscout', // Unique permission id.
'icon-class' => 'dashicons ',
'label' => __( 'Help Scout', 'my_plugin_slug' ),
'tooltip' => __( 'Get easy access to our support via Help Scout Beacon.', 'my_plugin_slug' ), // Optional tooltip.
'desc' => __( 'Rendering Help Scout\'s beacon for easy support access', 'my_plugin_slug' ),
'priority' => 16,
/**
* The permission layer is currently only persistent with built-in permissions.
* So if you make this permission optional, you won't be able to determine if the user switched it on or off.
*/
'is_optional' => false,
'default' => true,
);
return $permissions;
}
my_fs()->add_filter( 'permission_list', 'add_helpscount_permission' );
```
```
is_registered() &&
// Checks if user didn't opt out from tracking.
my_fs()->is_tracking_allowed()
) {
// Render Help Scout Beacon.
require_once( '../path/to/help-scout-beacon.php' );
}
```
## Controlling the in-dashboard trial promotion in the Freemius WordPress SDK[](#controlling-the-in-dashboard-trial-promotion-in-the-freemius-wordpress-sdk "Direct link to Controlling the in-dashboard trial promotion in the Freemius WordPress SDK")
```
override_i18n( array(
'hey' => 'Hey',
'trial-x-promotion-message' => 'Thank you so much for using %s!',
'already-opted-in-to-product-usage-tracking' => 'How do you like %s so far? Test all our %s premium features with a %d-day free trial.',
'start-free-trial' => 'Start free trial',
// Trial with a payment method required.
'no-commitment-for-x-days' => 'No commitment for %s days - cancel anytime!',
// Trial without a payment method.
'no-cc-required' => 'No credit card required',
) );
#----------------------------------------------------------------------------------
#region Show the 1st trial promotion after 7 days instead of 24 hours.
#----------------------------------------------------------------------------------
function my_show_first_trial_after_7_days( $day_in_sec ) {
// 7 days in sec.
return 7 * 24 * 60 * 60;
}
my_fs()->add_filter( 'show_first_trial_after_n_sec', 'my_show_first_trial_after_7_days' );
#endregion
#----------------------------------------------------------------------------------
#region Re-show the trial promotional offer after every 60 days instead of 30 days.
#----------------------------------------------------------------------------------
function my_reshow_trial_after_every_60_days( $thirty_days_in_sec ) {
// 60 days in sec.
return 60 * 24 * 60 * 60;
}
my_fs()->add_filter( 'reshow_trial_after_every_n_sec', 'my_reshow_trial_after_every_60_days' );
#endregion
#----------------------------------------------------------------------------------
#region Add custom action after trial start/expiration
#----------------------------------------------------------------------------------
function my_after_license_change_handler( $plan_change_desc, FS_Plugin_Plan $plan) {
$plan_name = $plan->name;
switch( $plan_change_desc ) {
case 'trial_started':
// Do something immediately after a trial is started.
break;
case 'trial_expired':
// Do something immediately after a trial expiration.
break;
}
}
my_fs()->add_action( 'after_license_change', 'my_after_license_change_handler', 10, 2);
#endregion
```
## EDD to Freemius Pricing Page Override based on URLs / Href[](#edd-to-freemius-pricing-page-override-based-on-urls--href "Direct link to EDD to Freemius Pricing Page Override based on URLs / Href")
```
```
## Freemius submenu items visibility filter[](#freemius-submenu-items-visibility-filter "Direct link to Freemius submenu items visibility filter")
```
add_filter( 'is_submenu_visible', 'my_is_submenu_visible', 10, 2 );
```
## Freemius Purchase Completion JavaScript Callback Filter[](#freemius-purchase-completion-javascript-callback-filter "Direct link to Freemius Purchase Completion JavaScript Callback Filter")
```
(function() {
if ( null == ga ) {
// Add code to include GA.
}
})();
' . $html;
}
my_fs()->add_filter('checkout/purchaseCompleted', 'my_after_purchase_js');
my_fs()->add_filter('templates/checkout.php', 'my_checkout_enrich');
```
## Freemius Buy Button Code for a Multi-Plans Table[](#freemius-buy-button-code-for-a-multi-plans-table "Direct link to Freemius Buy Button Code for a Multi-Plans Table")
```
```
## Controlling the visibility of admin notices added by the Freemius SDK[](#controlling-the-visibility-of-admin-notices-added-by-the-freemius-sdk "Direct link to Controlling the visibility of admin notices added by the Freemius SDK")
```
-theme`.
* @var string $plugin The product's title.
* @var string $wp_user_id An optional WP user ID that this admin notice is for.
* }
* @return bool
*/
function my_custom_show_admin_notice( $show, $msg ) {
if ('trial_promotion' == $msg['id']) {
// Don't show the trial promotional admin notice.
return false;
}
return $show;
}
my_fs()->add_filter( 'show_admin_notice', 'my_custom_show_admin_notice', 10, 2 );
```
## Merging different free and premium product versions into one with Freemius[](#merging-different-free-and-premium-product-versions-into-one-with-freemius "Direct link to Merging different free and premium product versions into one with Freemius")
```
is_premium() ) {
require_once dirname(__FILE__) . 'path/to/free/loader.php';
}
if ( my_fs()->is__premium only() ) {
if ( my_fs()->can_use_premium_code() ) {
require_once dirname(__FILE__) . 'path/to/premium/loader.php';
}
}
```
## Disable deactivation feedback form[](#disable-deactivation-feedback-form "Direct link to Disable deactivation feedback form")
```
add_filter( 'show_deactivation_feedback_form', '__return_false' );
```
## Disable after deactivation subscription cancellation window[](#disable-after-deactivation-subscription-cancellation-window "Direct link to Disable after deactivation subscription cancellation window")
warning
A subscription cancellation window will only show up when deactivating a product associated with a license that is only activated on the current site. Over the years, we learned that some users assume a product deactivation is also a cancelation of its subscription, which may cause an unexpected charge that can lead to a dispute. Therefore, we generally recommend keeping the default behavior as it reduces payment reversals and dispute fees.
```
add_filter( 'show_deactivation_subscription_cancellation', '__return_false' );
```
---
# Gutenberg Block Integration
Developing blocks for the Gutenberg editor is quite [straightforward](https://developer.wordpress.org/block-editor/tutorials/create-block/) these days as the project continues to mature; and there are numerous [tutorials](https://www.google.com/search?q=gutenberg+block+development\&oq=gutenberg+block+development\&aqs=chrome..69i57j69i60l3j0l2j0i22i30l2.5615j1j7\&sourceid=chrome\&ie=UTF-8) available to help create almost any type of block you want.
However, knowing how to *monetize* a block is not so immediately obvious and requires some approaches that you may not be familiar with. Using the techniques outlined in this guide will help you to overcome any potential issues, you might come across, during the integration process.
note
Note: It's assumed that you're already familiar with developing blocks for the Gutenberg editor. If not then we highly recommended working through the official [Gutenberg handbook](https://developer.wordpress.org/block-editor/) before attempting integration with the Freemius platform.
## Integrating a Block with Freemius[](#integrating-a-block-with-freemius "Direct link to Integrating a Block with Freemius")
There isn't just one single method available when developing Gutenberg blocks, and each one requires a different approach to complete Freemius integration successfully. We'll look at the common types of block in this section and how you can make them work properly with Freemius.
For **paid only** blocks, integration is quite simple as there's no free version at all. Which means there aren't any features that need removing during deployment. This type of block can be structured pretty much as you wish as long as the code to load premium scripts etc., are wrapped with the usual Freemius [licensing logic](https://freemius.com/help/help/documentation/wordpress-sdk/software-licensing/.md).
For **freemium** blocks, integration is usually more complicated as the paid features need separating out from the free code. If you've chosen to render block content via PHP then integration is also much easier as paid features can be wrapped with the same logic you're already used to.
e.g.
```
if( fs()->can_use_premium_code__premium_only() ) {
// paid logic here
}
```
Any paid block features written solely in JavaScript should be implemented via (JavaScript) [hooks](https://developer.wordpress.org/block-editor/packages/packages-hooks/) (see next section) so that they can be removed from the free plugin during [deployment to Freemius](https://freemius.com/help/help/documentation/release-management/deployment/.md).
To help understand how to effectively add paid features to a block written in JavaScript only, we've added a [new Gutenberg-integrated plugin](https://github.com/Freemius/hello-dolly/tree/master/freemium%20v.3/hello-dolly) to our [Hello Dolly Freemium](https://github.com/Freemius/hello-dolly) repository that contains a fully working block, which monetizes certain features.
Specifically, the free features included in the plugin are:
1. One song ('**Hello Dolly**') available.
2. Refresh the displayed lyric for the current song via block inspector controls.
And the **paid** features are:
1. Choose to display lyrics from three extra songs, depending on the current active plan ('**Summertime**', '**Wonderful World**', or '**Dream a Little Dream**').
2. Optionally show the line number of the current song lyric (available in any paid plan).
We'll use snippets of code from [this block plugin](https://github.com/Freemius/hello-dolly/tree/master/freemium%20v.3/hello-dolly) throughout this guide to demonstrate the most relevant techniques you can use when monetizing your own blocks.
## The Need for JavaScript Hooks[](#the-need-for-javascript-hooks "Direct link to The Need for JavaScript Hooks")
When you need to extend a block feature written in JavaScript then hooks are extremely useful and allow you to seamlessly add paid features.
They're available in WordPress core so just import them into your block code just like any other package:
```
const { applyFilters, doAction } = wp.hooks;
```
Usage is similar to PHP hooks, where you pass in a default value to a hook:
```
let some_option = applyFilters('some-option', [{ label: 'Some Option' }]);
```
Then the default filter value can be modified elsewhere in the codebase:
```
const { addFilter } = wp.hooks;
addFilter('some-option', 'my-plugin/some-option', function (options) {
// Add another options object to the array.
options.push({ label: 'Another Option' });
return options;
});
```
Normally, all block code (for one or more blocks) is compiled into a single file containing vanilla JavaScript. But when using hooks to implement paid features this isn't really useful as we need the paid features compiled to a *separate* file so it can be conditionally enqueued, and removed from the free version completely during deployment.
All you need to do is make sure your build process is set up to produce *separate* files for free and paid features.
In the Hello Dolly plugin the [@wordpress/scripts](https://developer.wordpress.org/block-editor/packages/packages-scripts/) package is used to compile the JavaScript code. To make sure code is compiled to separate files a couple of new scripts were added to `[package.json](https://github.com/Freemius/hello-dolly/blob/master/freemium%20v.3/hello-dolly/package.json)` for development and production builds:
```
"build:custom": "wp-scripts build src/blocks/song-lyrics/index.js src/pro/extend-blocks.js",
"start:custom": "wp-scripts start src/blocks/song-lyrics/index.js src/pro/extend-blocks.js",
```
## Localizing Freemius Data[](#localizing-freemius-data "Direct link to Localizing Freemius Data")
To enable/disable paid block features we need to access Freemius license, and plan data, via JavaScript.
This isn't directly possible at the moment, but in the future, we plan to provide a richer JavaScript SDK which will handle license-related logic in a similar manner to how our PHP SDK does it.
In the meantime though, we can [localize](https://developer.wordpress.org/reference/functions/wp_localize_script/) Freemius data and manually pass it to JavaScript via PHP.
Data can be localized as follows:
```
$licensing = array( 'can_use_premium_code' => my_fs()->can_use_premium_code() );
wp_localize_script('my-script', 'my_block_licensing_data', $licensing);
```
Add whatever data to the PHP array that you need to access via JavaScript. This localized data can then be used directly in your block code (as it's automatically available via a global JavaScript object).
```
const licensing = my_block_licensing_data ? my_block_licensing_data : null;
if (licensing.can_use_premium_code) {
// ... premium only logic ...
}
```
The major benefit of this method is that you can fully test paid features locally **before** deploying. Switching licenses that have different active plans will enable that functionality automatically. Or, deactivating the license will just revert the block to free features only.
Being able to test block features locally like this can really speed up development time!
## Monetizing JavaScript Rendered Blocks[](#monetizing-javascript-rendered-blocks "Direct link to Monetizing JavaScript Rendered Blocks")
Blocks written purely in JavaScript need extra considerations compared to PHP blocks. Any JavaScript feature can be monetized but the key is *how* it's implemented. Some features are easier to monetize than others because of the way JavaScript blocks are rendered.
If your block implements extra features via changes to the [`edit()`](https://developer.wordpress.org/block-editor/developers/block-api/block-edit-save/#edit) function then you won't have any issues. You can go ahead and use JavaScript hooks to separate out paid features as shown in the previous section.
But if you're adding paid features that update the blocks [`save()`](https://developer.wordpress.org/block-editor/developers/block-api/block-edit-save/#save) function directly as soon as the license is activated, then (when the block is loaded inside the post editor) you'll almost certainly see a block invalid content warning.
This dialog box does actually allow you to update the block to the new version that includes paid features just by clicking the **Attempt Block Recovery** button.
However, the UX is still pretty unfriendly. You wouldn't really want to show this to a user when updating block content directly as it looks like some unidentified error has occurred.
There are plans to [address](https://github.com/WordPress/gutenberg/issues/25436) this issue and improve the UX but the proposal has no definite time-frame for implementation. So, until then it's probably best to avoid triggering the block invalid content warning wherever possible.
### Managing Direct Changes to Block Markup[](#managing-direct-changes-to-block-markup "Direct link to Managing Direct Changes to Block Markup")
Fortunately there are other methods you can use to avoid the block invalidation warning.
For very small changes to the save content, that are enabled in paid plans, you can simply include the markup in the free version and disable UI controls to access/update them.
In the Hello Dolly Freemium plugin this method is used to show the line number of the lyric for the currently selected song:
```
const { applyFilters, doAction, createHooks } = wp.hooks;
const { Fragment } = wp.element;
export function Markup(props) {
const { song, lyric, lineNumber, showLineNumber } = props;
return (
{song}: {lyric}{' '}
{showLineNumber && (
({lineNumber})
)}
);
}
```
The `showLineNumber` attribute is set to `false` initially so that it doesn't display until you upgrade to a paid plan and enable it. And if the license is downgraded to the free version or is deactivated then `showLineNumber` is reset to `false`.
The inspector controls to modify `showLineNumber` status are only shown in the paid version and these are actively stripped out from the free version (see next section). It's important to stress that only the bare minimum content is included with the free version and there is no easy way it can be accidentally enabled.
This approach is fine for **very small** changes to the save function, but is not recommended for substantial changes. If you wish to directly modify the rendered save content significantly (e.g. for license status changes) then you'll need to use another method.
One way to do this is to use the blocks `componentDidMount()` lifecycle method (or React hook equivalent).
If Freemius license/plan data is localized then you could store the current license status and active plan in block attributes and use it to compare against the passed in data every time the editor (re)loads. Then, if the license status (or paid plan) has changed then you could then trigger a block update via `componentDidMount()`.
This would **bypass the block invalid content warning** and update the block content automatically to the new version. The only caveat with this method is that a manual post update is required to persist changes (as new block changes have been detected). If you leave the editor without saving changes then the block will be auto-updated the next time it's viewed in the editor.
To summarise here are the main choices you have to manage block rendering when the blocks save content has been directly modified:
2. For **very small** markup changes include the bare minimum markup in the blocks save function needed for the paid feature and set the relevant block attribute(s) to `false`. Strip out inspector controls from the free version via JavaScript hooks, and don't forget to manually remove the block source code before deploying to Freemius.
3. Modify the blocks save content via the `componentDidMount()` lifecycle method (or React hook equivalent). A manual post update is required to persist changes.
4. Use PHP to render the save function content. This is about as bullet-proof as you can get and is an ideal solution if you also need to provide a shortcode as well as a block (e.g. to support 3rd party page-builders). However, there are many benefits to coding your blocks in JavaScript with the most obvious being that block changes update in the editor in real-time opposed to a small delay when using PHP as it needs to render on the server.
5. Do nothing! Allow the block invalid content warning message to be displayed when the block's save content is directly updated and leave it to users to update (a manual post update is required with this method too). Until the UX is improved then it's not really recommended that you use this method as you'll probably see a spike in support requests (e.g. reporting the block content is broken etc.)!
### Managing Non-direct Changes to Block Markup[](#managing-non-direct-changes-to-block-markup "Direct link to Managing Non-direct Changes to Block Markup")
Blocks can also be monetized by adding options and controls to the block toolbar, or inspector panel. This involves making changes to the blocks `edit` function via JavaScript hooks. And because altering the `edit` function won't **ever** trigger the block invalid content warning this makes it a completely safe way to add paid block features!
In the [Hello Dolly Freemium](https://github.com/Freemius/hello-dolly/tree/master/freemium%20v.3/hello-dolly) block we've added three new songs that become available (depending on the current active plan) as soon as the license is activated. And whenever the license is deactivated the songs are no longer available.
To do this a filter was added for the songs available in the block inspector:
\[RadioControl.js]
```
let song_options = applyFilters('song-list', [
{ label: 'Hello Dolly', value: 'Hello Dolly' },
]);
```
We can then use the filter to extend the list of songs available:
\[extend-blocks.js]
```
addFilter('song-list', 'hello-dolly/song-lyrics', function (songs) {
if (!hello_dolly_editor_data) {
return 'Error, Freemius data not found!';
}
const { can_use_premium_code, plan } = hello_dolly_editor_data;
if (can_use_premium_code) {
if (
plan === 'summertime' ||
plan === 'wonderful_world' ||
plan === 'dream'
) {
songs.push({ label: 'Summertime', value: 'Summertime' });
}
if (plan === 'wonderful_world' || plan === 'dream') {
songs.push({ label: 'Wonderful World', value: 'Wonderful World' });
}
if (plan === 'dream') {
songs.push({
label: 'Dream a Little Dream',
value: 'Dream a Little Dream',
});
}
}
return songs;
});
```
This won't do anything apart from filter which radio buttons are available in the block inspector panel. We also need to actively filter the lyrics for each song so that they're available in the paid plans.
First, add the filter as we did before:
[\[lyrics.js\]](https://github.com/Freemius/hello-dolly/blob/master/freemium%20v.3/hello-dolly/src/blocks/song-lyrics/lyrics.js#L35)
```
lyrics = applyFilters('song-lyrics', lyrics);
```
And then extend the song lyrics too, similar to how we did before:
[\[extend-blocks.js\]](https://github.com/Freemius/hello-dolly/blob/master/freemium%20v.3/hello-dolly/src/pro/extend-blocks.js#L35-L133)
```
addFilter('song-lyrics', 'hello-dolly/song-lyrics', function (lyrics) {
if (!hello_dolly_editor_data) {
return 'Error, Freemius data not found!';
}
const { can_use_premium_code, plan } = hello_dolly_editor_data;
if (can_use_premium_code) {
if (
plan === 'summertime' ||
plan === 'wonderful_world' ||
plan === 'dream'
) {
lyrics['Summertime'] = `Summertime and the livin' is easy
...
Ah, said it's summertime`;
}
if (plan === 'wonderful_world' || plan === 'dream') {
lyrics['Wonderful World'] = `I see trees of green, red roses, too,
...
What a wonderful world`;
}
if (plan === 'dream') {
lyrics['Dream a Little Dream'] = `Stars shining bright above you
...
Dream a little dream of me`;
}
}
return lyrics;
});
```
This works really well and all our paid features are completely stripped from the plugin during deployment.
You might have noticed that the JavaScript logic to check if the current active plan is valid is a little verbose:
```
if (plan === 'summertime' || plan === 'wonderful_world' || plan === 'dream') {
// add lyrics
}
```
Compared to it's PHP counterpart:
```
if ( hd_fs()->is_plan( 'summertime' ) ) {
// add lyrics
}
```
This is because we're localizing *just* the current active plan name and so more manual checks are required in the JavaScript code.
We could easily match the PHP logic by passing in more localized data to include specific plan data:
```
$data = array(
'current_plan' => hd_fs()->get_plan_name(),
'can_use_premium_code' => hd_fs()->can_use_premium_code(),
'is_plan_summertime' => hd_fs()->is_plan( 'summertime' ),
'is_plan_wonderful_world' => hd_fs()->is_plan( 'wonderful_world' ),
'is_plan_dream' => hd_fs()->is_plan( 'dream' ),
);
wp_localize_script('hello-dolly-block-script', 'hello_dolly_editor_data', $data);
```
And then changed the paid feature code to:
```
addFilter('song-lyrics', 'hello-dolly/song-lyrics', function (lyrics) {
if (!hello_dolly_editor_data) {
return 'Error, Freemius data not found!';
}
const {
can_use_premium_code,
is_plan_summertime,
is_plan_wonderful_world,
is_plan_dream,
} = hello_dolly_editor_data;
if (can_use_premium_code) {
if (is_plan_summertime) {
lyrics['Summertime'] = `Summertime and the livin' is easy
...
Ah, said it's summertime`;
}
if (is_plan_wonderful_world) {
lyrics['Wonderful World'] = `I see trees of green, red roses, too,
...
What a wonderful world`;
}
if (is_plan_dream) {
lyrics['Dream a Little Dream'] = `Stars shining bright above you
...
Dream a little dream of me`;
}
}
});
```
The system is quite flexible. You can choose which approach suits you best, you're not restricted to any particular implementation.
## Downgrading Issues[](#downgrading-issues "Direct link to Downgrading Issues")
Sometimes when downgrading from the paid version to free you need to be aware of scenarios that could cause issues and unexpected behaviour in your blocks.
For example, in our Hello Dolly Freemium plugin if the currently selected song is only available in the paid version then it will suddenly disappear if the license is deactivated.
In this case we need to specifically reset the song and lyrics block attributes to the free one (Hello Dolly). Notice we're also resetting `lineNumber` as we can't guarantee the current line number will exist in Hello Dolly, and `showLineNumber` is reset too as this is a paid only feature.
```
const {
attributes: { song, lyric },
setAttributes,
} = this.props;
// if downgrading and the currently selected song is not available
if (!lyrics.hasOwnProperty(song)) {
setAttributes({
song: 'Hello Dolly',
lyric: lyrics['Hello Dolly'].split(/\n/)[0],
lineNumber: 1,
showLineNumber: false,
});
}
```
## Deployment to Freemius[](#deployment-to-freemius "Direct link to Deployment to Freemius")
Before deploying the plugin to Freemius make sure that you run the build script to produce compiled and minified block code.
Paid block features can be stripped out during deployment using the `@fs_premium_only` Freemius directive.
e.g. `@fs_premium_only /build/extend-blocks.js`
It's also recommended that you keep all your block source code in a single folder so that it can be easily removed prior to deployment if required.
## Testing the Hello Dolly Freemium Plugin[](#testing-the-hello-dolly-freemium-plugin "Direct link to Testing the Hello Dolly Freemium Plugin")
The [Hello Dolly Freemium](https://github.com/Freemius/hello-dolly/tree/master/freemium%20v.3/hello-dolly) plugin contains a fully working example of a block integrated with the Freemius platform.
To install locally, clone the plugin repository: `git clone https://github.com/Freemius/hello-dolly.git`
The plugin uses the WordPress SDK as a submodule so you'll need to pull it after cloning using the following command: `git submodule update --init`
Then, copy the `freemium v.3\hello-dolly` folder to your local WordPress plugins folder (`/wp-content/plugins/`) and activate.
Upon activation we'll be prompted with a license activation screen. Since it's a Freemium plugin, you can click the *Activation Free Version* link to continue, and then choose whether to opt-in to Freemius usage-tracking or not.
To test the paid plans you can use the following license keys:
* *Summertime* plan license key: `sk_cOG+nk&tsEYLVo74~W*SqwJcLq4;V`
* *Wonderful World* plan license key: `sk_4#:r099AfRm8m*QUgN&K%s6Ds_Si5`
* *Dream* plan license key: `sk_6&Db*Nn#IVZ2oj7qh=ZHEkZv5H3a6`
If you already skipped the license activation prompt, a license can be activated from the plugins page in the WP Admin, by clicking the *Activate License* link under the **Hello Dolly Freemium** plugin.
To create and configure your own Hello Dolly Freemium plugin using Freemius from scratch, follow [this video tutorial](https://www.youtube.com/watch?v=gj6aoYG4fUI\&t=101s) that takes you through the entire process step-by-step.
If you plan on making changes to blocks then use either of these two commands to recompile the block source code:
* Development: `npm run start:custom`
* Production: `npm run build:custom`
---
# Integration & Configuration
Integrating the Freemius SDK into your product is a quick step you need to complete in order to be able to take advantage of all the benefits that come with using Freemius. After completing these instructions your product will be all set up and ready to sell.
**Here’s how to do it:**
After logging in to your Freemius account and clicking on the **'Add product / bundle'** button at the top left hand corner you will be able to provide some basic settings for your product, including Slug and Title:
Upon hitting the **‘Create New’** button, you are then redirected to the **5-minute integration guide**.
The next step is to download the ZIP file that contains the Freemius SDK and all of the Freemius magic that comes with it. You can download the latest release from our [GitHub repository](https://github.com/Freemius/wordpress-sdk), unzip it, rename it to ‘freemius’.
Move the renamed `freemius` folder as-is in to the root folder of your WordPress theme or plugin.
With the Freemius SDK folder included in your product, you can complete the quick customization process according to the instructions on the [SDK Integration](https://dashboard.freemius.com) page of the Developer Dashboard.
When you’re done, your customized ‘easy SDK access’ function will be auto-generated for you.
note
Note: This snippet of code initializes the Freemius SDK using an array of key/value pairs that contains specific information about your Freemius product and unlocks the full range of features available. Access to the Freemius SDK features comes via a global variable defined as part of the snippet.
For **WordPress plugins**, copy & paste it into the top of your main plugin’s PHP file, right after the plugin’s header comment and `if ( ! defined( 'ABSPATH' ) ) exit;` check.
For **WordPress themes**, copy & paste it into the top of your theme’s `functions.php` file.
Here’s how the code should look:

Under normal circumstances, we don't recommend editing the snippet directly once it's added to your WordPress product. However, there are times when you may need to tweak it manually. We'll cover when you might want to do this in a [later section](#manually-editing-the-sdk-integration-snippet).
However, in all cases, you should begin by copying the snippet from the SDK Integration page of the Developer Dashboard and pasting it into your plugin or theme. Don't be tempted to try and create the snippet from scratch as this method is prone to errors. It's always best to start with the auto-generated snippet and tweak it when necessary.
## Where to Add the SDK Integration Snippet[](#where-to-add-the-sdk-integration-snippet "Direct link to Where to Add the SDK Integration Snippet")
Depending on the structure of your plugin you may wish to add the SDK snippet to another location than your main plugin file. For themes, the SDK relies on the snippet to be placed in `functions.php`, if you place it elsewhere you are risking unexpected behavior - so please don’t do it.
Regardless of where it’s added, it's recommended that initialization of the Freemius SDK should be completed as soon as possible and preferably before any other code is executed inside your WordPress product.
This will help to minimize issues with trying to access SDK features before they are initialized. Also, SDK initialization should not occur **after** the WordPress `'plugins_loaded'` hook. This is incorrect and will break some of the SDK's logic due to the execution order of other logic contained in WordPress core.
If you experience problems when placing the SDK snippet in a file alternative location than the recommended ones, then try adding it back in the main plugin file, to rule out any implementation errors.
## Snippet Settings Reference[](#snippet-settings-reference "Direct link to Snippet Settings Reference")
The array that's passed to `fs_dynamic_init()` consists of key-value pairs, including nested arrays for some settings. All possible values are covered as a reference guide, but not all will necessarily be relevant to your particular plugin or theme.
Specific settings will be generated depending on the information entered in the Developer Dashboard. Don't worry if your SDK snippet doesn't include all of the settings. This is perfectly normal.
All settings are listed below along with a description.
note
Note: All settings apply to both plugins and themes unless otherwise stated.
`id`[](#id "Direct link to id")
number
Example: 1234
Auto-generated Freemius product ID which uniquely identifies your plugin or theme. This is created when the product is first created and cannot be changed.
`slug`[](#slug "Direct link to slug")
string
Example: 'my-plugin'
Used to create the product folder name during deployment and in the updates mechanism. Also used in dynamically generated URLs (e.g. EULA).
`premium_slug`[](#premium_slug "Direct link to premium_slug")
string
Example: 'my-plugin-pro'
Used for freemium products to create the premium product’s version folder name during deployment. This needs to be different from the free version slug. Also used in dynamically generated URLs (e.g. EULA).
`type`[](#type "Direct link to type")
string
Default: `'plugin'`
Allowed Values: `'plugin'` | `'theme'`
Type of WordPress product.
`public_key`[](#public_key "Direct link to public_key")
string
Example: 'pk\_n56hrjss36joj632vgyy345ggv555'
Public key is a unique key prefixed with 'pk\_' specific to the Freemium product. This is typically used for authentication with public Freemius API endpoints.
`is_premium`[](#is_premium "Direct link to is_premium")
boolean
Specify if the product’s codebase is the free or premium version.
`premium_suffix`[](#premium_suffix "Direct link to premium_suffix")
string
Example: 'Pro'
Default: `'plugin'`
The suffix added to a premium plugin’s paid version title. This option is relevant for freemium products.
`is_premium_only`[](#is_premium_only "Direct link to is_premium_only")
boolean
Default: `false`
Specify if the plugin or theme is premium-only (i.e. no free version). This setting is added automatically if the default free plan is deleted and there's at least one paid plan.
`has_premium_version`[](#has_premium_version "Direct link to has_premium_version")
boolean
Default: `false`
Does the plugin or theme have a premium version available?
`has_addons`[](#has_addons "Direct link to has_addons")
boolean
Default: `false`
Does the plugin or theme have any associated addons?
`has_paid_plans`[](#has_paid_plans "Direct link to has_paid_plans")
boolean
Default: `false`
Does the plugin or theme have any paid plans?
`is_org_compliant`[](#is_org_compliant "Direct link to is_org_compliant")
boolean
Default: `true`
Is the product’s free version WordPress.org compliant.
`has_affiliation`[](#has_affiliation "Direct link to has_affiliation")
boolean|string
Default: `false`
Allowed Values: `'selected'` | `'customers'` | `'users'`
This setting is included if the affiliate program for the product is enabled (via the Developer Dashboard [Affiliation page](https://freemius.com/help/../../affiliate-platform/affiliate-program-activation/index)).
Its value is determined by the "Who can be an affiliate?" setting. When `customers` is selected, it means the seller only allows customers to become affiliates so the admin notice and menu item will only show up for customers. From the SDK's point of view, `users` and `selected` are identical, since only users will be exposed to the settings of the product in the WordPress admin.
`menu`[](#menu "Direct link to menu")
array
An array that denotes which Freemius pages to display in the WordPress admin menu, and how the plugin settings page menu is handled. See [how to configure for the menu array.](#configuration-for-menu-array)
`opt_in_moderation`[](#opt_in_moderation "Direct link to opt_in_moderation")
array
An associative array containing configuration for opt-in moderation of your product. [More on this later](#configuration_for_opt_in_moderation_array).
`secret_key`[](#secret_key "Direct link to secret_key")
string
Example: 'sk\_84gbhR634gb732vy796h4gTY43'
Default: `'plugin'`
Secret key is a unique key prefixed with 'sk\_' specific to the Freemium product. When present it enables sandbox mode for development & testing. It also elevates additional permissions that are helpful for development and testing modes.
note
Note: The secret key is automatically included in the SDK snippet for convenience. As per the comments in the snippet, this should be removed from production code, but don't worry if you forget as the PHP processor removes it automatically in the Deployment mechanism
### Configuration for `'menu'` array[](#configuration-for-menu-array "Direct link to configuration-for-menu-array")
Possible settings for the `'menu'` array are:
`slug`[](#slug "Direct link to slug")
string
Example: 'my-plugin-menu'
WordPress admin menu slug used for the plugin settings page.
`parent`[](#parent "Direct link to parent")
string
Example: array('slug' => 'options-general.php')
The parent menu slug to use if the plugin settings page is a submenu of another menu. Even though this setting expects an array the `slug` field is the only option currently available.
`first-path`[](#first-path "Direct link to first-path")
string
Example: 'admin.php?page=my-plugin-menu'
This is where the plugin, or theme, will redirect to after activation.
`contact`[](#contact "Direct link to contact")
boolean
Default: `true`
Display the Freemius **Contact Us** page in the WordPress admin menu for the plugin or theme.
`support`[](#support "Direct link to support")
boolean
Default: `true`
Display the Freemius **Support Forum** page in the WordPress admin menu for the plugin or theme.
`addons`[](#addons "Direct link to addons")
boolean
Default: `true`
Display the Freemius **Add Ons** page in the WordPress admin menu for the plugin or theme.
`affiliation`[](#affiliation "Direct link to affiliation")
boolean
Default: `false`
Display the Freemius **Affiliation** page in the WordPress admin menu for the plugin or theme.
`account`[](#account "Direct link to account")
boolean
Default: `true`
If you set this to `false` then the SDK will not include any links to the **Account** page. If you are selling with Freemius the **Account** page is essential, therefore, make sure to manually link to that page from your settings interface using `my_fs()->get_account_url()`.
### Configuration for `'opt_in_moderation'` array[](#configuration-for-opt_in_moderation-array "Direct link to configuration-for-opt_in_moderation-array")
The moderation configuration allows you to control how the Freemius WordPress SDK is activated for your customers. This is particularly useful when integrating the SDK into an existing product with active users, and you prefer not to display the Opt-In screen to all users at once. In such cases, we recommend performing a phased rollout of the integration to identify and resolve any issues before deploying it widely to your user base. Ideally,
1. You control what percentages of new installations will see the [Opt-In screen](https://freemius.com/help/help/documentation/wordpress-sdk/opt-in-message/.md).
2. You can also control what percentage of updated installations will see it.
This can be configured with the following parameters:
```
'opt_in_moderation' => array(
'new' => 100,
'updates' => 0,
'localhost' => true,
),
```
`new`[](#new "Direct link to new")
int|boolean
Default: `true (as 100%)`
An integer from `0` to `100` to control the exposure percentage of the opt-in to new product installs. It also supports a boolean value. When set to `true`, then assume 100% exposure; if set to `false`, then no exposure at all.
`updates`[](#updates "Direct link to updates")
int|boolean
Default: `true (as 100%)`
This is the same as the `'new'` parameter, but controls the opt-in exposure for product updates (i.e., what % of websites will see the opt-in after upgrading to a new version with the Freemius SDK, when the previous version didn’t include the SDK).
`localhost`[](#localhost "Direct link to localhost")
boolean
Default: `true`
Whether to show the opt-in on localhost sites.
note
Note: This setting was introduced in [version 2.5.4 of the SDK](https://github.com/Freemius/wordpress-sdk/releases/tag/2.5.4). With the removal of the connectivity test, the moderation capabilities have been transitioned to the SDK settings. You can read more about it in our new [release note](https://freemius.com/blog/release-notes-wordpress-sdk-connectivity-test-stopped).
## Manually Editing the SDK Integration Snippet[](#manually-editing-the-sdk-integration-snippet "Direct link to Manually Editing the SDK Integration Snippet")
There are certain fields that aren't updated or included by default in the auto-generated SDK snippet. Therefore, if you need to support a certain feature exposed by this type of field it will need to be added manually. This is best done after the snippet has been inserted into your WordPress product.
It's not usually recommended to edit any fields directly from the auto-generated snippet. Instead, the snippet should be updated by changing the settings for your plugin or theme in the Developer Dashboard.
Here's a list of the fields that can be manually inserted/edited:
`navigation`[](#navigation "Direct link to navigation")
string
Allowed Values: `'menu'` | `'tabs'`
Enable [tabbed layout](https://freemius.com/help/help/documentation/wordpress-sdk/tabs-navigation/.md) support for Freemius pages rather than display them as menu items. This is a very useful option to reduce clutter in your plugin’s admin menu structure.
`pricing`[](#pricing "Direct link to pricing")
boolean
Default: `true`
Turn off all upgrade/pricing links except the account page. To enable this option it needs to be added to the `'menu'` array which is automatically added to the snippet. If, for some reason, this doesn't exist, then you can add it manually and create a single entry for `'pricing'` as follows: `'menu' => array( 'pricing' => false,),`.
`has_premium_version`[](#has_premium_version "Direct link to has_premium_version")
boolean
If your product is a Serviceware (a SaaS wrapped into a plugin or theme), set this option to false. This is an example of an option that is initially set in the auto-generated snippet but can be updated manually.
`bundle_id`[](#bundle_id "Direct link to bundle_id")
number
Example: 1234
Auto-generated Freemius ID which uniquely identifies a specific bundle.
`bundle_public_key`[](#bundle_public_key "Direct link to bundle_public_key")
string
Example: 'pk\_hrjss36joj632vgyy345ggv555'
Bundle key is a unique key, and is specific to the Freemium bundle.
`bundle_license_auto_activation`[](#bundle_license_auto_activation "Direct link to bundle_license_auto_activation")
boolean
Default: `false`
When set to `true`, an activation of a bundle license key will automatically activate the license key for all the other bundle's paid products installed on the site that are not yet associated with a license key.
note
The two bundle settings are required for products that are also sold as part of a bundle, when you want to sell the bundle via the WordPress admin instead of just the paid version of that product.
**Example:** For a freemium plugin with 10 paid add-ons, and you wish to sell a bundle of the plugin's paid version and 5 of the paid add-ons.
Without setting the bundle params in the SDK snippet, the in-dashboard pricing and checkout will be for the paid version of the plugin. On the other hand, when the params are set, the pricing page will show the prices of the bundle in context and that's what the user will purchase if they go through the checkout.
`permissions`[](#permissions "Direct link to permissions")
array\
Default: `false`
This is a key/value array where the key is a string (the permission name), and the value a boolean variable - which determines whether that permission is requested or not. Currently the only supported key is `'newsletter'` and will explicitly ask a permission for "Updates, announcements, marketing, no spam".
note
Additional permissions may be available in the future to make it easy for you to pick and choose what permission their product needs on opt-in for. It's also possible for you to introduce your own [custom permissions](https://freemius.com/help/help/documentation/wordpress-sdk/opt-in-message/.md) via the `permission_list` Freemius filter.
`enable_anonymous`[](#enable_anonymous "Direct link to enable_anonymous")
boolean
If your plugin is a Serviceware and cannot be used before creating an account, you can set this option to `true` and it will require users to opt-in after activation by removing the option to skip the opt-in.
`anonymous_mode`[](#anonymous_mode "Direct link to anonymous_mode")
boolean
When set to `true` it will automatically simulate a skip of an opt-in. This flag can be useful if you don’t want to ask users to opt-in to your free version or want to create your own custom opt-in interface, yet still utilize the power of the Freemius WordPress SDK (e.g. deactivation feedback form, in-dashboard checkout, etc.).
We highly recommend to use the SDK’s high-performing and multi-site network ready default opt-in, except if your product comes with an onboarding wizard and you’d want to custom add the opt-in UI and decision as part of that wizard.
To reset the “anonymous mode”, you can programmatically call `my_fs()->connect_again()`, which will also automatically redirect to the opt-in screen after resetting the flag. You can programmatically trigger a skip using `my_fs()->skip_connection()` or an opt-in consent using `my_fs()->opt_in()`.
`parallel_activation`[](#parallel_activation "Direct link to parallel_activation")
array
Use this to support parallel activation of both the free and premium versions of a WordPress plugin. Read more about it [below](#parallel-activation-of-free-and-premium-versions)
### Parallel activation of Free and Premium versions[](#parallel-activation-of-free-and-premium-versions "Direct link to Parallel activation of Free and Premium versions")
By default, our SDK automatically deactivates the free version of a plugin when the premium version is activated. However, you can modify this behavior using the following configuration:
```
'parallel_activation' => array(
'enabled' => true,
'premium_version_basename' => 'premium-slug/file-name.php',
),
```
With this configuration, the free version will remain active when the premium version is activated. Additionally, the SDK will display the license activation page if the free version has not yet been activated with a license.
#### Benefits of Parallel Activation[](#benefits-of-parallel-activation "Direct link to Benefits of Parallel Activation")
Parallel activation allows the “Active installs” counter on WordPress.org to include sites using the paid version without deactivating the free version. This is only useful if you distribute the free version on WordPress.org. If you don’t, this feature won’t provide you any benefits.
#### Drawbacks of Parallel Activation[](#drawbacks-of-parallel-activation "Direct link to Drawbacks of Parallel Activation")
This setup can create the perception that users need to manage updates for both the free and paid versions, leading to confusion about which version should be updated first. Additionally, there’s a risk of breaking functionality if major, non-backward compatible changes are made to one version. For this reason, we generally discourage parallel activation from a user experience (UX) perspective. Furthermore, since the typical conversion rate from free to paid is around 2%, the impact on the active installs counter is minimal.
note
While some of these manual settings may eventually be supported in the auto-generated snippet, for now, they must be added manually if needed.
## Updating the SDK Integration Snippet[](#updating-the-sdk-integration-snippet "Direct link to Updating the SDK Integration Snippet")
Whenever you make changes to your plugin or theme settings in the Developer Dashboard, this may trigger an update to the auto-generated SDK Integration snippet. It's important that whenever this is updated that you manually copy/paste it into your plugin or theme so that your product is always up to date with the latest version.
If the SDK integration snippet (minus any manual changes) doesn't match the Developer Dashboard version, then you could run into problems, so it's best to always keep it up-to-date and in sync when changes are made in the Developer Dashboard that affect the snippet.
The main reason why we don't recommend manually editing the SDK integration snippet (unless you have to) is because every time the snippet is updated inside your plugin or theme, you'll have to re-apply any manual changes you made previously. This can be tedious and prone to errors.
One final thing to remember is that if you have your SDK integration snippet in an alternative location (i.e. other than the main plugin file) then you'll also need to update the path reference to the Freemius SDK `start.php` file every time the snippet is updated.
## Activate Opt-ins[](#activate-opt-ins "Direct link to Activate Opt-ins")
Once you've completed the SDK integration, you can go back to the WordPress admin and activate & opt-in to your product (plugin or theme). If everything was done correctly, you should be able to see the data flowing into your Freemius dashboard in real time.
---
# Known License Activation Issues
In some cases, a license activation can fail unexpectedly without showing any errors.
Typical symptoms:
* The license activation page refreshes without anything happening.
* The *Activate* button gets "stuck," and nothing happens.
* The license remains activated on a site that is no longer accessible, and the activations limit is reached.
Here are the most common cases in which this happens, including how to work around the issues:
## 1. License Activations Limit Reached[](#1-license-activations-limit-reached "Direct link to 1. License Activations Limit Reached")
The issue typically arises when a website instance is deleted or becomes inaccessible without the license being deactivated through the standard process, or when the license is already activated on another site.
### Solution[](#solution "Direct link to Solution")
#### Have WordPress Site Access[](#have-wordpress-site-access "Direct link to Have WordPress Site Access")
If you have access to the WordPress site’s `Account` page for the relevant plugin/theme, navigate to it and click the `Deactivate License` link. After that, you can activate the license on another site.
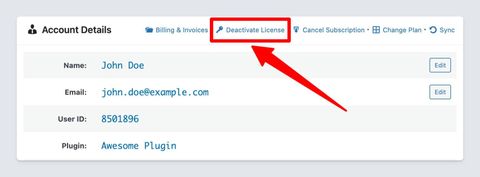
Give Your Customers More Control
Additionally, you can ask your customers to restrict the sites that have access to the license by whitelisting those from the self-service [Customer Portal](https://freemius.com/help/help/documentation/users-account-management/license-security/.md#url-whitelisting-aka-license-firewall).
#### No WordPress Site Access (Single-Site License)[](#no-wordpress-site-access-single-site-license "Direct link to No WordPress Site Access (Single-Site License)")
If you no longer have access to the WordPress site and your license is for a single site, follow these steps:
* Log in to the [Customer Portal](https://customers.freemius.com/).
* Navigate to the `Licenses` section (beneath the `Websites` menu item).
* Click the `Deactivate` button.
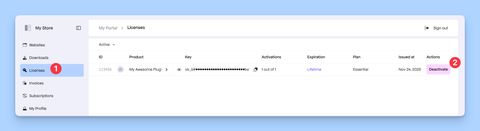
#### No WordPress Site Access (Multi-Site License)[](#no-wordpress-site-access-multi-site-license "Direct link to No WordPress Site Access (Multi-Site License)")
If you no longer have access to the WordPress site and your license supports multiple site activations, follow these steps:
* Log in to the [Customer Portal](https://customers.freemius.com/).
* Navigate to the `Websites` section.
* Find the relevant site (you can check the domain).
* Click on it to open its details panel.
* Scroll down to find the license section and click the `Deactivate` button.
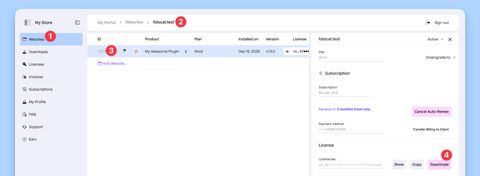
## 2. ISP Blockage[](#2-isp-blockage "Direct link to 2. ISP Blockage")
We noticed that some ISPs, especially in Turkey and Russia, are often blocking websites that utilize Cloudflare, which can block connectivity to our API servers.
### Solution[](#solution-1 "Direct link to Solution")
You can activate the license using a proxy by following these simple steps:
1. Go to [us-proxy.org](https://www.us-proxy.org/)
2. Get the 1st proxy details available and add the following code to the `functions.php` of the currently active theme:
```
add_action('http_api_curl', function( $handle ){
curl_setopt($handle, CURLOPT_PROXY, "REPLACE_ME_WITH_PROXY_IP");
curl_setopt($handle, CURLOPT_PROXYPORT, REPLACE_ME_WITH_PROXY_PORT);
}, 10);
```
3. After a successful license-activation, comment out the newly added lines of code to avoid running future cURL requests through a proxy.
## 3. Caching Layer Issue[](#3-caching-layer-issue "Direct link to 3. Caching Layer Issue")
For performance reasons, many in-memory caching solutions like Memcached or Redis require setting a Byte-limit to the values they store, and to optimize performance, all Freemius settings are stored in a single record in the `wp_options` table, which means that if the length of the settings is greater than the configured limit, it may cause one of the following unexpected behaviors:
* The settings won't be stored at all
* The settings will fail to properly load
* The settings will be stored incompletely, causing data corruption
This will prevent the settings from properly propagating to (or from) the Database.
### Solution[](#solution-2 "Direct link to Solution")
Try to temporarily disable the caching layer just for the license activation process.
## 4. Database Encoding Issue[](#4-database-encoding-issue "Direct link to 4. Database Encoding Issue")
In some cases, we noticed that misconfigured encoding of the `option_value` column in the `wp_options` table could fail to store the required data after license activation. E.g. - Even though the license gets properly activated, WordPress may not “remember” it. Typically this happens when there are any UTF-8 or UTF-16 characters in the license owner's name or address.
### Solution[](#solution-3 "Direct link to Solution")
Try changing the encoding of the `option_value` column in the `wp_options` table to UTF-8 (or UTF-16) and then try activating the license again.
## 5. Security Layer Blockage[](#5-security-layer-blockage "Direct link to 5. Security Layer Blockage")
Freemius’ license key generator randomly creates 32-char keys using alphanumeric characters and some special characters for enhanced security. We noticed that some security plugins/layers/modules (e.g., ModSecurity) might block a license activation process if the combination of the license’s special characters “look” suspicious.
### Solution[](#solution-4 "Direct link to Solution")
Try to temporarily disable any security plugins/layers/modules you have just for the license activation process. After the license is activated, make sure to reactivate the security components you disabled.
---
# Opt-in Screen
The Freemius SDK comes with a default opt-in screen that has gone through many improvement iterations to maximize clarity and optimize conversion rate while adhering to the standard WP Admin UI styles.
As every plugin/theme is unique, you may want to customize the opt-in screen to better match your product's style/tone/brand and audience. You can leverage one or more of the opt-in hooks [actions & filters](https://developer.wordpress.org/plugins/hooks/) to achieve that.
## Default Opt-In Messages[](#default-opt-in-messages "Direct link to Default Opt-In Messages")
The opt-in message consists of a header and a message and varies according to the state of the admin.
Here’s the default opt-in message that **new users** that activate your product will see:
> **Never miss an important update** Opt in to get email notifications for security & feature updates, and to share some basic WordPress environment info. This will help us make the `{product_type}` more compatible with your site and better at doing what you need it to.
The default opt-in message that your **existing users** (people who have already had your product activated, prior to updating to Freemius-integrated version) will see is:
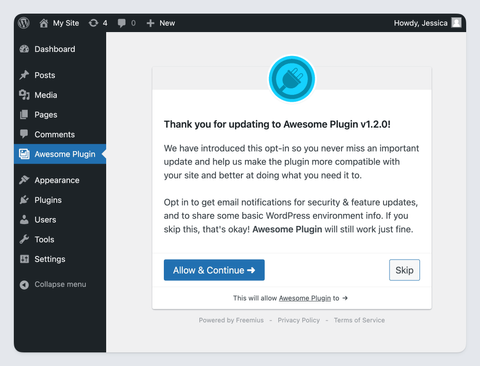
> **Thank you for updating to Awesome Plugin v`{product_version}`!** We have introduced this opt-in so you never miss an important update and help us make the `{product_type}` more compatible with your site and better at doing what you need it to. Opt in to get email notifications for security & feature updates, and to share some basic WordPress environment info. If you skip this, that's okay! **`{product_title}`** will still work just fine.
## Opt-In Message Customization[](#opt-in-message-customization "Direct link to Opt-In Message Customization")
To customize either of these default messages - simply use the following filters we’ve created:
* `connect-header_on-update` and `connect_message_on_update` to override the default message **existing users** will see
* `connect-header` and `connect_message` to override the default message **new users** will see
Here’s an example of how that can be done:
```
function my_fs_custom_connect_header_on_update( $header_html ) {
$user = wp_get_current_user();
return sprintf( __( 'Thanks %s for updating to our latest release!', 'my-text-domain' ), $user->user_firstname );
}
my_fs()->add_filter( 'connect_header_on_update', 'my_fs_custom_connect_header_on_update' );
function my_fs_custom_connect_message_on_update( $message, $user_first_name, $product_title, $user_login, $site_link, $freemius_link ) {
return sprintf( __( 'Please help us improve %2$s! If you opt-in, some data about your usage of %2$s will be sent to %5$s. If you skip this, that\'s okay! %2$s will still work just fine.', 'my-text-domain' ), $user_first_name, '' . $product_title . '', '' . $user_login . '', $site_link, $freemius_link );
}
my_fs()->add_filter( 'connect_message_on_update', 'my_fs_custom_connect_message_on_update', 10, 6 );
```
## Opt-In Icon Customization[](#opt-in-icon-customization "Direct link to Opt-In Icon Customization")
When you are running your plugin or theme on a localhost environment, if your product is hosted on WordPress.org, the SDK will automatically attempt to download the featured profile icon from WordPress.org and store it in `/freemius/assets/img/{slug}.{png|jpg|gif|svg}`. If it works, all you need is to deploy the zip with the downloaded file and you are good.
If you don't have a free product version on WordPress.org or would like to load an alternative icon, the best way is to use the `plugin_icon` filter:
```
function my_fs_custom_icon() {
return dirname( __FILE__ ) . '/local/path/to/your/icon.{png|jpg|gif|svg}';
}
my_fs()->add_filter( 'plugin_icon', 'my_fs_custom_icon' );
```
## Opt-In Button Labels Customization[](#opt-in-button-labels-customization "Direct link to Opt-In Button Labels Customization")
You can easily customize the button labels by using Freemius i18n override function. Example:
```
if ( function_exists( 'fs_override_i18n' ) ) {
fs_override_i18n( array(
'opt-in-connect' => __( 'Ok - I am in!', 'your-text-domain' ),
'skip' => __( 'Maybe later', 'your-text-domain' ),
), 'your-slug' );
}
```
This will set the primary opt-in button label to **Ok - I am in!** and replace the default skip label with **Maybe Later**.
## Opt-In Permissions Customization[](#opt-in-permissions-customization "Direct link to Opt-In Permissions Customization")
In addition to the message, the opt-in screen lists in detail all the permissions that will be granted to the product upon an opt-in.
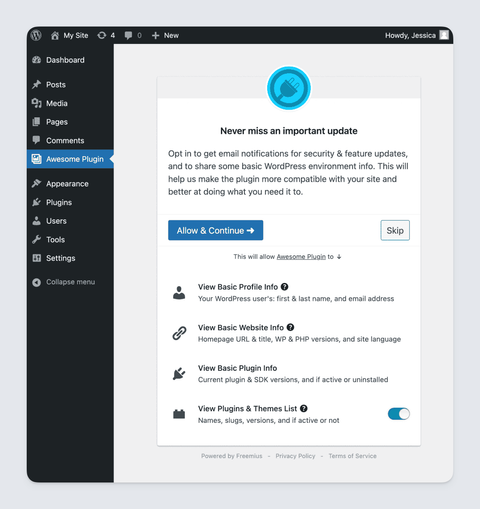
If you'd like to track additional events/data or require additional permissions that are relevant to your product, you can leverage the `permission_list` filter to add custom permissions.
Here's an example that shows how to add custom *Newsletter* permission:
```
function add_helpscount_permission( $permissions ) {
$permissions['helpscout'] = array(
'icon-class' => 'dashicons ',
'label' => my_fs()->get_text_inline( 'Help Scout', 'helpscout' ),
'desc' => my_fs()->get_text_inline( 'Rendering Help Scout\'s beacon for easy support access', 'permissions-helpscout' ),
'priority' => 16,
);
return $permissions;
}
my_fs()->add_filter( 'permission_list', 'add_helpscount_permission' );
```
The `'priority'` parameter determines the visual order of the permission on the permissions list. The default permissions priorities are: `5`, `10`, `13`, and `20`. So when using `15`, the SDK will add the permission just before the last one (between permission `13` and `20`).
## License Activation Screen[](#license-activation-screen "Direct link to License Activation Screen")
While the default opt-in screen is shown for the free version of your product, the SDK displays a license activation screen for the premium version. This screen is very similar to the opt-in screen, with the key difference being the inclusion of a license key field and an "Activate License" button.
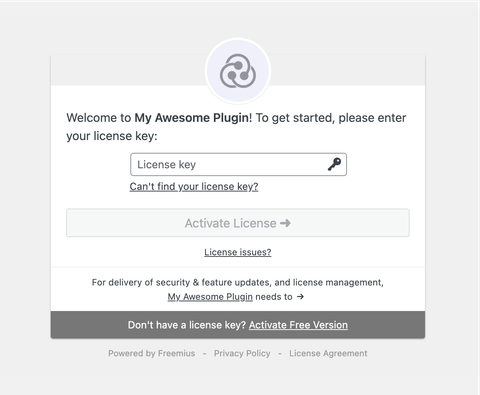
The license activation screen supports the same customization options as the opt-in screen, allowing you to use the same filters. It also shares the same template files.
## Advanced Opt-In Customization Actions[](#advanced-opt-in-customization-actions "Direct link to Advanced Opt-In Customization Actions")
The SDK now supports a collection of advanced actions to allow you to inject text and visual components at various stages of screen rendering. All actions receive a single associative array argument with the opt-in state (check the example below).
### `connect/before`[](#connectbefore "Direct link to connectbefore")
For adding text or visual elements before/above the opt-in container.
```
function add_custom_header( $activation_state ) {
if ( $activation_state[ 'is_license_activation' ] ) {
// The opt-in is rendered as license activation.
}
if ( $activation_state[ 'is_pending_activation' ] ) {
// The user clicked the opt-in and now pending email confirmation.
}
if ( $activation_state[ 'is_network_level_activation' ] ) {
// A network-level opt-in after network activation of the plugin (only applicable for plugins).
}
if ( $activation_state[ 'is_dialog' ] ) {
// The opt-in is rendered within a modal dialog (only applicable for themes).
}
return ' Awesome Plugin';
}
my_fs()->add_filter( 'connect/before', 'add_custom_header' );
```
### `connect/after`[](#connectafter "Direct link to connectafter")
For adding text or visual elements after/below the opt-in container.
### `connect/before_message`[](#connectbefore_message "Direct link to connectbefore_message")
For adding text or visual elements before/above the opt-in message header (within the opt-in container).
### `connect/after_message`[](#connectafter_message "Direct link to connectafter_message")
For adding text or visual elements after/below the opt-in message (within the opt-in container).
### `connect/before_actions`[](#connectbefore_actions "Direct link to connectbefore_actions")
For adding text or visual elements before/above the opt-in action buttons.
### `connect/after_actions`[](#connectafter_actions "Direct link to connectafter_actions")
For adding text or visual elements after/below the opt-in action buttons.
## Additional Customization[](#additional-customization "Direct link to Additional Customization")
If the customization options above are still insufficient for your goals, you can leverage the `templates/connect.php` filter, which enables you to filter the HTML of the opt-in screen.
If you want to take the customization further, the opt-in template is located under `/freemius/templates/connect.php`. The WordPress SDK is an open-source project, so you are free to modify the file as you wish. However, we strongly recommend you refrain from doing that. Here are some good reasons as to why:
1. The current opt-in UI and behavior was officially approved and is compliant with the WordPress.org guidelines. If you change it, the compliance with the guidelines is under your responsibility.
2. We ran many experiments to optimize the opt-in CTR (Click Through Rate) until we achieved this enhanced variation. There's a good reason why it looks like an OAuth screen - most users have already connected their Facebook or Google to 3rd party services before and are familiar with this UI concept.
3. Freemius is running on hundreds of plugins and themes. Therefore, there's a good chance that a user that installs your product had come across our opt-in before and recognizes the Freemius icon. It's easier to trust a UI people are already familiar with.
4. You'll need to make those modifications again whenever you want to update to a new version of the SDK.
---
# Safe Mode & Clone Resolution
Upon license key activation, Freemius assigns a unique ID and pair of public/secret keys tied to the website's URL. These are used for securely extending the license expiration date after subscription renewals, checking if there are new plugin/theme updates, and allowing customers to execute other account-related remote (or local) actions that get synced back to a website (or Freemius).
## What is a website clone?[](#what-is-a-website-clone "Direct link to What is a website clone?")
A clone is a website (or a subsite in a multisite network) assigned with an ID and pair of keys identical to another website (or subsite).
## How's a clone created?[](#hows-a-clone-created "Direct link to How's a clone created?")
There are several cases in which a site's URL could change:
* The site is updated to use a newly purchased domain name.
* A clone of a site from production to staging (or the other way around).
* Creation of a subsite by replicating an existing template subsite in a multisite network.
* WaaS multisite network environment where users can spin a website that is created by duplicating a template subsite.
* A network of websites/brands that are intentionally identical and automatically synced.
## What is the problem with clone websites?[](#what-is-the-problem-with-clone-websites "Direct link to What is the problem with clone websites?")
If two websites are assigned with the same ID and keys, actions on one website will impact the other, potentially triggering unexpected behaviors.
For example, when a plugin is deactivated, the Freemius SDK automatically notifies the licensing engine to detach the license from the website to free up the license activations counter for reuse on another website. However, if there's a clone, the license deactivation would propagate to the clone, which will deactivate the license, and therefore, automatic updates will stop working.
## Clone Website Resolution[](#clone-website-resolution "Direct link to Clone Website Resolution")
When a plugin/theme uses SDK v.2.5.0 or higher, it has a built-in clone identification and resolution mechanism.
### Clone Identification[](#clone-identification "Direct link to Clone Identification")
The identification mechanism simply checks for unexpected mismatches between the URL of the website and the URL that is currently linked to the license on our backend (the "source of truth").
### Automatic Clone Resolution[](#automatic-clone-resolution "Direct link to Automatic Clone Resolution")
Once a clone is identified, the mechanism will attempt to resolve it automatically based on different heuristics and the status of the buyer's account to reduce interruptions to the minimum.
For example, we know that it's common to have a template subsite on multisite networks for spinning new subsites using replication. Therefore, when a subsite is a clone of another subsite in the same multisite network, and the license's quota wasn't fully utilized, the clone subsite would be resolved automatically as a new website. It will be issued with a new ID and pair of keys, and the license will be auto-activated in the background.
This automatic resolution comes with 3 retries to overcome temporary connectivity issues and other unexpected server problems.
### Programmatic Clone Resolution[](#programmatic-clone-resolution "Direct link to Programmatic Clone Resolution")
If cloning websites is part of your workflow (e.g., using a template for client sites), you can leverage the `FS__RESOLVE_CLONE_AS` flag to programmatically guide the clone resolution mechanism on how to resolve clones in your environment. Simply add the flag with one of the following optional values to your template site’s `wp-config.php` (or `functions.php`):
```
// A temporary duplication for the purpose of testing, staging, or development.
define( 'FS__RESOLVE_CLONE_AS', 'temporary_duplicate' );
// The new site is replacing the old one – this will migrate the license activation to the new site to resolve the clone.
define( 'FS__RESOLVE_CLONE_AS', 'new_home' );
// The cloned site is a new and different one – this will auto activate the license on the new site to resolve the clone.
define( 'FS__RESOLVE_CLONE_AS', 'long_term_duplicate' );
```
### Safe Mode[](#safe-mode "Direct link to Safe Mode")
If an automatic resolution isn't possible, the plugin/theme gets into a *Safe Mode*.
During *Safe Mode*, data syncing, as well as some account actions, will be temporarily disabled. However, automatic updates will continue working until the actual expiration date of the license or the one stored on the website, whichever comes first.
In addition, an admin notice for manual clone resolution will appear in the WP Admin:
### Manual Clone Resolution[](#manual-clone-resolution "Direct link to Manual Clone Resolution")
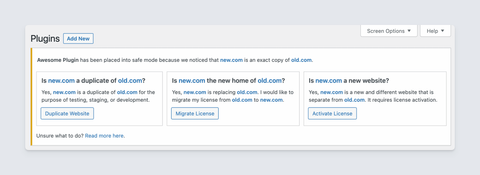
The clone resolution notice is pretty straightforward and empowers users to choose how to resolve the clone issue.
#### Duplicate Website[](#duplicate-website "Direct link to Duplicate Website")
If the website is a duplicate for testing, staging, or development, clicking the "Duplicate Website" will resolve the situation. The plugin/theme will remain fully functional, and automatic updates will be served as usual for 2 weeks (or until license expiration, whichever comes first).
In addition, the following dismissible notice will appear to remind about the 2-week period:
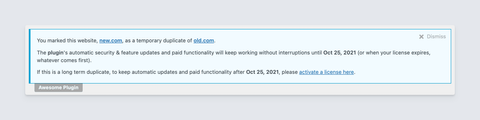
Suppose the duplicate testing/staging/development site is required for an extended period. In that case, the notice offers an option to activate a license to keep the paid functionality and automatic updates for more than 2 weeks.
If the duplicate website remains active for a long period, the manual resolution notice will reappear after 2 weeks with one difference. Instead of the “Duplicate Website” button a “Long-Term Duplicate” button will appear.
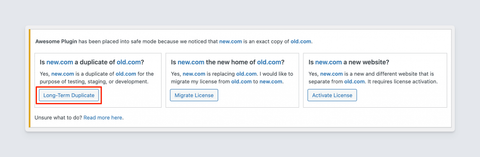
Clicking that option will activate a license and enable keeping the paid functionality and automatic updates for as long as the license is valid.
#### License Migration[](#license-migration "Direct link to License Migration")
If the new site URL is replacing an old site’s URL, clicking the “Migrate License” (or “Migrate”) will migrate the site’s data, including the license, to the new website. And place the old site, if it still exists, into a safe mode. The most common case for this is taking a site from development (or staging) to production.
Cannot Migrate License?
If clicking the button triggers a page reload but the clone resolution notice still appears, the migration failed. We are improving the migration process so the WordPress SDK can catch the error and notify users.
This can happen if the license cannot be migrated to the new URL, for example, due to [license security settings](https://freemius.com/help/help/documentation/users-account-management/license-security/.md#url-whitelisting-aka-license-firewall) or insufficient [license quota](https://freemius.com/help/help/documentation/wordpress/license-utilization/.md) when migrating from staging to production.
#### New Website[](#new-website "Direct link to New Website")
If the new site is separate & standalone, clicking the "Activate License" (or "New Website") will create a new site ID & pair of keys and will activate the license. The most common case for this would be to create a copy of a site from an existing template.
#### Taking No Action[](#taking-no-action "Direct link to Taking No Action")
If no action is taken, the plugin/theme will remain fully functional, and automatic updates will be served as usual, for a grace period of 2 weeks (or until license expiration, whichever comes first).
---
# Handling Licensing
It’s quite easy to be able to have your product support a licensing mechanism with Freemius. All you need to do is add some logic that will help Freemius understand which parts (code blocks) of your product belong to which of your payment plans. Once you have that logic in place Freemius will automatically use it to determine which of your product’s capabilities should be included or excluded on each plan.
## Plan vs. Code Type[](#plan-vs-code-type "Direct link to Plan vs. Code Type")
Before jumping into the code, it's important to understand the difference between a **Plan** and a **Code Type**.
### Plan[](#plan "Direct link to Plan")
Every product on Freemius can have as many plans as you wish. A plan is a set of features or services. Multi-site license offers not considered as additional plans.
### Code Type[](#code-type "Direct link to Code Type")
Every plugin, theme, or add-on on Freemius can have two code types at most: *Free Version* and *Premium Version*. The *Free Version* is the product's code version stripped from ANY of the product's paid features. On the other hand, the *Premium Version* is the product's code version including ALL of the product's code. It doesn't necessarily mean that all the code will be available for use, it just means that all the code included in the *Premium Version*.
## License Related Methods[](#license-related-methods "Direct link to License Related Methods")
`can_use_premium_code()`[](#can_use_premium_code "Direct link to can_use_premium_code")
Check if a user is on a trial or has an activated license that enables premium features.
`is_free_plan()`[](#is_free_plan "Direct link to is_free_plan")
Check if the user is on the free plan of the product.
`is_plan($plan, $exact = false)`[](#is_plan "Direct link to is_plan")
Check if the user is on a specified plan. If the user is on a trial of that plan the result will be `false`.
`is_trial()`[](#is_trial "Direct link to is_trial")
Check if the user is on a trial.
`is_trial_plan($plan, $exact = false)`[](#is_trial_plan "Direct link to is_trial_plan")
Check if the user is on a specific trial plan.
`is_plan_or_trial($plan, $exact = false)`[](#is_plan_or_trial "Direct link to is_plan_or_trial")
Check if the user is on a specific plan or on that plan's trial.
`is_paying()`[](#is_paying "Direct link to is_paying")
Check if the user owns an activated and valid (paid) license.
`is_not_paying()`[](#is_not_paying "Direct link to is_not_paying")
Check if the user has an activated non-expired license that was purchased. Manually issued licenses will return `false`.
`is_paying_or_trial()`[](#is_paying_or_trial "Direct link to is_paying_or_trial")
Check if the user is paying or on a trial.
`is_premium()`[](#is_premium "Direct link to is_premium")
Check if user is running the product's *Premium Version*.
`is_trial_utilized()`[](#is_trial_utilized "Direct link to is_trial_utilized")
Check if the trial has already been used.
`is_payments_sandbox()`[](#is_payments_sandbox "Direct link to is_payments_sandbox")
Check if user is running payments in sandbox mode.
The SDK also comes with several handy license-related methods that in addition to performing their logic, all the logic that will be included within their `if` scope will be automatically stripped from the *Free Version* after the deployment process (by the Freemius' PHP preprocessor).
`is__premium_only()`[](#is__premium_only "Direct link to is__premium_only")
Check if user is only running the product's *Premium Version* code.
`is_paying__premium_only()`[](#is_paying__premium_only "Direct link to is_paying__premium_only")
Check if user is on a trial or on the free plan (not paying).
`can_use_premium_code__premium_only()`[](#can_use_premium_code__premium_only "Direct link to can_use_premium_code__premium_only")
Check if a user is on a trial or has an activated license that enables premium features.
`is_plan__premium_only($plan, $exact = false)`[](#is_plan__premium_only "Direct link to is_plan__premium_only")
Check if the user is on a specified plan. If the user is on a trial of that plan the result will be `false`.
`is_plan_or_trial__premium_only($plan, $exact = false)`[](#is_plan_or_trial__premium_only "Direct link to is_plan_or_trial__premium_only")
Check if the user is on a specific plan or on that plan's trial.
`is_paying_or_trial__premium_only()`[](#is_paying_or_trial__premium_only "Direct link to is_paying_or_trial__premium_only")
Check if the user is paying or on a trial.
### Recommended Methods[](#recommended-methods "Direct link to Recommended Methods")
If your product only has a single paid plan, the primary methods that you'll be using are:
* `can_use_premium_code()`
* `is__premium_only()`
* `can_use_premium_code__premium_only()`
If your product has multiple paid plans, the recommended methods to start with are:
* `is_plan_or_trial()`
* `is__premium_only()`
* `is_plan_or_trial__premium_only()`
### Examples[](#examples "Direct link to Examples")
Here are some concrete examples to help clarify this better:
warning
Note that in the following examples the product's shortcode is referred to as `my_fs` and the paid plan’s name is **professional**. It will obviously be different for you when you come to customize it.
To check if a website is eligible to use any of the premium defined logic (if the user is either currently in a trial period or simply owns a valid license), simply use:
```
// This IF block will be auto removed from the Free version.
if ( my_fs()->is__premium_only() ) {
// This IF will be executed only if the user in a trial mode or have a valid license.
if ( my_fs()->can_use_premium_code() ) {
// ... premium only logic ...
}
}
```
Alternatively, you can use the following code which is equivalent:
```
// This IF block will be auto removed from the Free Version and will only get executed if the user on a trial or have a valid license.
if ( my_fs()->can_use_premium_code__premium_only() ) {
// ... premium only logic ...
}
```
Here’s how you can add customized **marketing content** to encourage your users to upgrade from your **free** to your your **paid** version:
```
if ( my_fs()->is_not_paying() ) {
echo '
Awesome Plugin';
}
my_fs()->add_filter( 'connect/before', 'add_custom_header' );
```
### `connect/after`[](#connectafter "Direct link to connectafter")
For adding text or visual elements after/below the opt-in container.
### `connect/before_message`[](#connectbefore_message "Direct link to connectbefore_message")
For adding text or visual elements before/above the opt-in message header (within the opt-in container).
### `connect/after_message`[](#connectafter_message "Direct link to connectafter_message")
For adding text or visual elements after/below the opt-in message (within the opt-in container).
### `connect/before_actions`[](#connectbefore_actions "Direct link to connectbefore_actions")
For adding text or visual elements before/above the opt-in action buttons.
### `connect/after_actions`[](#connectafter_actions "Direct link to connectafter_actions")
For adding text or visual elements after/below the opt-in action buttons.
## Additional Customization[](#additional-customization "Direct link to Additional Customization")
If the customization options above are still insufficient for your goals, you can leverage the `templates/connect.php` filter, which enables you to filter the HTML of the opt-in screen.
If you want to take the customization further, the opt-in template is located under `/freemius/templates/connect.php`. The WordPress SDK is an open-source project, so you are free to modify the file as you wish. However, we strongly recommend you refrain from doing that. Here are some good reasons as to why:
1. The current opt-in UI and behavior was officially approved and is compliant with the WordPress.org guidelines. If you change it, the compliance with the guidelines is under your responsibility.
2. We ran many experiments to optimize the opt-in CTR (Click Through Rate) until we achieved this enhanced variation. There's a good reason why it looks like an OAuth screen - most users have already connected their Facebook or Google to 3rd party services before and are familiar with this UI concept.
3. Freemius is running on hundreds of plugins and themes. Therefore, there's a good chance that a user that installs your product had come across our opt-in before and recognizes the Freemius icon. It's easier to trust a UI people are already familiar with.
4. You'll need to make those modifications again whenever you want to update to a new version of the SDK.
---
# Safe Mode & Clone Resolution
Upon license key activation, Freemius assigns a unique ID and pair of public/secret keys tied to the website's URL. These are used for securely extending the license expiration date after subscription renewals, checking if there are new plugin/theme updates, and allowing customers to execute other account-related remote (or local) actions that get synced back to a website (or Freemius).
## What is a website clone?[](#what-is-a-website-clone "Direct link to What is a website clone?")
A clone is a website (or a subsite in a multisite network) assigned with an ID and pair of keys identical to another website (or subsite).
## How's a clone created?[](#hows-a-clone-created "Direct link to How's a clone created?")
There are several cases in which a site's URL could change:
* The site is updated to use a newly purchased domain name.
* A clone of a site from production to staging (or the other way around).
* Creation of a subsite by replicating an existing template subsite in a multisite network.
* WaaS multisite network environment where users can spin a website that is created by duplicating a template subsite.
* A network of websites/brands that are intentionally identical and automatically synced.
## What is the problem with clone websites?[](#what-is-the-problem-with-clone-websites "Direct link to What is the problem with clone websites?")
If two websites are assigned with the same ID and keys, actions on one website will impact the other, potentially triggering unexpected behaviors.
For example, when a plugin is deactivated, the Freemius SDK automatically notifies the licensing engine to detach the license from the website to free up the license activations counter for reuse on another website. However, if there's a clone, the license deactivation would propagate to the clone, which will deactivate the license, and therefore, automatic updates will stop working.
## Clone Website Resolution[](#clone-website-resolution "Direct link to Clone Website Resolution")
When a plugin/theme uses SDK v.2.5.0 or higher, it has a built-in clone identification and resolution mechanism.
### Clone Identification[](#clone-identification "Direct link to Clone Identification")
The identification mechanism simply checks for unexpected mismatches between the URL of the website and the URL that is currently linked to the license on our backend (the "source of truth").
### Automatic Clone Resolution[](#automatic-clone-resolution "Direct link to Automatic Clone Resolution")
Once a clone is identified, the mechanism will attempt to resolve it automatically based on different heuristics and the status of the buyer's account to reduce interruptions to the minimum.
For example, we know that it's common to have a template subsite on multisite networks for spinning new subsites using replication. Therefore, when a subsite is a clone of another subsite in the same multisite network, and the license's quota wasn't fully utilized, the clone subsite would be resolved automatically as a new website. It will be issued with a new ID and pair of keys, and the license will be auto-activated in the background.
This automatic resolution comes with 3 retries to overcome temporary connectivity issues and other unexpected server problems.
### Programmatic Clone Resolution[](#programmatic-clone-resolution "Direct link to Programmatic Clone Resolution")
If cloning websites is part of your workflow (e.g., using a template for client sites), you can leverage the `FS__RESOLVE_CLONE_AS` flag to programmatically guide the clone resolution mechanism on how to resolve clones in your environment. Simply add the flag with one of the following optional values to your template site’s `wp-config.php` (or `functions.php`):
```
// A temporary duplication for the purpose of testing, staging, or development.
define( 'FS__RESOLVE_CLONE_AS', 'temporary_duplicate' );
// The new site is replacing the old one – this will migrate the license activation to the new site to resolve the clone.
define( 'FS__RESOLVE_CLONE_AS', 'new_home' );
// The cloned site is a new and different one – this will auto activate the license on the new site to resolve the clone.
define( 'FS__RESOLVE_CLONE_AS', 'long_term_duplicate' );
```
### Safe Mode[](#safe-mode "Direct link to Safe Mode")
If an automatic resolution isn't possible, the plugin/theme gets into a *Safe Mode*.
During *Safe Mode*, data syncing, as well as some account actions, will be temporarily disabled. However, automatic updates will continue working until the actual expiration date of the license or the one stored on the website, whichever comes first.
In addition, an admin notice for manual clone resolution will appear in the WP Admin:
### Manual Clone Resolution[](#manual-clone-resolution "Direct link to Manual Clone Resolution")

The clone resolution notice is pretty straightforward and empowers users to choose how to resolve the clone issue.
#### Duplicate Website[](#duplicate-website "Direct link to Duplicate Website")
If the website is a duplicate for testing, staging, or development, clicking the "Duplicate Website" will resolve the situation. The plugin/theme will remain fully functional, and automatic updates will be served as usual for 2 weeks (or until license expiration, whichever comes first).
In addition, the following dismissible notice will appear to remind about the 2-week period:

Suppose the duplicate testing/staging/development site is required for an extended period. In that case, the notice offers an option to activate a license to keep the paid functionality and automatic updates for more than 2 weeks.
If the duplicate website remains active for a long period, the manual resolution notice will reappear after 2 weeks with one difference. Instead of the “Duplicate Website” button a “Long-Term Duplicate” button will appear.

Clicking that option will activate a license and enable keeping the paid functionality and automatic updates for as long as the license is valid.
#### License Migration[](#license-migration "Direct link to License Migration")
If the new site URL is replacing an old site’s URL, clicking the “Migrate License” (or “Migrate”) will migrate the site’s data, including the license, to the new website. And place the old site, if it still exists, into a safe mode. The most common case for this is taking a site from development (or staging) to production.
Cannot Migrate License?
If clicking the button triggers a page reload but the clone resolution notice still appears, the migration failed. We are improving the migration process so the WordPress SDK can catch the error and notify users.
This can happen if the license cannot be migrated to the new URL, for example, due to [license security settings](https://freemius.com/help/help/documentation/users-account-management/license-security/.md#url-whitelisting-aka-license-firewall) or insufficient [license quota](https://freemius.com/help/help/documentation/wordpress/license-utilization/.md) when migrating from staging to production.
#### New Website[](#new-website "Direct link to New Website")
If the new site is separate & standalone, clicking the "Activate License" (or "New Website") will create a new site ID & pair of keys and will activate the license. The most common case for this would be to create a copy of a site from an existing template.
#### Taking No Action[](#taking-no-action "Direct link to Taking No Action")
If no action is taken, the plugin/theme will remain fully functional, and automatic updates will be served as usual, for a grace period of 2 weeks (or until license expiration, whichever comes first).
---
# Handling Licensing
It’s quite easy to be able to have your product support a licensing mechanism with Freemius. All you need to do is add some logic that will help Freemius understand which parts (code blocks) of your product belong to which of your payment plans. Once you have that logic in place Freemius will automatically use it to determine which of your product’s capabilities should be included or excluded on each plan.
## Plan vs. Code Type[](#plan-vs-code-type "Direct link to Plan vs. Code Type")
Before jumping into the code, it's important to understand the difference between a **Plan** and a **Code Type**.
### Plan[](#plan "Direct link to Plan")
Every product on Freemius can have as many plans as you wish. A plan is a set of features or services. Multi-site license offers not considered as additional plans.
### Code Type[](#code-type "Direct link to Code Type")
Every plugin, theme, or add-on on Freemius can have two code types at most: *Free Version* and *Premium Version*. The *Free Version* is the product's code version stripped from ANY of the product's paid features. On the other hand, the *Premium Version* is the product's code version including ALL of the product's code. It doesn't necessarily mean that all the code will be available for use, it just means that all the code included in the *Premium Version*.
## License Related Methods[](#license-related-methods "Direct link to License Related Methods")
`can_use_premium_code()`[](#can_use_premium_code "Direct link to can_use_premium_code")
Check if a user is on a trial or has an activated license that enables premium features.
`is_free_plan()`[](#is_free_plan "Direct link to is_free_plan")
Check if the user is on the free plan of the product.
`is_plan($plan, $exact = false)`[](#is_plan "Direct link to is_plan")
Check if the user is on a specified plan. If the user is on a trial of that plan the result will be `false`.
`is_trial()`[](#is_trial "Direct link to is_trial")
Check if the user is on a trial.
`is_trial_plan($plan, $exact = false)`[](#is_trial_plan "Direct link to is_trial_plan")
Check if the user is on a specific trial plan.
`is_plan_or_trial($plan, $exact = false)`[](#is_plan_or_trial "Direct link to is_plan_or_trial")
Check if the user is on a specific plan or on that plan's trial.
`is_paying()`[](#is_paying "Direct link to is_paying")
Check if the user owns an activated and valid (paid) license.
`is_not_paying()`[](#is_not_paying "Direct link to is_not_paying")
Check if the user has an activated non-expired license that was purchased. Manually issued licenses will return `false`.
`is_paying_or_trial()`[](#is_paying_or_trial "Direct link to is_paying_or_trial")
Check if the user is paying or on a trial.
`is_premium()`[](#is_premium "Direct link to is_premium")
Check if user is running the product's *Premium Version*.
`is_trial_utilized()`[](#is_trial_utilized "Direct link to is_trial_utilized")
Check if the trial has already been used.
`is_payments_sandbox()`[](#is_payments_sandbox "Direct link to is_payments_sandbox")
Check if user is running payments in sandbox mode.
The SDK also comes with several handy license-related methods that in addition to performing their logic, all the logic that will be included within their `if` scope will be automatically stripped from the *Free Version* after the deployment process (by the Freemius' PHP preprocessor).
`is__premium_only()`[](#is__premium_only "Direct link to is__premium_only")
Check if user is only running the product's *Premium Version* code.
`is_paying__premium_only()`[](#is_paying__premium_only "Direct link to is_paying__premium_only")
Check if user is on a trial or on the free plan (not paying).
`can_use_premium_code__premium_only()`[](#can_use_premium_code__premium_only "Direct link to can_use_premium_code__premium_only")
Check if a user is on a trial or has an activated license that enables premium features.
`is_plan__premium_only($plan, $exact = false)`[](#is_plan__premium_only "Direct link to is_plan__premium_only")
Check if the user is on a specified plan. If the user is on a trial of that plan the result will be `false`.
`is_plan_or_trial__premium_only($plan, $exact = false)`[](#is_plan_or_trial__premium_only "Direct link to is_plan_or_trial__premium_only")
Check if the user is on a specific plan or on that plan's trial.
`is_paying_or_trial__premium_only()`[](#is_paying_or_trial__premium_only "Direct link to is_paying_or_trial__premium_only")
Check if the user is paying or on a trial.
### Recommended Methods[](#recommended-methods "Direct link to Recommended Methods")
If your product only has a single paid plan, the primary methods that you'll be using are:
* `can_use_premium_code()`
* `is__premium_only()`
* `can_use_premium_code__premium_only()`
If your product has multiple paid plans, the recommended methods to start with are:
* `is_plan_or_trial()`
* `is__premium_only()`
* `is_plan_or_trial__premium_only()`
### Examples[](#examples "Direct link to Examples")
Here are some concrete examples to help clarify this better:
warning
Note that in the following examples the product's shortcode is referred to as `my_fs` and the paid plan’s name is **professional**. It will obviously be different for you when you come to customize it.
To check if a website is eligible to use any of the premium defined logic (if the user is either currently in a trial period or simply owns a valid license), simply use:
```
// This IF block will be auto removed from the Free version.
if ( my_fs()->is__premium_only() ) {
// This IF will be executed only if the user in a trial mode or have a valid license.
if ( my_fs()->can_use_premium_code() ) {
// ... premium only logic ...
}
}
```
Alternatively, you can use the following code which is equivalent:
```
// This IF block will be auto removed from the Free Version and will only get executed if the user on a trial or have a valid license.
if ( my_fs()->can_use_premium_code__premium_only() ) {
// ... premium only logic ...
}
```
Here’s how you can add customized **marketing content** to encourage your users to upgrade from your **free** to your your **paid** version:
```
if ( my_fs()->is_not_paying() ) {
echo ']` button. You can click that button to perform an immediate update.
note
Only a super-admin can update plugins and themes in a network environment.
4. After visiting the *Account* page, the network updates transient/cache will be updated with the required data for the product's update.
5. At this point, if you visit **WP Network Admin → Dashboard → Updates**, or the network plugins page, the update should be available.
---
# All
## Is Freemius a WordPress.org Compliant?[](#is-freemius-a-wordpressorg-compliant "Direct link to Is Freemius a WordPress.org Compliant?")
Mos-def! If you are familiar with the [guidelines](https://wordpress.org/plugins/about/guidelines/), you already know that “phoning home” is not allowed without the user’s consent. Therefore, we don’t capture any information without user opt-in. We probably have the most strict opt-in form in the wp.org repo.
## What makes Freemius WordPress.org compliant?[](#what-makes-freemius-wordpressorg-compliant "Direct link to What makes Freemius WordPress.org compliant?")
We’ve built a special PHP preprocessor that looks into your project’s PHP files and uses the SDK calls in your code as annotations to understand what parts of it should be excluded from the free product version. Then, the preprocessor automatically generates a free version of your plugin by striping away all of its premium code. The free version is the version that should be uploaded to WordPress.org, in order to comply with the [WordPress.org guidelines](https://developer.wordpress.org/plugins/wordpress-org/detailed-plugin-guidelines/).
## Can I use Freemius Insights with EDD or WooCommerce?[](#can-i-use-freemius-insights-with-edd-or-woocommerce "Direct link to Can I use Freemius Insights with EDD or WooCommerce?")
Absolutely YES! There’s no collision nor interaction between [Freemius Insights](https://freemius.com/wordpress/insights/) and other eCommerce solutions. [Freemius Insights](https://freemius.com/wordpress/insights/) does not depend on on our monetization solutions. You can add [Freemius Insights](https://freemius.com/wordpress/insights/) to both your free and premium plugin versions.
## Can I use Freemius Insights on CodeCanyon and ThemeForest?[](#can-i-use-freemius-insights-on-codecanyon-and-themeforest "Direct link to Can I use Freemius Insights on CodeCanyon and ThemeForest?")
Yes! It’s compliant with the marketplace rules. In fact, a similar analytics product, called *PressTrends*, was widely adapted by *ThemeForest* and *CodeCanyon* developers in early 2014.
## Can I use Insights in my Premium only plugin or theme?[](#can-i-use-insights-in-my-premium-only-plugin-or-theme "Direct link to Can I use Insights in my Premium only plugin or theme?")
Yes, you can! In addition, since you are not obligated to any guidelines, you can capture all the information and skip the opt-in screen. If you do so, you would need to explicitly mention that part in your privacy and terms of use. Having said that, since no one actually reads the privacy and terms, we recommend using the opt-in screen as an ethical transparency act.
## Can I use Freemius with my theme?[](#can-i-use-freemius-with-my-theme "Direct link to Can I use Freemius with my theme?")
Yes! *Freemius* is now fully integrated with themes!
## Will you share the captured emails with someone else?[](#will-you-share-the-captured-emails-with-someone-else "Direct link to Will you share the captured emails with someone else?")
Your data is safe and sound. We will never-ever, never-ever share your captured user emails with any 3rd party.
## What payment methods can I accept with Freemius?[](#what-payment-methods-can-i-accept-with-freemius "Direct link to What payment methods can I accept with Freemius?")
We use iDeal (Netherlands), Stripe and PayPal, and therefore accept all major credit cards and PayPal payments. See the list of [supported countries](https://freemius.com/help/documentation/selling-with-freemius/supported-countries/).
## Can I customize the opt-in screen?[](#can-i-customize-the-opt-in-screen "Direct link to Can I customize the opt-in screen?")
We have crafted special filters to customize the messaging and buttons of the opt-in screen. You can also completely edit the PHP template file in the SDK. Make sure you keep it clear about what information is being captured and that it’s sent to *Freemius*. Otherwise, it won’t be compliant with the [WordPress.org guidelines](https://wordpress.org/plugins/about/guidelines/).
## Do I need to set up a gateway to sell with Freemius?[](#do-i-need-to-set-up-a-gateway-to-sell-with-freemius "Direct link to Do I need to set up a gateway to sell with Freemius?")
Nope. No need for that because Freemius serves as your reseller.
## What currencies do you support?[](#what-currencies-do-you-support "Direct link to What currencies do you support?")
With Freemius you can sell and receive payments in USD (US dollars), GBP (British pounds), and EUR (Euros). See the list of [supported countries](https://freemius.com/help/documentation/selling-with-freemius/supported-countries/).
## Does Freemius store customer credit card numbers on Freemius servers?[](#does-freemius-store-customer-credit-card-numbers-on-freemius-servers "Direct link to Does Freemius store customer credit card numbers on Freemius servers?")
We aren’t crazy 🙂 Credit Cards do not even “touch” our servers and “speak” directly to Stripe, a well trusted and secure gateway.
## Is Freemius Checkout PCI compliant?[](#is-freemius-checkout-pci-compliant "Direct link to Is Freemius Checkout PCI compliant?")
Yes, we are PCI compliant; we use PayPal Express Checkout and Stripe.js, and our checkout is secured with an HTTPS protocol.
## Is Freemius In-App/Dashboard checkout PCI compliant?[](#is-freemius-in-appdashboard-checkout-pci-compliant "Direct link to Is Freemius In-App/Dashboard checkout PCI compliant?")
Yes. Whether the housing site runs securely over HTTPS or not, our In-Dashbord Checkout is loaded securely via a PCI compliant HTTPS iframe.
## Can I customize the in-dashboard pricing and checkout pages?[](#can-i-customize-the-in-dashboard-pricing-and-checkout-pages "Direct link to Can I customize the in-dashboard pricing and checkout pages?")
The pricing page is automatically generated and styled by Freemius, following WordPress admin dashboard design practices. We make sure it looks natural and optimized for best conversation results.
We have years of experience optimizing conversion, and we use data to continuously improve on the pricing page.
We do provide an option to add custom CSS stylesheets to enable personalization.
You can add those stylesheets in ***Plans*** -> **Customization**:
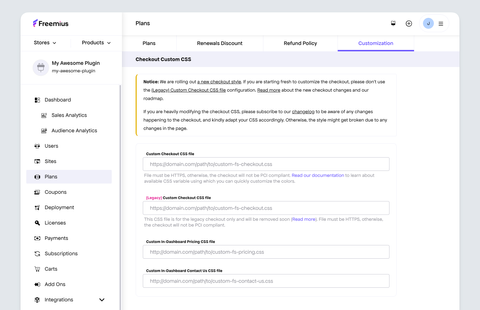
> Note: For now, we do not recommend using custom CSS since changes in the page HTML structure might break your styles. We’ll try to communicate any changes in the HTML DOM. Having said that, and for the sake of agile development, we do not guarantee notifying you about any changes – it’s up to you to monitor changes.
## Do you support coupons?[](#do-you-support-coupons "Direct link to Do you support coupons?")
Yes – we support absolute amounts and percentage based [coupons](https://freemius.com/help/documentation/marketing-automation/special-coupons-discounts/). You can set up the effective date range of a coupon’s validity, whether the discount should apply for all payments or only for the initial payment, and multiple customization options.
## Does Freemius support EU VAT?[](#does-freemius-support-eu-vat "Direct link to Does Freemius support EU VAT?")
Yes. Avoid the hassles of EU VAT compliance by having Freemius handle VAT collection, compliance and payments. Utilize support for real-time VAT ID validation and exemption when selling to businesses.
## How much do I have to generate in order volume using Freemius before I can get paid?[](#how-much-do-i-have-to-generate-in-order-volume-using-freemius-before-i-can-get-paid "Direct link to How much do I have to generate in order volume using Freemius before I can get paid?")
The minimum account balance required for payment is $100.00.
## Can I refund my customers?[](#can-i-refund-my-customers "Direct link to Can I refund my customers?")
You can refund transactions up to 30 days after the transaction was successfully processed and payment was created. We currently only offer full refunds (no partial refunds). If you’d like to refund a customer after the 30 days refund window is over, we recommend resolving the refund request with your own payment services.
## Do you offer automated recurring/subscription-based billing?[](#do-you-offer-automated-recurringsubscription-based-billing "Direct link to Do you offer automated recurring/subscription-based billing?")
We support automatic renewals, and encourage software makers to sell subscriptions to build long term sustainable businesses. It increases renewal rate, removes the hassle of payment renewal and increases your bottom line. Freemius monthly and annual plans are both automatically renewed.
## How long will it take until the customer sees the refund?[](#how-long-will-it-take-until-the-customer-sees-the-refund "Direct link to How long will it take until the customer sees the refund?")
While some refunds may be instantaneous, credit refunds can take 5–10 business days to show up in their customer’s credit card statement.
## What happens if a customer disputes a payment / chargeback?[](#what-happens-if-a-customer-disputes-a-payment--chargeback "Direct link to What happens if a customer disputes a payment / chargeback?")
The payment amount will be temporarily be held and we’ll contact you ASAP, giving you the chance to resolve the dispute directly with the customer.
If the dispute isn’t resolved, we’ll step inup and handle each case individually.
* If the dispute is resolved in your favor, you are all good.
* If the dispute is resolved in favor of the customer, the held amount will be refunded to the customer.
* If it was a bank dispute (via Stripe), chargebacks incur a fee of $15 which will be deducted from your balance.
## Do you offer specialized pricing for micro-transactions like on Apple’s App Store or Google’s Android Market?[](#do-you-offer-specialized-pricing-for-micro-transactions-like-on-apples-app-store-or-googles-android-market "Direct link to Do you offer specialized pricing for micro-transactions like on Apple’s App Store or Google’s Android Market?")
The recommended minimum price per transaction is $3.99. Otherwise, your processing fee will be as high as 30%-50% due to the minimum per transaction rates charged by Stripe and PayPal. [Email us](https://freemius.com/cdn-cgi/l/email-protection#4c3f393c3c233e380c2a3e29292125393f622f2321) to discuss your specific situation.
## How do you handle downloads and file hosting?[](#how-do-you-handle-downloads-and-file-hosting "Direct link to How do you handle downloads and file hosting?")
We securely deliver reliable downloads to valid license holders through our API, utilizing S3 hosting on AWS.
## What provision is there for users to export their data if they wanted to leave the platform?[](#what-provision-is-there-for-users-to-export-their-data-if-they-wanted-to-leave-the-platform "Direct link to What provision is there for users to export their data if they wanted to leave the platform?")
Many marketplaces choose to hide their customers’ data from developers and “lock them” inside the platform.
We believe that the data belongs to the developers. If a developer decides to leave the platform for any reason whatsoever, he/she can easily download their user-list from our dashboard with one click, and they can access all of their data by leveraging our RESTful API for migration purposes.
## Can I customize the ‘From’ addresses of the email messages sent by Freemius?[](#can-i-customize-the-from-addresses-of-the-email-messages-sent-by-freemius "Direct link to Can I customize the ‘From’ addresses of the email messages sent by Freemius?")
Yep – you can do that in the ‘Email Addresses’ section.
## Do you support affiliates?[](#do-you-support-affiliates "Direct link to Do you support affiliates?")
Yes we do! Freemius comes with a fully-featured [Affiliation Platform](https://freemius.com/help/documentation/affiliate-platform/) which you can utilize to onboard and manage affiliates.
## What does the license renewal process look like for customers?[](#what-does-the-license-renewal-process-look-like-for-customers "Direct link to What does the license renewal process look like for customers?")
All plans (besides lifetime / one-time plan) are automatically renewed. For annual plans, the customer will receive a friendly reminder email a month prior to the renewal date, giving them enough time to cancel the subscription, if they wish to do so.
## How can I send emails to my users and customers?[](#how-can-i-send-emails-to-my-users-and-customers "Direct link to How can I send emails to my users and customers?")
We don’t provide a custom emailing mechanism. We might offer this option in the future as an additional paid package.
For now, the best way is to either download the ‘users list’ file from the ***Users*** section in the dashboard,
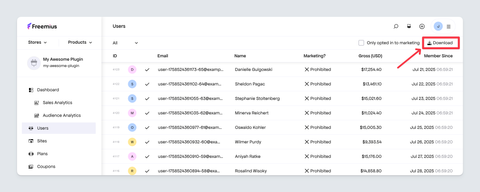
or leverage our [webhooks mechanism](https://freemius.com/help/documentation/marketing-automation/events-webhooks/) by pushing users’ details, including emails addresses, to mailing platforms such as MailChimp or Customer.io.
## Does Freemius support prorating?[](#does-freemius-support-prorating "Direct link to Does Freemius support prorating?")
Proration handles the increase or decrease to the subscription price when a price changes during any period of a subscription. By default, [Freemius prorates plan updates](https://freemius.com/help/documentation/selling-with-freemius/proration/) (upgrades or downgrades).
## Can I offer a free trial to my users?[](#can-i-offer-a-free-trial-to-my-users "Direct link to Can I offer a free trial to my users?")
Yes. You can set a [trial period](https://freemius.com/help/documentation/selling-with-freemius/free-trials/) in your plan settings. Just make sure to turn the “Require Credit Card or PayPal” option off.
## How do trials work if I have a free version on WordPress.org?[](#how-do-trials-work-if-i-have-a-free-version-on-wordpressorg "Direct link to How do trials work if I have a free version on WordPress.org?")
If you have a free version, after 24 hours, a dismissable admin notice with a trial offer will automatically appear in the WP admin dashboard.

Clicking on the “Start free trial” button will redirect the user to the plugin’s in-dashboard pricing page with the option to start a trial with any of the plans. Once the user selects a plan and starts the trial, the premium version is securely accessible through a download link which will appear in an admin notice and in an automated email.
## Can I offer a paid trial to my users?[](#can-i-offer-a-paid-trial-to-my-users "Direct link to Can I offer a paid trial to my users?")
Yes. You can offer a [Free Trial with a required payment method](https://freemius.com/help/documentation/selling-with-freemius/free-trials/) by setting a trial period in your plan settings and then turning on the “Require Credit Card or PayPal” option.
## Is your SDK RTL compliant?[](#is-your-sdk-rtl-compliant "Direct link to Is your SDK RTL compliant?")
Yes, it is.
## Under the “Sites” menu, what is the difference between “Plan” and “Is Premium”?[](#under-the-sites-menu-what-is-the-difference-between-plan-and-is-premium "Direct link to Under the “Sites” menu, what is the difference between “Plan” and “Is Premium”?")
If you name your paid plan as **“Premium”** you might get a little confused with the terminology. The data under the plan column shows the current plan of the install. **“Is Premium”** tells if that site is running the *free* or the *premium* code version of your module.
## Will selecting “deactivate license” under user account in WordPress cancel the billing / subscription?[](#will-selecting-deactivate-license-under-user-account-in-wordpress-cancel-the-billing--subscription "Direct link to Will selecting “deactivate license” under user account in WordPress cancel the billing / subscription?")
Deactivating the license will not cancel the subscription. It’s there for cases in which the customer wants to migrate a license to a different installation (for example, when migrating to a different host or domain).
## What languages is your WordPress SDK translated to?[](#what-languages-is-your-wordpress-sdk-translated-to "Direct link to What languages is your WordPress SDK translated to?")
You can check out all of the supported languages and help us translate the SDK (we know you want to be on our hall of fame 😉 ) on our [Transifex translations manager](https://www.transifex.com/freemius/wordpress-sdk/).
## How to switch the language on the pricing and checkout pages in the dashboard?[](#how-to-switch-the-language-on-the-pricing-and-checkout-pages-in-the-dashboard "Direct link to How to switch the language on the pricing and checkout pages in the dashboard?")
This is a work in progress. Currently, the pricing and checkout pages are only in English. Making them translatable is part of our roadmap.
## Can I protect my premium offering if the user cancels the trial or if the trial is over and the user didn’t upgrade?[](#can-i-protect-my-premium-offering-if-the-user-cancels-the-trial-or-if-the-trial-is-over-and-the-user-didnt-upgrade "Direct link to Can I protect my premium offering if the user cancels the trial or if the trial is over and the user didn’t upgrade?")
If a user got your premium code via a trial but never paid for a license, you can block the premium logic and protect yourself from trial abuse by using the following code:
```
If ( my_fs()->can_use_premium_code() ) {
// … premium code ...
}
```
By default, all trials are “blocking” to prevent trial abusement. So if the trial is over/expired and the user didn’t upgrade (or canceled the trial), the premium features will be blocked even if you set your plan to keep the features and only block updates and support:

## Can I offer a discount on license renewals?[](#can-i-offer-a-discount-on-license-renewals "Direct link to Can I offer a discount on license renewals?")
Yes, you can. Keep in mind though, that our annual and monthly plans renew automatically. This means that customers don’t have to take any proactive action to renew the license. In other words, you don’t need to convince the customer to renew. The decision is whether to cancel the license or continue. Unless a customer is unhappy with your plugin or has stopped using it, a renewal discount has no significant effect on that decision.
Therefore, as a rule of thumb, we do not recommend setting a discount for renewals unless your plugin does not provide a continued value (e.g. a migration plugin, or any one-time action plugin). In that case, maybe it is worth setting up a [lifetime price](https://freemius.com/blog/lifetime-license-for-wordpress-plugins-the-right-way/).
## Can I upsell multi-site licenses?[](#can-i-upsell-multi-site-licenses "Direct link to Can I upsell multi-site licenses?")
Yes. You can set up custom *monthly*, *annual* and *lifetime* pricing for any amount of licenses.
## Are there any additional fees for receiving payments through PayPal?[](#are-there-any-additional-fees-for-receiving-payments-through-paypal "Direct link to Are there any additional fees for receiving payments through PayPal?")
PayPal payment transfers to U.S.-based accounts are free. For payment transfers to non-U.S. accounts, PayPal incorporates a 2% fee (maximum of $20 USD).
## What will my customers see on their Credit-Card and PayPal statement?[](#what-will-my-customers-see-on-their-credit-card-and-paypal-statement "Direct link to What will my customers see on their Credit-Card and PayPal statement?")
Customers who purchase your product through Freemius will receive a credit card statement showing your product’s name.
For PayPal transactions, the store name will appear as your product’s name. However, PayPal email notifications will state Freemius and include your product description in the plan details. Unfortunately, PayPal does not offer a way to customize this further.
## I received a subscription notification without a payment notification, what’s going on?[](#i-received-a-subscription-notification-without-a-payment-notification-whats-going-on "Direct link to I received a subscription notification without a payment notification, what’s going on?")
Due to the way PayPal’s recurring profiles mechanism works, it can take up to 24 hours until Freemius receives the approval notification for the subscriptions’ initial payment. To keep a smooth purchase experience for customers, Freemius will email the license key and the download link to the paid product – right away.
To mitigate potential abuse, when a customer subscribes to your product the system will issue a 24-hour blocking license. Once we receive the payment notification from PayPal, the license will be extended based on the subscription billing cycle, and the blocking state of the license will be auto-adjusted based on the plan’s configuration.
We could have designed the upgrade process slightly differently, emailing the downloadable product only after the payment approval, but we decided that we aren’t going to “break” a proper subscription UX just because of a small group of trolls that can abuse this PayPal flaw.
## How can I get paid? How do I get my earnings?[](#how-can-i-get-paid-how-do-i-get-my-earnings "Direct link to How can I get paid? How do I get my earnings?")
There are currently four payment methods available for you to collect your earnings from Freemius:
1. PayPal (Default payment, using PayPal MassPay)
2. Payoneer
3. Wire Transfer (International and Domestic / IBAN)
4. TransferWise
International wires can be converted to your local currency. Due to our high volumes we’ve managed to negotiate great terms with our bank for currency conversion-rates and a complete fee waiver on foreign-currency international wire.
## Why is the active installs metric on WordPress.org different than the one on Freemius?[](#why-is-the-active-installs-metric-on-wordpressorg-different-than-the-one-on-freemius "Direct link to Why is the active installs metric on WordPress.org different than the one on Freemius?")
There’s a fundamental difference in the way WordPress.org and Freemius count active installs.
Based on publicly available responses from key people in the WordPress meta team, the WordPress.org active installs counter relies on the WordPress.org updates mechanism, which is sampled on a weekly basis. Updates are triggered only when there’s traffic to the site, so if a site installed your plugin or theme and did not get any traffic during that sampling period OR, if the updates mechanism is blocked (or turned off), this site will not get counted. Also, we suspect that the WordPress.org sampling relies on domains and not on IPs. In that case, for example, all of the VVV installs that installed your product will only be counted as a single site.
On the other hand, Freemius uses real actions such as an explicit opt-in or deactivation/uninstall events. One fallback of that tracking methodology is if a user hard-deletes the product from the filesystem, using FTP/SSH, it is still considered active.
---
# Analytics & Insights
## Can I use Insights in my Premium only plugin or theme?[](#can-i-use-insights-in-my-premium-only-plugin-or-theme "Direct link to Can I use Insights in my Premium only plugin or theme?")
Yes, you can! In addition, since you are not obligated to any guidelines, you can capture all the information and skip the opt-in screen. If you do so, you would need to explicitly mention that part in your privacy and terms of use. Having said that, since no one actually reads the privacy and terms, we recommend using the opt-in screen as an ethical transparency act.
## Can I customize the opt-in screen?[](#can-i-customize-the-opt-in-screen "Direct link to Can I customize the opt-in screen?")
We have crafted special filters to customize the messaging and buttons of the opt-in screen. You can also completely edit the PHP template file in the SDK. Make sure you keep it clear about what information is being captured and that it’s sent to *Freemius*. Otherwise, it won’t be compliant with the [WordPress.org guidelines](https://wordpress.org/plugins/about/guidelines/).
## Can I use Freemius Insights on CodeCanyon and ThemeForest?[](#can-i-use-freemius-insights-on-codecanyon-and-themeforest "Direct link to Can I use Freemius Insights on CodeCanyon and ThemeForest?")
Yes! It’s compliant with the marketplace rules. In fact, a similar analytics product, called *PressTrends*, was widely adapted by *ThemeForest* and *CodeCanyon* developers in early 2014.
## Can I use Freemius Insights with EDD or WooCommerce?[](#can-i-use-freemius-insights-with-edd-or-woocommerce "Direct link to Can I use Freemius Insights with EDD or WooCommerce?")
Absolutely YES! There’s no collision nor interaction between [Freemius Insights](https://freemius.com/wordpress/insights/) and other eCommerce solutions. [Freemius Insights](https://freemius.com/wordpress/insights/) does not depend on on our monetization solutions. You can add [Freemius Insights](https://freemius.com/wordpress/insights/) to both your free and premium plugin versions.
## Why is the active installs metric on WordPress.org different than the one on Freemius?[](#why-is-the-active-installs-metric-on-wordpressorg-different-than-the-one-on-freemius "Direct link to Why is the active installs metric on WordPress.org different than the one on Freemius?")
There’s a fundamental difference in the way WordPress.org and Freemius count active installs.
Based on publicly available responses from key people in the WordPress meta team, the WordPress.org active installs counter relies on the WordPress.org updates mechanism, which is sampled on a weekly basis. Updates are triggered only when there’s traffic to the site, so if a site installed your plugin or theme and did not get any traffic during that sampling period OR, if the updates mechanism is blocked (or turned off), this site will not get counted. Also, we suspect that the WordPress.org sampling relies on domains and not on IPs. In that case, for example, all of the VVV installs that installed your product will only be counted as a single site.
On the other hand, Freemius uses real actions such as an explicit opt-in or deactivation/uninstall events. One fallback of that tracking methodology is if a user hard-deletes the product from the filesystem, using FTP/SSH, it is still considered active.
---
# Emails
## How can I send emails to my users and customers?[](#how-can-i-send-emails-to-my-users-and-customers "Direct link to How can I send emails to my users and customers?")
We don’t provide a custom emailing mechanism. We might offer this option in the future as an additional paid package.
For now, the best way is to either download the ‘users list’ file from the ***Users*** section in the dashboard,

or leverage our [webhooks mechanism](https://freemius.com/help/documentation/marketing-automation/events-webhooks/) by pushing users’ details, including emails, to mailing platforms such as MailChimp or Customer.io.
## Can I customize the ‘From’ addresses of the email messages sent by Freemius?[](#can-i-customize-the-from-addresses-of-the-email-messages-sent-by-freemius "Direct link to Can I customize the ‘From’ addresses of the email messages sent by Freemius?")
Yep – you can do that in the ‘Email Addresses’ section.
## Will you share the captured emails with someone else?[](#will-you-share-the-captured-emails-with-someone-else "Direct link to Will you share the captured emails with someone else?")
Your data is safe and sound. We will never-ever, never-ever share your captured user emails with any 3rd party.
---
# Freemius SDK
## What languages is your WordPress SDK translated to?[](#what-languages-is-your-wordpress-sdk-translated-to "Direct link to What languages is your WordPress SDK translated to?")
You can check out all of the supported languages and help us translate the SDK (we know you want to be on our hall of fame 😉 ) on our [Transifex translations manager](https://www.transifex.com/freemius/wordpress-sdk/).
## Is your SDK RTL compliant?[](#is-your-sdk-rtl-compliant "Direct link to Is your SDK RTL compliant?")
Yes, it is.
## What makes Freemius WordPress.org compliant?[](#what-makes-freemius-wordpressorg-compliant "Direct link to What makes Freemius WordPress.org compliant?")
We’ve built a special PHP preprocessor that looks into your project’s PHP files and uses the SDK calls in your code as annotations to understand what parts of it should be excluded from the free product version. Then, the preprocessor automatically generates a free version of your plugin by striping away all of its premium code. The free version is the version that should be uploaded to WordPress.org, in order to comply with the [WordPress.org guidelines](https://developer.wordpress.org/plugins/wordpress-org/detailed-plugin-guidelines/).
---
# Licensing
## Can I upsell multi-site licenses?[](#can-i-upsell-multi-site-licenses "Direct link to Can I upsell multi-site licenses?")
Yes. You can set up custom *monthly*, *annual* and *lifetime* pricing for any amount of licenses.
## Can I offer a discount on license renewals?[](#can-i-offer-a-discount-on-license-renewals "Direct link to Can I offer a discount on license renewals?")
Yes, you can. Keep in mind though, that our annual and monthly plans renew automatically. This means that customers don’t have to take any proactive action to renew the license. In other words, you don’t need to convince the customer to renew. The decision is whether to cancel the license or continue. Unless a customer is unhappy with your plugin or has stopped using it, a renewal discount has no significant effect on that decision.
Therefore, as a rule of thumb, we do not recommend setting a discount for renewals unless your plugin does not provide a continued value (e.g. a migration plugin, or any one-time action plugin). In that case, maybe it is worth setting up a [lifetime price](https://freemius.com/blog/lifetime-license-for-wordpress-plugins-the-right-way/).
## Will selecting “deactivate license” under user account in WordPress cancel the billing / subscription?[](#will-selecting-deactivate-license-under-user-account-in-wordpress-cancel-the-billing--subscription "Direct link to Will selecting “deactivate license” under user account in WordPress cancel the billing / subscription?")
Deactivating the license will not cancel the subscription.
It’s there for cases in which the customer wants to migrate a license to a different installation (for example, when migrating to a different host or domain).
## Can I offer a paid trial to my users?[](#can-i-offer-a-paid-trial-to-my-users "Direct link to Can I offer a paid trial to my users?")
Yes. You can offer a [Free Trial with a required payment method](https://freemius.com/help/documentation/selling-with-freemius/free-trials/) by setting a trial period in your plan settings and then turning on the “Require Credit Card or PayPal” option.
## Can I offer a free trial to my users?[](#can-i-offer-a-free-trial-to-my-users "Direct link to Can I offer a free trial to my users?")
Yes. You can set a [trial period](https://freemius.com/help/documentation/selling-with-freemius/free-trials/) in your plan settings. Just make sure to turn the “Require Credit Card or PayPal” option off.
## Does Freemius support prorating?[](#does-freemius-support-prorating "Direct link to Does Freemius support prorating?")
Proration handles the increase or decrease to the subscription price when a price changes during any period of a subscription. By default, [Freemius prorates plan updates](https://freemius.com/help/documentation/selling-with-freemius/proration/) (upgrades or downgrades).
## What does the license renewal process look like for customers?[](#what-does-the-license-renewal-process-look-like-for-customers "Direct link to What does the license renewal process look like for customers?")
All plans (besides lifetime / one-time plan) are automatically renewed. For annual plans, the customer will receive a friendly reminder email a month prior to the renewal date, giving them enough time to cancel the subscription, if they wish to do so.
## Can I protect my premium offering if the user cancels the trial or if the trial is over and the user didn’t upgrade?[](#can-i-protect-my-premium-offering-if-the-user-cancels-the-trial-or-if-the-trial-is-over-and-the-user-didnt-upgrade "Direct link to Can I protect my premium offering if the user cancels the trial or if the trial is over and the user didn’t upgrade?")
If a user got your premium code via a trial but never paid for a license, you can block the premium logic and protect yourself from trial abuse by using the following code:
```
If ( my_fs()->can_use_premium_code() ) {
// … premium code ...
}
```
By default, all trials are “blocking” to prevent trial abusement. So if the trial is over/expired and the user didn’t upgrade (or canceled the trial), the premium features will be blocked even if you set your plan to keep the features and only block updates and support:

## How do trials work if I have a free version on WordPress.org?[](#how-do-trials-work-if-i-have-a-free-version-on-wordpressorg "Direct link to How do trials work if I have a free version on WordPress.org?")
If you have a free version, after 24 hours, a dismissable admin notice with a trial offer will automatically appear in the WP admin dashboard.

Clicking on the “Start free trial” button will redirect the user to the plugin’s in-dashboard pricing page with the option to start a trial with any of the plans. Once the user selects a plan and starts the trial, the premium version is securely accessible through a download link which will appear in an admin notice and in an automated email.
## How do you handle downloads and file hosting?[](#how-do-you-handle-downloads-and-file-hosting "Direct link to How do you handle downloads and file hosting?")
We securely deliver reliable downloads to valid license holders through our API, utilizing S3 hosting on AWS.
## Do you offer automated recurring/subscription-based billing?[](#do-you-offer-automated-recurringsubscription-based-billing "Direct link to Do you offer automated recurring/subscription-based billing?")
We support automatic renewals, and encourage software makers to sell subscriptions to build long term sustainable businesses. It increases renewal rate, removes the hassle of payment renewal and increases your bottom line. Freemius monthly and annual plans are both automatically renewed.
## I received a subscription notification without a payment notification, what’s going on?[](#i-received-a-subscription-notification-without-a-payment-notification-whats-going-on "Direct link to I received a subscription notification without a payment notification, what’s going on?")
Due to the way PayPal’s recurring profiles mechanism works, it can take up to 24 hours until Freemius receives the approval notification for the subscriptions’ initial payment. To keep a smooth purchase experience for customers, Freemius will email the license key and the download link to the paid product – right away.
To mitigate potential abuse, when a customer subscribes to your product the system will issue a 24-hour blocking license. Once we receive the payment notification from PayPal, the license will be extended based on the subscription billing cycle, and the blocking state of the license will be auto-adjusted based on the plan’s configuration.
We could have designed the upgrade process slightly differently, emailing the downloadable product only after the payment approval, but we decided that we aren’t going to “break” a proper subscription UX just because of a small group of trolls that can abuse this PayPal flaw.
---
# My Account
## Are there any additional fees for receiving payments through PayPal?[](#are-there-any-additional-fees-for-receiving-payments-through-paypal "Direct link to Are there any additional fees for receiving payments through PayPal?")
PayPal payment transfers to U.S.-based accounts are free. For payment transfers to non-U.S. accounts, PayPal incorporates a 2% fee (maximum of $20 USD).
## How to switch the language on the pricing and checkout pages in the dashboard?[](#how-to-switch-the-language-on-the-pricing-and-checkout-pages-in-the-dashboard "Direct link to How to switch the language on the pricing and checkout pages in the dashboard?")
This is a work in progress. Currently, the pricing and checkout pages are only in English. Making them translatable is part of our roadmap.
## Do you support affiliates?[](#do-you-support-affiliates "Direct link to Do you support affiliates?")
Yes we do! Freemius comes with a fully-featured [Affiliation Platform](https://freemius.com/help/documentation/affiliate-platform/) which you can utilize to onboard and manage affiliates.
## What provision is there for users to export their data if they wanted to leave the platform?[](#what-provision-is-there-for-users-to-export-their-data-if-they-wanted-to-leave-the-platform "Direct link to What provision is there for users to export their data if they wanted to leave the platform?")
Many marketplaces choose to hide their customers’ data from developers and “lock them” inside the platform.
We believe that the data belongs to the developers. If a developer decides to leave the platform for any reason whatsoever, he/she can easily download their user-list from our dashboard with one click, and they can access all of their data by leveraging our RESTful API for migration purposes.
---
# Sales
## What payment methods can I accept with Freemius?[](#what-payment-methods-can-i-accept-with-freemius "Direct link to What payment methods can I accept with Freemius?")
We use iDeal (Netherlands), Stripe and PayPal, and therefore accept all major credit cards and PayPal payments. See the list of [supported countries](https://freemius.com/help/documentation/selling-with-freemius/supported-countries/).
## Do you support coupons?[](#do-you-support-coupons "Direct link to Do you support coupons?")
Yes – we support absolute amounts and percentage based [coupons](https://freemius.com/help/documentation/marketing-automation/special-coupons-discounts/). You can set up the effective date range of a coupon’s validity, whether the discount should apply for all payments or only for the initial payment, and multiple customization options.
## Do I need to set up a gateway to sell with Freemius?[](#do-i-need-to-set-up-a-gateway-to-sell-with-freemius "Direct link to Do I need to set up a gateway to sell with Freemius?")
Nope. No need for that because Freemius serves as your reseller.
## What currencies do you support?[](#what-currencies-do-you-support "Direct link to What currencies do you support?")
With Freemius you can sell and receive payments in USD (US dollars), GBP (British pounds), and EUR (Euros). See the list of [supported countries](https://freemius.com/help/documentation/selling-with-freemius/supported-countries/).
## Does Freemius store customer credit card numbers on Freemius servers?[](#does-freemius-store-customer-credit-card-numbers-on-freemius-servers "Direct link to Does Freemius store customer credit card numbers on Freemius servers?")
We aren’t crazy 🙂 Credit Cards do not even “touch” our servers and “speak” directly to Stripe, a well trusted and secure gateway.
## Is Freemius Checkout PCI compliant?[](#is-freemius-checkout-pci-compliant "Direct link to Is Freemius Checkout PCI compliant?")
Yes, we are PCI compliant; we use PayPal Express Checkout and Stripe.js, and our checkout is secured with an HTTPS protocol.
## Is Freemius In-App/Dashboard checkout PCI compliant?[](#is-freemius-in-appdashboard-checkout-pci-compliant "Direct link to Is Freemius In-App/Dashboard checkout PCI compliant?")
Yes. Whether the housing site runs securely over HTTPS or not, our In-Dashbord Checkout is loaded securely via a PCI compliant HTTPS iframe.
## Does Freemius support EU VAT?[](#does-freemius-support-eu-vat "Direct link to Does Freemius support EU VAT?")
Yes. Avoid the hassles of EU VAT compliance by having Freemius handle VAT collection, compliance and payments. Utilize support for real-time VAT ID validation and exemption when selling to businesses.
## How much do I have to generate in order volume using Freemius before I can get paid?[](#how-much-do-i-have-to-generate-in-order-volume-using-freemius-before-i-can-get-paid "Direct link to How much do I have to generate in order volume using Freemius before I can get paid?")
The minimum account balance required for payment is $100.00.
## How can I get paid? How do I get my earnings?[](#how-can-i-get-paid-how-do-i-get-my-earnings "Direct link to How can I get paid? How do I get my earnings?")
There are currently four payment methods available for you to collect your earnings from Freemius:
1. PayPal (Default payment, using PayPal MassPay)
2. Payoneer
3. Wire Transfer (International and Domestic / IBAN)
4. TransferWise
International wires can be converted to your local currency. Due to our high volumes we’ve managed to negotiate great terms with our bank for currency conversion-rates and a complete fee waiver on foreign-currency international wire.
## Do you offer specialized pricing for micro-transactions like on Apple’s App Store or Google’s Android Market?[](#do-you-offer-specialized-pricing-for-micro-transactions-like-on-apples-app-store-or-googles-android-market "Direct link to Do you offer specialized pricing for micro-transactions like on Apple’s App Store or Google’s Android Market?")
The recommended minimum price per transaction is $3.99. Otherwise, your processing fee will be as high as 30%-50% due to the minimum per transaction rates charged by Stripe and PayPal. [Email us](https://freemius.com/cdn-cgi/l/email-protection#eb989e9b9b84999fab8d998e8e86829e98c5888486) to discuss your specific situation.
## Can I customize the in-dashboard pricing and checkout pages?[](#can-i-customize-the-in-dashboard-pricing-and-checkout-pages "Direct link to Can I customize the in-dashboard pricing and checkout pages?")
The pricing page is automatically generated and styled by Freemius, following WordPress admin dashboard design practices. We make sure it looks natural and optimized for best conversation results.
We have years of experience optimizing conversion, and we use data to continuously improve on the pricing page.
We do provide an option to add custom CSS stylesheets to enable personalization.
You can add those stylesheets in ***Plans*** -> **Customization**:

> Note: For now, we do not recommend using custom CSS since changes in the page HTML structure might break your styles. We’ll try to communicate any changes in the HTML DOM. Having said that, and for the sake of agile development, we do not guarantee notifying you about any changes – it’s up to you to monitor changes.
## Can I refund my customers?[](#can-i-refund-my-customers "Direct link to Can I refund my customers?")
You can refund transactions up to 30 days after the transaction was successfully processed and payment was created. We currently only offer full refunds (no partial refunds). If you’d like to refund a customer after the 30 days refund window is over, we recommend resolving the refund request with your own payment services.
## How long will it take until the customer sees the refund?[](#how-long-will-it-take-until-the-customer-sees-the-refund "Direct link to How long will it take until the customer sees the refund?")
While some refunds may be instantaneous, credit refunds can take 5–10 business days to show up in their customer’s credit card statement.
## What happens if a customer disputes a payment / chargeback?[](#what-happens-if-a-customer-disputes-a-payment--chargeback "Direct link to What happens if a customer disputes a payment / chargeback?")
The payment amount will be temporarily be held and we’ll contact you ASAP, giving you the chance to resolve the dispute directly with the customer.
If the dispute isn’t resolved, we’ll step inup and handle each case individually.
* If the dispute is resolved in your favor, you are all good.
* If the dispute is resolved in favor of the customer, the held amount will be refunded to the customer.
* If it was a bank dispute (via Stripe), chargebacks incur a fee of $15 which will be deducted from your balance.
## Do you support affiliates?[](#do-you-support-affiliates "Direct link to Do you support affiliates?")
Yes we do! Freemius comes with a fully-featured [Affiliation Platform](https://freemius.com/help/documentation/affiliate-platform/) which you can utilize to onboard and manage affiliates.
## Does Freemius support prorating?[](#does-freemius-support-prorating "Direct link to Does Freemius support prorating?")
Proration handles the increase or decrease to the subscription price when a price changes during any period of a subscription. By default, [Freemius prorates plan updates](https://freemius.com/help/documentation/selling-with-freemius/proration/) (upgrades or downgrades).
## Under the “Sites” menu, what is the difference between “Plan” and “Is Premium”?[](#under-the-sites-menu-what-is-the-difference-between-plan-and-is-premium "Direct link to Under the “Sites” menu, what is the difference between “Plan” and “Is Premium”?")
If you name your paid plan as **“Premium”** you might get a little confused with the terminology. The data under the plan column shows the current plan of the install. **“Is Premium”** tells if that site is running the *free* or the *premium* code version of your module.
## Can I upsell multi-site licenses?[](#can-i-upsell-multi-site-licenses "Direct link to Can I upsell multi-site licenses?")
Yes. You can set up custom *monthly*, *annual* and *lifetime* pricing for any amount of licenses.
## Are there any additional fees for receiving payments through PayPal?[](#are-there-any-additional-fees-for-receiving-payments-through-paypal "Direct link to Are there any additional fees for receiving payments through PayPal?")
PayPal payment transfers to U.S.-based accounts are free. For payment transfers to non-U.S. accounts, PayPal incorporates a 2% fee (maximum of $20 USD).
## What will my customers see on their Credit-Card and PayPal statement?[](#what-will-my-customers-see-on-their-credit-card-and-paypal-statement "Direct link to What will my customers see on their Credit-Card and PayPal statement?")
Customers who purchase your product through Freemius will receive a credit card statement showing your product’s name.
For PayPal transactions, the store name will appear as your product’s name. However, PayPal email notifications will state Freemius and include your product description in the plan details. Unfortunately, PayPal does not offer a way to customize this further.
---
Whatever you want to show when the user is not logged in.
User logged in and has at least one license on Freemius.
User logged in and has at least one ACTIVE license on Freemius.
Whatever you want to show when the user is logged in but does not have any licenses for your product on Freemius.
``` --- # Support Contact Form ## How to enable the Contact Form in the Customer Portal[](#how-to-enable-the-contact-form-in-the-customer-portal "Direct link to How to enable the Contact Form in the Customer Portal") To activate the contact form, select the relevant store from the ***Stores*** tab. Go to the store’s ***Settings*** and toggle the *Show support contact form* switch on: [](/help/videos/freemius-developer-dashboard-enable-contact-form.mp4) Refresh the Customer Portal, and you should see the new “Support” menu item. 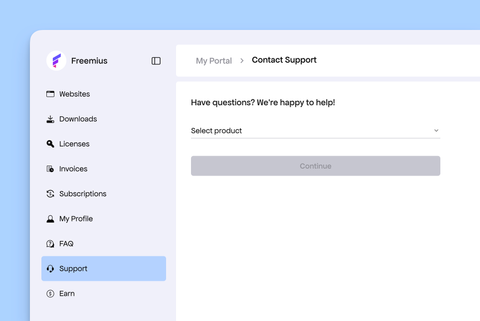 ## Contextual Categories[](#contextual-categories "Direct link to Contextual Categories") The contact form dynamically shows different categories according to the selected product and user information. For example, a “Trial Extension” category will only appear for products offering free trials: 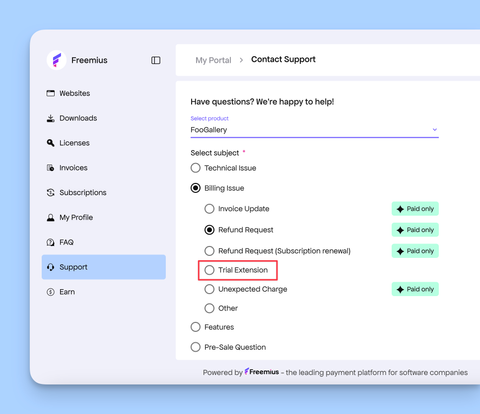 We plan to keep improving this as we go, making it more intelligent over time. ## FAQ Integration[](#faq-integration "Direct link to FAQ Integration") Upon a category and subcategory selection, the contact form will automatically reveal the relevant questions and answers from the FAQ, when applicable: ## Refund Policy Integration[](#refund-policy-integration "Direct link to Refund Policy Integration") When a customer indicates they are contacting support for a refund, a short human-readable summary of the refund policy will reactively appear to remind the customer what they agreed to when purchasing your product: 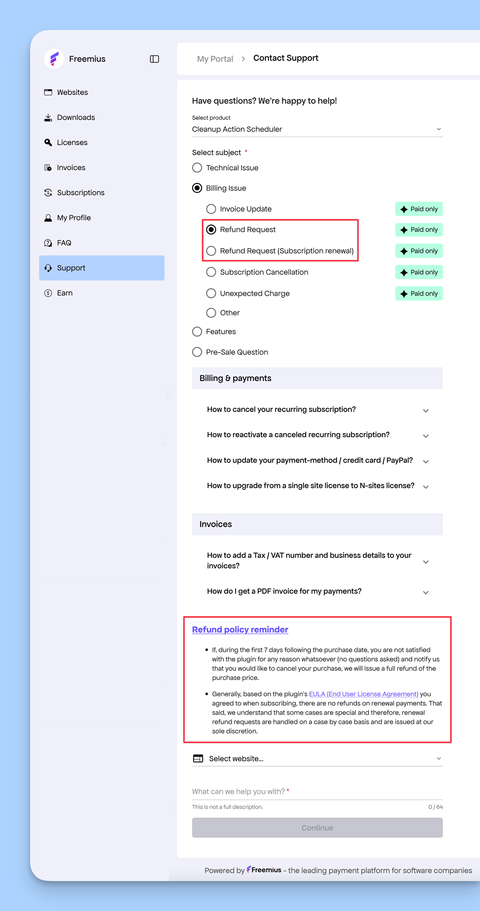 The commonest refund request is for subscription renewals. So, we hope that the policy reminder, which highlights that renewals are generally not refundable, will reduce the number of customers asking for refunds. ## Help Scout Docs Integration[](#help-scout-docs-integration "Direct link to Help Scout Docs Integration") If you integrate the contact form with Help Scout Docs, you can auto-populate relevant articles directly from your knowledge base: [](/help/videos/freemius-user-dashboard-contact-form-helpscout-docs.mp4) To enable the integration of the contact form with your Help Scout Docs, head to ***Integrations*** -> ***Help Scout*** in the Developer Dashboard, and set your Docs API Key: 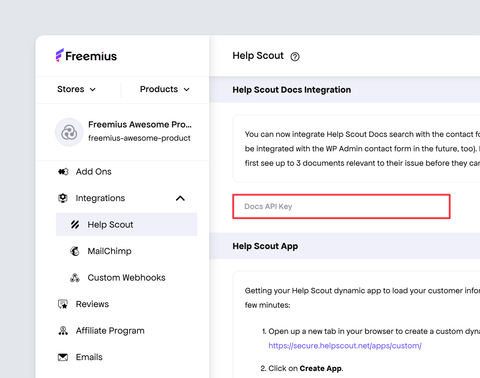 More information can be found [here](https://freemius.com/help/help/documentation/integrations/help-scout/.md). note If you are not using Help Scout for your documentation center, we plan to enrich the capability for custom API endpoints to search documents. ## Public Knowledge Base Integration[](#public-knowledge-base-integration "Direct link to Public Knowledge Base Integration") Whether you use Help Scout Docs or any other publicly available knowledge base, we now encourage users to check your docs while waiting to hear back from support: 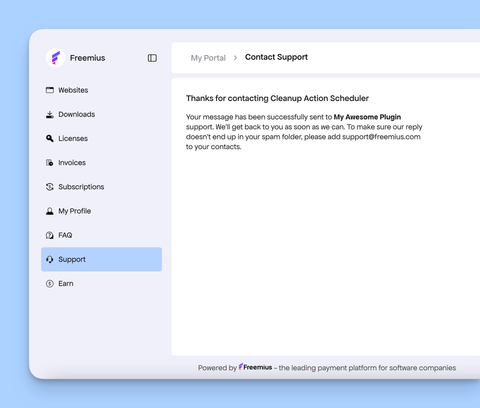 To enable this extra capability, you’ll need to enable the “Knowledge Base” switch in any of your product’s plans, and include the link to your knowledge base: 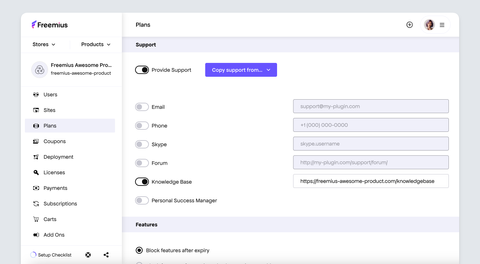 ## Freemius Checkout Integration[](#freemius-checkout-integration "Direct link to Freemius Checkout Integration") If you are not offering free support, you’ll notice that support-related categories highlighted as **PAID ONLY**, making it clear to users that they need to be a paying customer to receive support. If the user chooses to ignore that, all the integrations mentioned above will continue functioning, trying to surface all the relevant data to help the user in a self-served approach. But, if the user pursues a ticket, they’ll be prompted with a dialog box explaining they need to purchase (or renew) a license first. If they choose to get a license, the checkout will be opened right on the spot, offering them an uninterrupted experience until the submission of their ticket without even leaving the page! [](/help/videos/freemius-user-dashboard-contact-form-contextual-upsell.mp4) ## Link to Your Own Support Page[](#link-to-your-own-support-page "Direct link to Link to Your Own Support Page") If you'd like to link to your own support page instead of using the built-in form, you can configure it from your store settings. 1\. Go to **Store Settings** in the Freemius Developer Dashboard. 2. Under **Support Form**, enter the URL of your external support page.  Now, when a customer accesses support from the Customer Portal, they will see a **Continue** button that opens your custom support page in a new tab. 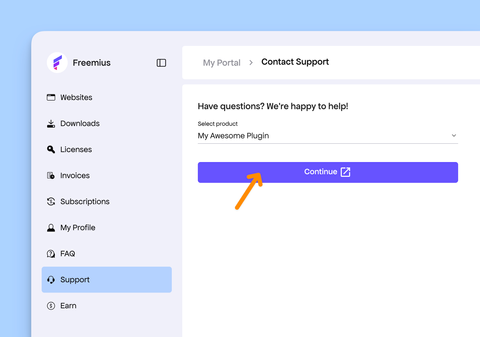 ## Customizations[](#customizations "Direct link to Customizations") ### How to hide selected categories of the contact form?[](#how-to-hide-selected-categories-of-the-contact-form "Direct link to How to hide selected categories of the contact form?") Each category of the contact form is assigned with a unique `id` attribute. These attributes allow you to easily hide any category using your custom CSS stylesheet, which you can set in the “My Store” configuration page. For example, the “Technical Support” category’s unique `id` is `contact__technical_issue`: 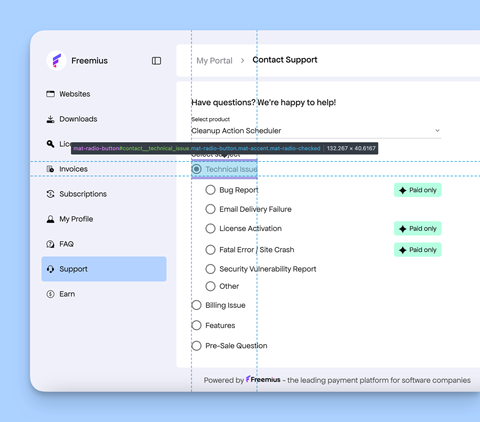 Allowing you to hide the category using: ``` #contact__technical_issue { display: none; } ``` Set the custom CSS stylesheet URL in the store’s ***Settings*** page. 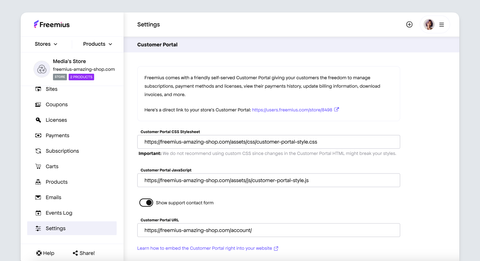 Learn how to [embed the Customer Portal](https://freemius.com/help/help/documentation/users-account-management/.md) right into your website. --- # WordPress SDK --- # Debugging Freemius has inbuilt options for debugging and logging issues so as to make the integration process easier for developers. Here is how to enable and use these features: ## Access the Freemius Debug Page[](#access-the-freemius-debug-page "Direct link to Access the Freemius Debug Page") You can access the **Freemius Debug** page directly via `{domain}/wp-admin/admin.php?page=freemius` to get information about the active SDK, Freemius-powered products on the site, users, and more. 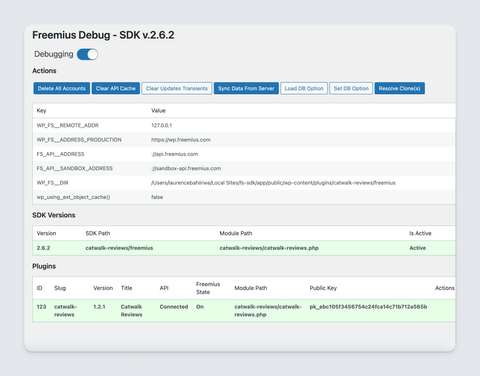 Setting `WP_FS__DEV_MODE` to `true` will enable logging. It will automatically activate the logger that outputs all logs to your browser's debugging console.  ## Output Logs to Screen[](#output-logs-to-screen "Direct link to Output Logs to Screen") You can output all logs to the screen by adding `&fs_dbg_echo=true` to the query string. Security Tip Adding `fs_dbg_echo=true` to the query string will only work when Freemius is set to [development mode](https://freemius.com/help/help/documentation/wordpress-sdk/testing/.md#setting-freemius-into-development-mode). Therefore, websites using your product are not at risk of exposing the logs unless an administrator sets `WP_FS__DEV_MODE` to `true` or manually toggles on the debugging switch in the *Freemius Debug* page. ## Debug Bar Integration[](#debug-bar-integration "Direct link to Debug Bar Integration") Additionally, if you are using [Debug Bar](https://wordpress.org/plugins/debug-bar/), Freemius SDK logging is fully integrated with it to make debugging even easier with its UI.  --- # Filters & Actions Hooks The Freemius WordPress SDK provides a collection of filters and actions that allow developers to customize and extend the functionality of their WordPress plugins or themes. The concept is similar to WordPress’ own filters and actions also known as [hooks](https://developer.wordpress.org/plugins/hooks/). ## Using Freemius Hooks[](#using-freemius-hooks "Direct link to Using Freemius Hooks") Using the Freemius hooks requires access to the Freemius instance, which is typically available in the main plugin file or wherever the SDK is initialized. ### Direct Usage[](#direct-usage "Direct link to Direct Usage") In your theme or plugin, you can use the standard `add_action()` or `add_filter()` functions via the Freemius instance, namely; * `my_fs()->add_action()` * `my_fs()->add_filter()` An example using the direct method. ``` my_fs()->add_action( 'after_license_activation', 'my_fs_after_license_activation' ); function my_fs_after_license_activation() { // Handle successful activation. } ``` note Ensure to change `my_fs()` to your actual Freemius instance prefix. ### Unique Hook Names[](#unique-hook-names "Direct link to Unique Hook Names") Similar to WordPress hooks, you can use a unique hook name for your product to avoid conflicts with other plugins or themes that might be using the same hook name. The naming convention for creating unique hook names is as follows: * The hook starts with `fs_` to identify it as a Freemius SDK hook. * Second, include the action name, e.g., `after_license_change`. * Finally, add the product slug at the end. * For plugins, add `my-plugin-slug`. Replace `my-plugin-slug` with the actual plugin slug. * For themes, add `my-theme-slug-theme`. Replace `my-theme-slug` with the actual theme slug before the suffix `-theme`. Example: A product with the slug `awesome-plugin` using `playground_anonymous_mode` filter hook. ``` add_filter( 'fs_playground_anonymous_mode-awesome-plugin', '__return_false' ); ``` tip The hook priorities and accepted arguments work the same way as in WordPress core e.g., see the [`is_submenu_visible`](#is_submenu_visible) filter hook. ## Filters Hooks[](#filters-hooks "Direct link to Filters Hooks") Filters allow developers to modify specific data or behavior within the Freemius SDK. To add a filter, use the following method from the Freemius instance: ``` my_fs()->add_filter( string $tag, callable $callback, $priority = 10, $accepted_args = 1 ); ``` The method signature is the same as WordPress' [add\_filter](https://developer.wordpress.org/reference/functions/add_filter/) function. The following filters are available: ### `default_currency`[](#default_currency "Direct link to default_currency") Set the default currency of the pricing page and checkout within the WP Admin dashboard. ``` function my_fs_default_currency( $currency ) { return 'eur'; } my_fs()->add_filter( 'default_currency', 'my_fs_default_currency' ); ``` ### `connect_url`[](#connect_url "Direct link to connect_url") Modifies the URL used for the activation screen. ### `trial_promotion_message`[](#trial_promotion_message "Direct link to trial_promotion_message") Customizes the message in the admin notice promoting trial usage to users. ### `is_long_term_user`[](#is_long_term_user "Direct link to is_long_term_user") Determines if a user is considered long-term based on custom criteria. The uninstall reasons shown in the deactivation feedback dialog are determined based on this user type. ### `uninstall_reasons`[](#uninstall_reasons "Direct link to uninstall_reasons") Defines the reasons presented to users in the deactivation feedback dialog during product deactivation. ### `is_plugin_update`[](#is_plugin_update "Direct link to is_plugin_update") Checks if Freemius was first added in a product update. ### `api_domains`[](#api_domains "Direct link to api_domains") Specifies API domains to include in an activation error message about domains that need to be whitelisted. ### `support_forum_submenu`[](#support_forum_submenu "Direct link to support_forum_submenu") Manages the visibility of the support forum submenu. ### `support_forum_url`[](#support_forum_url "Direct link to support_forum_url") Sets the URL for the support forum link for the product. ``` my_fs()->add_filter( 'support_forum_url', function ( $url ) { return 'https://awesome-plugin.com/support-forum/'; }); ``` ### `pricing_url`[](#pricing_url "Direct link to pricing_url") Override the default Freemius WordPress SDK pricing page. The \`$url\` parameter can be set to any other link e.g. website. ``` my_fs()->add_filter( 'pricing_url', function ( $url ) { return 'https://awesome-plugin.com/pricing/'; }); ``` ### `connect_message`[](#connect_message "Direct link to connect_message") Customizes the message displayed during the activation process. ### `connect_message_on_update`[](#connect_message_on_update "Direct link to connect_message_on_update") Adjusts the connection message shown during the activation process when Freemius was first added in a product update. ### `show_deactivation_subscription_cancellation`[](#show_deactivation_subscription_cancellation "Direct link to show_deactivation_subscription_cancellation") Disable the subscription cancellation prompt when deactivating the plugin. ``` my_fs()->add_filter( 'show_deactivation_subscription_cancellation', '__return_false' ); ``` ### `uninstall_confirmation_message`[](#uninstall_confirmation_message "Direct link to uninstall_confirmation_message") Customizes the confirmation message to show in an additional panel within the deactivation feedback dialog before the panel with the deactivation reasons is shown. ### `pending_activation_message`[](#pending_activation_message "Direct link to pending_activation_message") Customizes the message shown when activation is pending (when it requires completion by clicking an activation link sent via email). ### `is_submenu_visible`[](#is_submenu_visible "Direct link to is_submenu_visible") Controls the visibility of specific submenus for the product. Here is an example to conditionally show the contact submenu item for customers with a trial or are paying. ``` function my_fs_submenu_visibility_handler( $is_visible, $id ) { if ( 'contact' === $id ) { $is_visible = my_fs()->is_paying_or_trial(); } return $is_visible; } my_fs()->add_filter( 'is_submenu_visible', 'my_fs_submenu_visibility_handler', 10, 2 ); ``` ### `plugin_icon`[](#plugin_icon "Direct link to plugin_icon") Sets the icon displayed for the product. This affects the icon on the activation page, pricing page, and the updates section. ### `show_trial`[](#show_trial "Direct link to show_trial") Helps determine whether the Free Trial tab or the trial promotion admin notice should be shown. ### `is_pricing_page_visible`[](#is_pricing_page_visible "Direct link to is_pricing_page_visible") Controls the visibility of the pricing link for the product. ### `pricing/show_annual_in_monthly`[](#pricingshow_annual_in_monthly "Direct link to pricingshow_annual_in_monthly") By default, the pricing page shows monthly prices. 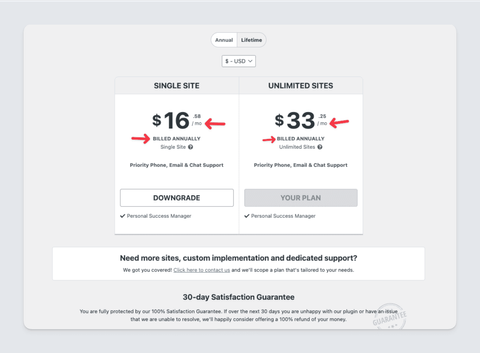 However, this behavior can be changed in the pricing page by including this single line of code in your SDK integration code and the pricing app will show the actual annual amounts. ``` my_fs()->add_filter( 'pricing/show_annual_in_monthly', '__return_false' ); ``` 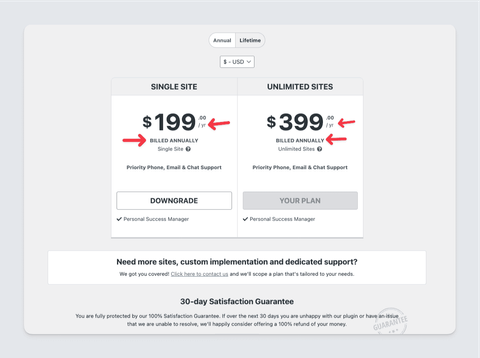 ### `checkout/parameters`[](#checkoutparameters "Direct link to checkoutparameters") Allows you to customize the Checkout with a subset of the options available in the [Checkout JS API](https://freemius.com/help/help/documentation/checkout/freemius-checkout-buy-button/.md). For example, the snippet below enables the refund badge and reviews, and sets the billing cycle selector to a dropdown (bypassing the upsells UI). **Example** ``` my_fs()->add_filter( 'checkout/parameters', function ( $existing_params ) { // You can use the $existing_params to check how the checkout is currently configured. // Everything you return from this callback will override the existing parameters. return [ 'show_refund_badge' => true, 'show_reviews' => true, 'billing_cycle_selector' => 'dropdown', ]; } ); ``` To ensure the core checkout logic is not broken, only a specific set of keys is supported. * [currency](https://freemius.com/help/help/documentation/checkout/freemius-checkout-buy-button/.md#currency) * [default\_currency](https://freemius.com/help/help/documentation/checkout/freemius-checkout-buy-button/.md#default_currency) * [always\_show\_renewals\_amount](https://freemius.com/help/help/documentation/checkout/freemius-checkout-buy-button/.md#always_show_renewals_amount) * [annual\_discount](https://freemius.com/help/help/documentation/checkout/freemius-checkout-buy-button/.md#annual_discount) * [billing\_cycle](https://freemius.com/help/help/documentation/checkout/freemius-checkout-buy-button/.md#billing_cycle) * [billing\_cycle\_selector](https://freemius.com/help/help/documentation/checkout/freemius-checkout-buy-button/.md#billing_cycle_selector) * [bundle\_discount](https://freemius.com/help/help/documentation/checkout/freemius-checkout-buy-button/.md#bundle_discount) * [maximize\_discounts](https://freemius.com/help/help/documentation/checkout/freemius-checkout-buy-button/.md#maximize_discounts) * [multisite\_discount](https://freemius.com/help/help/documentation/checkout/freemius-checkout-buy-button/.md#multisite_discount) * [show\_inline\_currency\_selector](https://freemius.com/help/help/documentation/checkout/freemius-checkout-buy-button/.md#show_inline_currency_selector) - [form\_position](https://freemius.com/help/help/documentation/checkout/freemius-checkout-buy-button/.md#form_position) - [is\_bundle\_collapsed](https://freemius.com/help/help/documentation/checkout/freemius-checkout-buy-button/.md#is_bundle_collapsed) - [layout](https://freemius.com/help/help/documentation/checkout/freemius-checkout-buy-button/.md#layout) - [refund\_policy\_position](https://freemius.com/help/help/documentation/checkout/freemius-checkout-buy-button/.md#refund_policy_position) - [show\_refund\_badge](https://freemius.com/help/help/documentation/checkout/freemius-checkout-buy-button/.md#show_refund_badge) - [show\_reviews](https://freemius.com/help/help/documentation/checkout/freemius-checkout-buy-button/.md#show_reviews) - [title](https://freemius.com/help/help/documentation/checkout/freemius-checkout-buy-button/.md#title) - [show\_monthly](https://freemius.com/help/help/documentation/checkout/freemius-checkout-buy-button/.md#show_monthly) - [show\_upsells](https://freemius.com/help/help/documentation/checkout/freemius-checkout-buy-button/.md#show_upsells) ### `checkout/purchasedCompleted`[](#checkoutpurchasedcompleted "Direct link to checkoutpurchasedcompleted") Add custom JavaScript code to run after the user has successfully made a purchase. For example ``` my_fs()->add_filter('checkout/purchaseCompleted', function () { return <<