
A 5-min step-by-step configuration tutorial to make your iPhone or Android “Cha-Ching!” every time your plugin makes a sale, without any special apps, nor Zapier, using just Gmail. This’ll work whether you are using Freemius, EDD (Easy Digital Downloads), WooCommerce or any other sales solution.
Backstory
A few months ago I participated in WordCamp Toronto and heard my friend Brian Messenlehner, a co-founder & CTO at WebDevStudios, mentioning a very cool feature he had set on his iPhone. Every time they make a sale of one of their plugins, his mobile device makes a Cha-Ching sound. I thought to myself: “Isn’t that awesome?!”.
Why not use apps?
There are a bunch of ‘Ka-Ching’ apps on the App Store and the Google Play market but they all require an email account access using your actual credentials (not an OAuth). Too shady if you ask me. Also, having another app running on my device just for that sound didn’t make sense.
Why not use Zapier or IFTTT?
After doing some online research I found a way to make that automation with Zapier and IFTTT. Zapier’s free plan is limited to 100 automated actions per month. If you make more than 100 sales, you’ll have to pay. IFTTT is free, but after reading the following tutorial, I learned it requires installing additional apps, while Gmail allows setting up a custom sound notifications per label, and that’s enough for creating a platform-agnostic sound notification.
Cha-Ching Sound Notification Steps for Gmail
Just a heads up before you start: this configuration will not work with Google’s Inbox app. If you are using Inbox, you’ll have to install Gmail in parallel.
Also, if following written instructions isn’t your thing, we’ve additionally prepared a cool video guide (scroll down to find it) 🙂 .
-
- Run Gmail on your desktop computer.
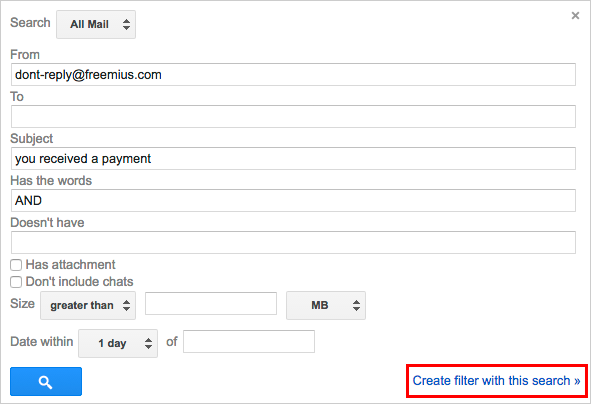
- Type a rule that will match your sales emails in the search box.
For Freemius payment emails, the rule looks like this:
from:([email protected]) AND subject:(you received a payment)If you are selling with EDD or WooCommerce PayPal gateway, the Gmail rule looks like that (both for one-time payments and for automatic renewals):
from:([email protected]) AND (subject:(received payment) OR subject:(automatic payment))If you are selling with EDD or WooCommerce Stripe gateway, the emails rule looks like this:
from:([email protected]) subject:(payment from) Charge - Click enter and you should see all your sale emails in the search results.
- Click on the small arrow next to the search button:

It will open up the filter set up box, just click on the “Create filter with this search” link:


-
- Next, check the “Apply the label:” and select an existing label or create a new label for all the sale emails:
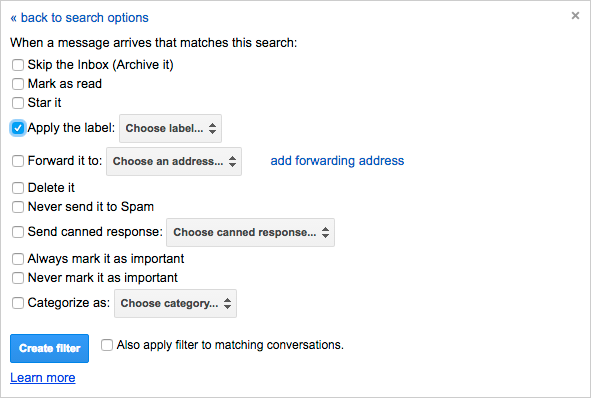
IMPORTANT: Do not use nested labels or labels with “/” in their name, apparently Gmail won’t work in that case (trust me, I wasted an hour figuring this out). Here are a few names you can use for your label:- FS_Payments (for all Freemius payments)
- EDD_Payments (for all EDD payments)
- WC_Payments (for all WooCommerce payments)
- PayPal_Payments (for all PayPal payments)
- Stripe_Payments (for all Stripe payments)
- Click on “Create filter” to finalize the filter creation.
- Launch Gmail on your mobile phone (if it was already running, restart the app).
- Click the hamburger menu icon located at the top left-hand side of the app.

- Next, check the “Apply the label:” and select an existing label or create a new label for all the sale emails:

-
- Scroll to the bottom until you see the “Settings” button and click it.
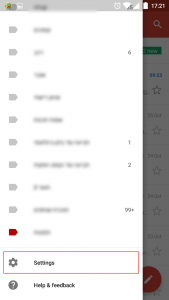
- Scroll to the bottom until you see the “Settings” button and click it.

-
- Click on your email account (the same inbox you used for creating the label).
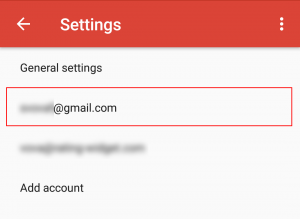
- Click on your email account (the same inbox you used for creating the label).

-
- Make sure the “Notifications” checkbox is checked, otherwise, all notifications will be off.

- Make sure the “Notifications” checkbox is checked, otherwise, all notifications will be off.

-
- Scroll to the bottom till you see the “Manage labels” option and click it.
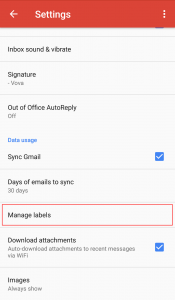
- Scroll to the bottom till you see the “Manage labels” option and click it.

-
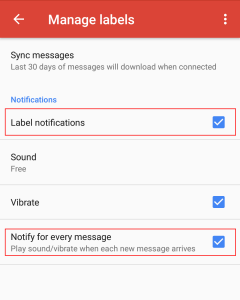
- Scroll down until you find the newly created label, and click it.
- Check the “Label notifications” and “Notify for every message” checkbox.

- While you are still on your mobile device, download the Cha Ching sound from here (Personal Use Only), or Google “cha-ching sound” to find dozens of other versions.
- Now click on the “Sound” button in the label settings.
- At this point, your device will present a list of default sounds to choose from. To be able to browse further and choose your ‘Cha Ching’ sound file you may need to have the ES File Explorer app installed.
- Browse to your ‘Downloads’ folder and select the downloaded mp3 ‘Cha-ching’ file.
- Done!
You can repeat those steps to set up custom sound notifications for different plans, or even add an “Oh no” sound notifications when someone cancels a subscription.
If you have any other cool ideas for custom sound notifications, share them with us in the comments below.
Happy cha-chinging!


Thanks! Using EDD and Paypal and the subject is "Notification of payment received" with email [email protected] .
HAHA! Can't figure out how to set it on iPhone! Any screenshots?
It's my bad, I assumed the iPhone Gmail app will be the same as on Android. We deleted the "iPhone" mention but doing some research to see if it's possible to achieve that solo with Gmail on iPhone devices as well. In the meanwhile, you can have it set for iPhone with IFTTT from this article.
An alternative is using the Pushover app, which is a standalone iOS/Android application that can receive notifications without any access to your email account. EDD has a plugin available which is super quick to setup, but otherwise could setup an API call. Well worth it for the cha-ching :)
Hey,
Thanks for this I've been trying to do this for years!!
Great for motivation.
I thought I would just add that I had to download ES File Explorer to be able to choose the sound file.
Thanks again :)
You're correct, of course (that's step #17) :)