Checkout with the TypeScript Node.js SDK
The freemius.checkout namespace is designed to facilitate various methods for producing checkout options and links from the backend. It provides a set of methods to create and manage checkout processes for your product, supporting the generation of checkout links, overlay options, sandbox testing, and processing redirects.
Creating Checkout Options or Links
Use the freemius.checkout.create method to start creating a checkout option or link. The create method includes several convenient configuration options. For example:
const checkout = await freemius.checkout.create({
  user: { email: '[email protected]', name: 'Jane Doe' },
  planId: '1234',
});
This returns a Checkout instance, which you can further customize.
checkout.setAffiliate(1234).setTrial('paid').setCoupon({ code: 'SAVE10' });

const link = checkout.getLink();
console.log('Customized Checkout Link:', link);
Generating Checkout Options
Use the getOptions method to generate checkout options for embedding in your application.
const options = checkout.getOptions();
console.log('Checkout Options:', options);
The checkout options are configuration objects that can be passed directly to the Freemius Overlay Checkout. Here is an example demonstrating how to use them in frameworks like Next.js with our CheckoutProvider component, which is included in the React Starter Kit.
import { CheckoutProvider } from '@/saas-starter/components/checkout-provider';
import { CheckoutPricingTable } from '@/components/checkout-pricing-table';
import { freemius } from '@/lib/freemius';

export default async function CheckoutPage() {
  const checkout = await freemius.checkout.create({
    user: { email: '[email protected]', name: 'Jane Doe' },
    planId: '1234',
  });

  // Pass the options to the client component
  return (
    <CheckoutProvider checkout={checkout.serialize()}>
      <CheckoutPricingTable />
    </CheckoutProvider>
  );
}
'use client';

import { useCheckout } from '@/saas-starter/hooks/checkout';

export function CheckoutPricingTable() {
  const checkout = useCheckout();

  return <Button onClick={() => checkout.open()}>Subscribe Now</Button>;
}
Please be mindful of how you pass the configuration object from the backend to the front end. The Freemius SDK holds sensitive information that should not be exposed to the client side. Always use the .serialize() method to filter out any sensitive data before passing it to the client.
Generating Checkout Links
You can also generate a direct checkout link using the getLink method:
const link = checkout.getLink();
console.log('Checkout Link:', link);
Generating Sandbox Links or Options
When testing your checkout flow, you can use sandbox mode to simulate transactions without affecting your live environment. To enable sandbox mode, use the isSandbox option in the create method.
const checkout = await freemius.checkout.create({
  isSandbox: true,
  user: { email: '[email protected]', name: 'Test User' },
  planId: '1234',
});
console.log('Sandbox Checkout Options:', checkout.getOptions());
Retrieving Sandbox Parameters
For more advanced testing, you can retrieve sandbox parameters directly using the getSandboxParams method. This method generates a secure token for sandbox transactions.
const sandboxParams = await freemius.checkout.getSandboxParams();
checkout.setSandbox(sandboxParams);

console.log('Sandbox Link:', checkout.getLink());
Sandbox mode is intended for testing purposes only and should not be used in production environments.
Processing Redirects
If you use the hosted checkout, you can use redirects to return users to your application after they complete the checkout process.
The Freemius SDK provides an easy way to handle these redirects using the processRedirect method. This method verifies the redirect URL and extracts relevant information about the checkout session.
const redirectInfo = await freemius.checkout.processRedirect(currentUrl);

if (redirectInfo) {
  console.log('Redirect Info:', redirectInfo);
  // Handle successful checkout
} else {
  console.error('Invalid or missing redirect info');
  // Handle errors or incomplete checkout
}
The method will return a RedirectInfo object only when it is able to verify the signature and URL parameters. The object will contain a licenseId property, which you can use to fetch the full purchase details.
Fixing Proxy URLs
In most Node.js applications, the app itself typically uses URLs like http://localhost:3000, while it is served to the end user as https://yourdomain.com through some type of proxy. As a result, the app always sees its own URL as http://localhost:3000 and not the actual URL the user is viewing.
This can cause issues when trying to verify redirects. Freemius signs the https://yourdomain.com URL, but your app is trying to verify the http://localhost:3000 URL.
To solve this, the processRedirect method accepts an optional second parameter where you can pass the proxy URL. Here are some examples of how to do this in different frameworks.
- Express
- Next.js (App Router)
app.get('/process-purchase', function (req, res) {
  const currentUrl = `${req.protocol}://${req.get('host')}${req.originalUrl}`;
  const proxyUrl = 'https://yourdomain.com'; // The actual URL seen by the user

  const redirectInfo = await freemius.checkout.processRedirect(
    currentUrl,
    proxyUrl
  );

  if (redirectInfo) {
    console.log('Redirect Info:', redirectInfo);
    // Handle successful checkout
  } else {
    console.error('Invalid or missing redirect info');
    // Handle errors or incomplete checkout
  }
});
export async function GET(request: Request) {
  const currentUrl = request.url;
  const proxyUrl = 'https://yourdomain.com'; // The actual URL seen by the user

  const redirectInfo = await freemius.checkout.processRedirect(
    currentUrl,
    proxyUrl
  );

  if (redirectInfo) {
    console.log('Redirect Info:', redirectInfo);
    // Handle successful checkout
  } else {
    console.error('Invalid or missing redirect info');
    // Handle errors or incomplete checkout
  }
}
Under-the-hood the SDK takes care of parsing the URL and verifying the signature for you.
Handling Upgrade Flow
Once users have an active subscription, you may want to provide an upgrade path to a higher‑tier plan.
To do this, you need to create an authorized checkout instance that includes the user's existing licenseId.
You can generate an upgrade checkout link or options by supplying the associated licenseId when creating the checkout instance.
// Get the stored entitlement of the user which would have the licenseId
const entitlement = getUserEntitlement();

const checkoutUpgrade = await freemius.checkout.create({
  licenseId: entitlement.licenseId,
  planId: 'upgraded-plan-id',
});

const upgradeLink = checkoutUpgrade.getLink();
This opens Freemius Checkout in the context of an upgrade, allowing the user to seamlessly upgrade the existing subscription.
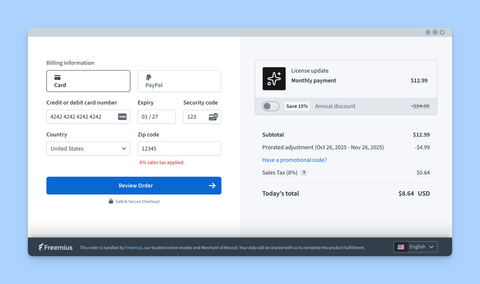
Notice that, when upgrading, Checkout automatically handles proration and billing adjustments based on the user's current subscription. It also no longer asks for user details such as email or name, since these are already known from the existing subscription.
By default, Freemius restricts users to a single active subscription (unless you configure otherwise).
The React Starter Kit includes a Customer Portal the comes with built-in support for handling upgrades.
Getting Pricing Information
To retrieve the pricing information for your product, you can use the freemius.pricing namespace. This is useful for displaying pricing tables or options on your site.
async function fetchPricing() {
  return await freemius.pricing.retrieve();
}
The React Starter Kit can be fed this data to display a pricing table.