Create API Endpoints needed for the React Starter Kit
After properly integrating licensing and entitlements into your JavaScript application, you can now explore how to create the necessary API endpoints for the React Starter Kit.
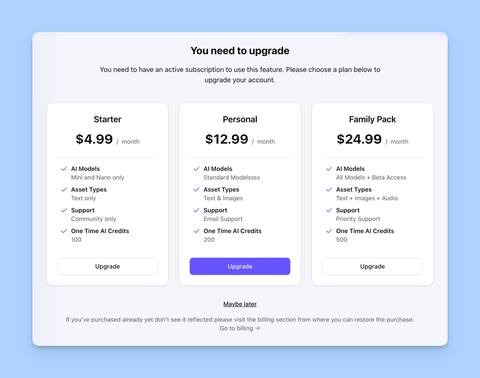
The React Starter Kit allows you to quickly set up Checkouts, Paywalls, and the Customer Portal in your React application. However, to accomplish this, you need to create a few API endpoints that will handle communication between your frontend and the Freemius servers.
Setting Up the Checkout Endpoint
You need to create an endpoint at /api/checkout to handle Checkout processing. The responsibilities of this endpoint include:
- Provide a backend API for the Overlay Checkout to process the purchase immediately.
- Provide a redirection endpoint for the Hosted Checkout to process the purchase and redirect the user back to our application.
- Provide API endpoint for data retrieval for various Pricing Table components.
For this, you will need a method named processRedirect that calls the relevant functions from the SDK to retrieve authenticated purchase information and update the user's entitlement in your database. Place this method in the same user-entitlement.ts file you created earlier.
import { CheckoutRedirectInfo } from '@freemius/sdk';

export async function processRedirect(
  info: CheckoutRedirectInfo
): Promise<void> {
  const purchaseInfo = await freemius.purchase.retrievePurchase(
    info.license_id
  );

  if (purchaseInfo) {
    await processPurchaseInfo(purchaseInfo);
  }
}
Once you have that, you can create the actual endpoint. Below is an example of how to do this in a serverless function using the Fetch API. You can adapt it to your framework's routing and request handling mechanism.
/**
 * This route handles the Purchase actions and sync actions coming from the Freemius React Starter Kit.
 */
import { freemius } from '@/lib/freemius'; // our freemius instance
import { processPurchaseInfo, processRedirect } from '@/lib/user-entitlement';

export default {
  async fetch(request: Request) {
    return await freemius.checkout.request.process(
      {
        onPurchase: processPurchaseInfo,
        proxyUrl: process.env.PUBLIC_AP_URL!,
        onRedirect: processRedirect,
        afterProcessUrl: process.env.PUBLIC_AP_URL! + '/billing',
      },
      request
    );
  },
};
This endpoint will now handle both Overlay Checkout and Hosted Checkout redirections. Here are the details about the options passed to the freemius.checkout.request.process method:
onPurchase: A callback function that is called when a purchase is made through the Overlay Checkout. Pass yourprocessPurchaseInfofunction to handle the purchase information and update the user's license in your database. The React Starter Kit calls this endpoint with the appropriate data when a purchase is made through the Overlay Checkout.proxyUrl: The public URL of your application. Read more about it here.onRedirect: A callback function that is called when a user is redirected back to your application after a purchase through the Hosted Checkout.afterProcessUrl: The URL where the user will be redirected after the purchase has been processed. In this case, users are redirected to the/billingpage of your application.
Managing Responses After Redirection
The SDK also allows you to customize the response after processing the Hosted Checkout redirection. You can do this by returning a Promise<Response> from the onRedirect callback function. Here is an example:
export async function processRedirect(
  info: CheckoutRedirectInfo
): Promise<Response> {
  const purchaseInfo = await freemius.purchase.retrievePurchase(
    info.license_id
  );

  if (purchaseInfo) {
    await processPurchaseInfo(purchaseInfo);
  }

  // Redirect the user to the billing page after processing the purchase
  return Response.redirect(process.env.PUBLIC_AP_URL! + '/billing', 302);
}
Now, you do not need to specify the afterProcessUrl option in the freemius.checkout.request.process method since you are handling the redirection yourself. Using the same approach, you can also render a custom HTML response or return JSON data if needed.
Setting Up the Customer Portal Endpoint
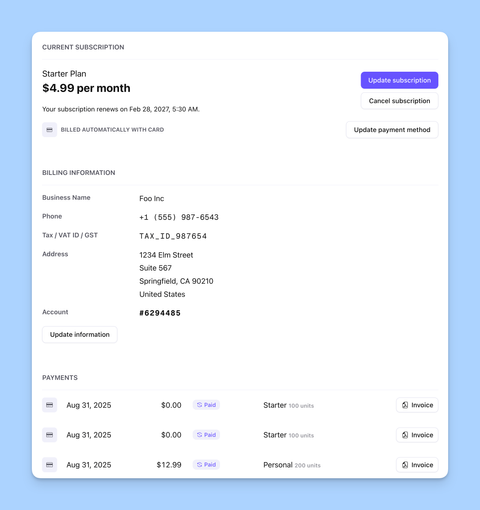
You will need another endpoint at /api/portal to handle Customer Portal access. The React Starter Kit includes an embeddable Customer Portal component, allowing you to display the Customer Portal directly within your application without redirecting users to a different page.
The component requires a backend API to retrieve data and process various actions. The responsibilities of this endpoint include:
- Retrieve the currently logged in user's purchase data.
- Provide secure links for various actions such as:
- Downloading invoices.
- Updating payment methods.
- Canceling subscriptions.
- Updating billing information.
- Provide a way to restore purchases if needed.
To implement this endpoint, you need a method in your application that informs the Freemius JS SDK about the currently logged-in user. Create a method named getFsUser that returns the user's email address, Freemius User ID, and other relevant information. This is important because the Customer Portal needs to know which user's data to retrieve and manage.
Place this method in the same user-entitlement.ts file, and use the getUserEntitlement method you created earlier to obtain the user's entitlement information.
Your application will typically have its own authentication and user management system, so the exact code may differ. In this example, the application uses better-auth, and the methods provided by it.
import { auth } from '@/lib/auth';
import { UserRetriever } from '@freemius/sdk';

/**
 * Get the Freemius user for the current session.
 *
 * This is used by the Freemius SDK to identify the user.
 *
 * @returns The Freemius user or null if the user is not logged in.
 */
export const getFsUser: UserRetriever = async () => {
  const session = await auth.api.getSession({
    headers: await headers(),
  });

  const entitlement = session
    ? await getUserEntitlement(session.user.id)
    : null;
  const email = session?.user.email ?? undefined;

  return freemius.entitlement.getFsUser(entitlement, email);
};
Now you can create the actual endpoint. Below is an example of how to do this in a serverless function using the Fetch API. You can adapt it to your framework's routing and request handling mechanism.
import { freemius } from '@/lib/freemius';
import { getFsUser, processPurchaseInfo } from '@/lib/user-entitlement';

export default {
  async fetch(request: Request) {
    return await freemius.customerPortal.request.process(
      {
        getUser: getFsUser,
        portalEndpoint: process.env.NEXT_PUBLIC_APP_URL! + '/api/portal',
        isSandbox: process.env.NODE_ENV !== 'production',
        onRestore: freemius.customerPortal.createRestorer(processPurchaseInfo),
      },
      request
    );
  },
};
The following options are available for the freemius.customerPortal.request.process method:
getUser: A function that returns the currently logged-in Freemius user. The SDK uses this to identify which user's data to retrieve and manage. Pass yourgetFsUserfunction here.portalEndpoint: The public URL of your Customer Portal endpoint. The SDK uses this to create authenticated links for various actions within the Customer Portal.isSandbox: A boolean indicating whether the application is running in a sandbox (development) environment. This is useful for testing purposes.onRestore: A callback function that is called when a user attempts to restore their purchases. Here, we use the helper methodfreemius.customerPortal.createRestorerto create a restorer function that uses our existingprocessPurchaseInfomethod to update the user's license in our database.
This covers everything you need to set up the required API endpoints to use the React Starter Kit in your application. You can now proceed to implement the frontend components as described in the React Starter Kit guide.
If you are using a specific framework, please check our dedicated Framework Guides for more tailored instructions and examples.
How the Purchase Restorer Works
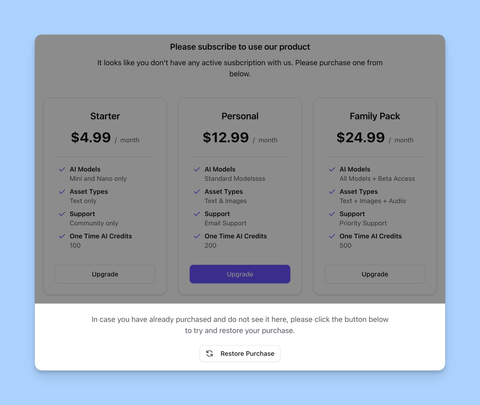
If the getFsUser function returns only an email address (for example, in cases where you do not have any Freemius license or purchase information in your local database), the Customer Portal will display a "Restore Purchases" button. When the user clicks this button, the onRestore callback function is triggered.
This function accepts a callback that can process an array of PurchaseInfo objects. Behind the scenes, the SDK will query the Freemius API to fetch all purchases associated with the provided email address.
Using this information, you can then update your local database with the relevant license and purchase details. In our example, we use the existing processPurchaseInfo method to handle this.
Since processPurchaseInfo handles a single PurchaseInfo object, we use the helper method freemius.customerPortal.createRestorer, which takes care of iterating over the array of purchases and calling our method for each one.
What's Next?
Please head over to the React Starter Kit guide to learn how to use the React components provided in the kit to create Checkouts, Paywalls, and the Customer Portal in your application.
Or continue with this series to learn more about different functionalities of the SDK.