|
|
Hosting a plugin on the WordPress.org repository is one of the most popular (and effective) ways of kickstarting a successful freemium business. If it’s your first time submitting a plugin to the repository, some of the steps may be unclear or confusing, which is why I’ve outlined the process to guide you. I’d also recommend bookmarking this page if you need to reference it in the future.
Preparing for Submission
First off, you need to get approval from the plugin review team to host your product on the repository. For that, you need to have an account on WordPress.org. Don’t have one? No worries — you can register here.
Creating the Plugin’s Readme.txt File
Next, you need to create a markdown-formatted readme.txt file that will be used for your plugin’s listing page on WordPress.org. It needs to contain the following information:
- Plugin name
- Contributors (your WordPress.org user ID)
- Plugin tags
- Requires at least (WordPress version)
- Tested up to (WordPress version)
- Stable tag (plugin version)
- License (GPLv2 or later)
- License URI: www.gnu.org/licenses/gpl-2.0.html
- Description (full-length description of your plugin)
- FAQs
- Screenshots
- Changelog
For reference, here is a standard readme.txt file template.
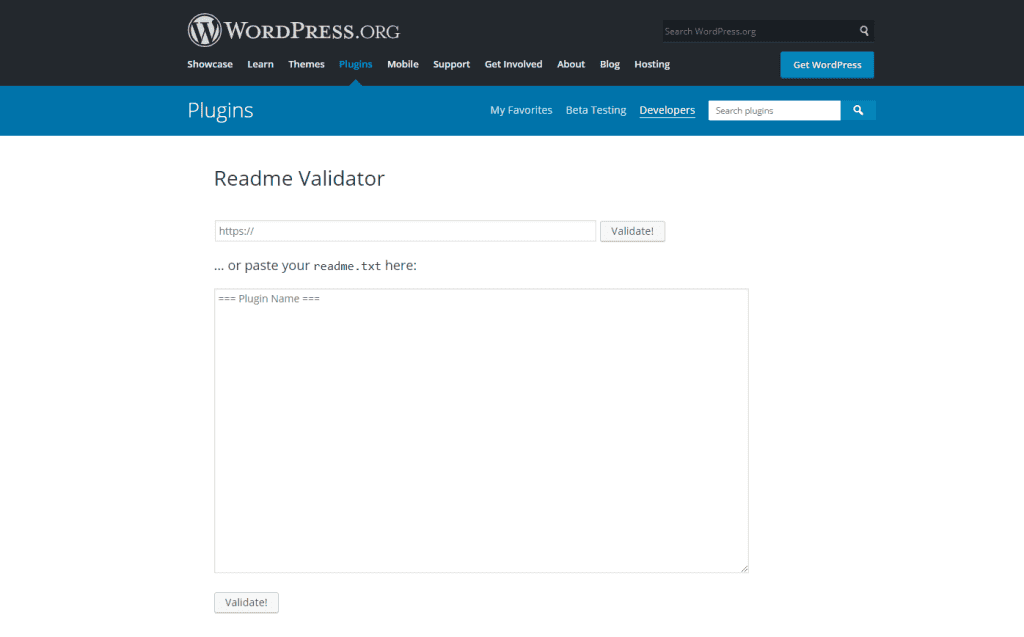
To ensure you’ve formatted and structured your plugin’s readme.txt file correctly, use the WordPress Readme Validator.
Choose Your Plugin Name Carefully
It is important you take the time to choose the “right” plugin name before the initial submission as it is going to impact your plugin’s listing URL, which impacts your WordPress.org listing’s SEO and eventually the plugin’s organic exposure and growth.
Here’s the relevant section covering the name’s impact from the plugin submission page:
Your plugin’s URL will be populated based on the value of Plugin Name in your main plugin file (the one with the plugin headers). If you set yours as Plugin Name: Boaty McBoatface then your URL will be https://wordpress.org/plugins/boaty-mcboatface and your slug will be boaty-mcboatface for example. If there is an existing plugin with your name, then you will be boaty-mcboatface-2, and so on. It behaves exactly like WordPress post names.
So when you choose the initial name, think about optimizing it for SEO rather than branding. Ask yourself what keywords you’d like to target and extrapolate the name out of it. You can find some naming tips here.
Remember, you can always change the plugin’s name after the initial submission – so even if you choose a name you don’t like, you can change it later on (and as many times as you wish). What you can’t change is the plugin’s slug, therefore, the initial naming is important.
Also notice that the slug is created out of the plugin name in your main plugin file, which can be different from the plugin name value in the readme.txt file.
Submitting Your Plugin
Once you settle on a good SEO name — and your plugin and readme.txt file are ready — head over to the Add Your Plugin page and submit it for review.
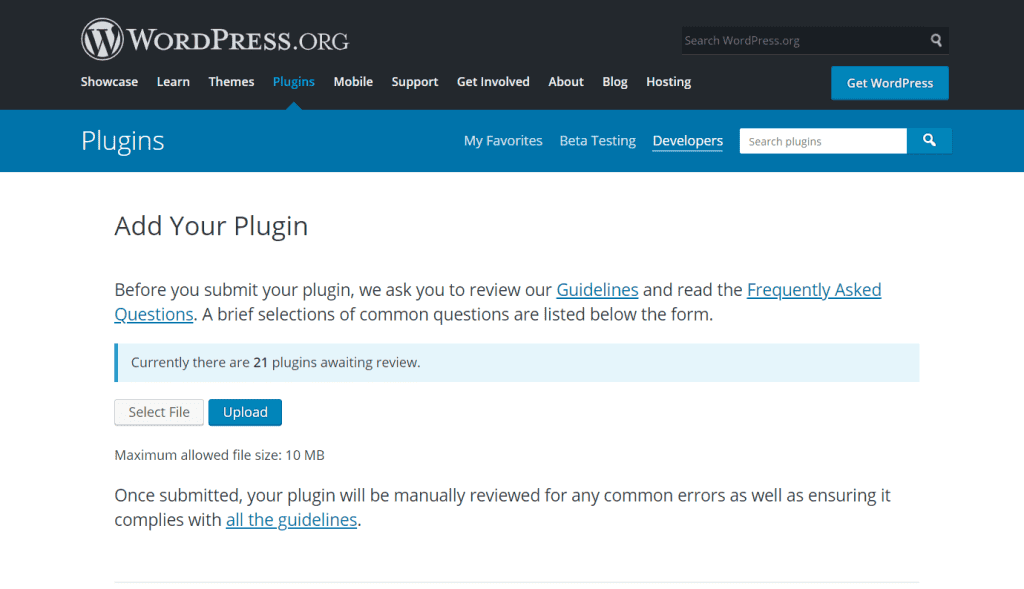
The review process is manual, and it can take anywhere from 1 to 10 days, depending on the review queue and the complexity of your plugin. If any issues are found, you’ll receive an email detailing said issues and how you can fix them.
Once the problems have been resolved (if there are any), you’ll receive approval via email. Your plugin is not public at this point, but you can still upload, edit, and delete files via the command line or an SVN client.

Tip: To make sure you don’t miss important emails, I recommend whitelisting [email protected], the email address that is used by the WordPress.org plugins review team for communication with plugin developers.
Uploading the Plugin
Now that you’ve been granted access to the SVN repository, the next step is to upload your plugin to the WordPress.org repository. Before you do, we recommend that you familiarize yourself with the basics of using Subversion with WordPress.
I’m going with the command-line interface for this tutorial. If you’re not a fan of it and prefer working with a visual client, consider TortoiseSVN for Windows and Cornerstone for Mac.
Before you can upload the plugin files to the SVN repository, you need to create a local folder where the files and assets will be stored. This command will create a local directory:
$ mkdir my-awesome-plugin
For consistency, it’s a good practice to name the folder and the plugin’s main PHP file according to the slug you were assigned after the initial submission. In this example, I assume your plugin’s name is My Awesome Plugin and your approved slug is my-awesome-plugin.
Now, to see and download the prebuilt repository:
$ svn checkout https://plugins.svn.wordpress.org/my-awesome-plugin local/path/to/my-awesome-plugin
This will give the following return:
A my-awesome-plugin/branches
A my-awesome-plugin/tags
A my-awesome-plugin/trunk
Checked out revision #####
Here, A means that the directories have been added to the local folder from the central repository. Next, you need to copy your plugin’s files and folders into the trunk folder:
$ rsync -r local/path/to/wordpress/wp-includes/plugins/my-awesome-plugin/* local/path/to/my-awesome-plugin/trunk
And add them to the repository.
$ svn add trunk/*
In return, you’ll be asked to authenticate yourself. Once you are logged in, you’ll get a response that will look something like this:
A trunk/my-awesome-plugin.php
A trunk/readme.txt
Important: WordPress.org treats the trunk folder as your plugin’s top-level folder. Therefore, do not copy the entire plugin folder as is, the trunk should only include the plugin’s contents.
Avoid this: trunk/my-awesome-plugin/my-awesome-plugin.php
After adding all of the files, commit the changes back to the central repository:
$ svn commit -m 'My first plugin version'
This will return the following response:
Adding trunk/my-awesome-plugin.php
Adding trunk/readme.txt
Transmitting file data.
Committed revision 9999999.
To upload a plugin icon, banner, and screenshots, you can create a new assets folder within your SVN local repository:
$ mkdir local/path/to/my-awesome-plugin/assets
You can learn how plugin assets work here.
Once you have your assets ready, add the plugin assets to the SVN repository:
$ svn add assets/*
Commit the changes again:
$ svn commit -m 'Assets upload'
That’s it! Your plugin is now available for download and you can start promoting it.
Publishing a New Release
For your plugin’s next update release, the steps are slightly different. Before you publish the new release, update the Stable Tag field in the trunk/readme.txt file and the version number in the plugin header comment. Once you have your plugin files ready, copy them to a subfolder of /tags and set the subfolder’s name to the new version, such as 1.0.1.
$ svn copy trunk tags/1.0.1

  A tags/1.0.1
Commit the changes.
$ svn commit -m 'Version 1.0.1 release'

  Adding tags/1.0.1
  Adding tags/1.0.1/my-awesome-plugin.php
  Adding tags/1.0.1/readme.txt
  Committed revision 999999.
And just like that, your plugin’s new version is ready!
Release Management Tips
- You may notice some delay from the moment of releasing a new version and when it becomes available for download on your WordPress.org plugin listing page. Give it a few hours, and if you still don’t see it you can email [email protected] as the system does have issues from time to time.
- As a rule of thumb, to reduce syncing issues, it’s recommended that the plugin version in your
trunkfolder is identical to the plugin version in your latest version in thetagsfolder.
What’s Next?
By nature, developers of free plugins are driven by and passionate about contributing things that are useful to the world. Above all, we want our products to solve specific problems that people may have. But regardless of how great your plugin is, it won’t be of much help if people can’t find it.
A good next step for enhancing the visibility of your free plugin is to optimize the readme.txt file for SEO, which is something we explore here.
If you are thinking of making money from your plugin, it isn’t enough to have your product online for free — you want people to discover it, use it, love it, and (hopefully) upgrade to your paid version! Nowadays, a WordPress developer wears many hats, from product maker to business owner to marketer, and to get your plugin seen by the right people you need to develop and refine your marketing skills.
Which is a subject we explore in-depth with our Marketing Handbook for WordPress Product Makers. I also highly recommend checking out the below cheat sheet for selling WordPress plugins and themes — it’s a concise, actionable roadmap for creating a successful WordPress business, from ideation to launch to growth.
Grab a free copy of our Cheat Sheet for
Selling Plugins and Themes
A growth roadmap with concise, actionable tips for every milestone of WordPress product development.

Are you planning to submit a plugin to the WordPress.org repository? Are you thinking about using the freemium business model? Sound off in the comments below!