Using the Freemius Checkout JS SDK to Embed the Overlay Checkout
This guide covers basic and advanced usage of the Freemius Checkout JavaScript SDK.
Basic Usage
First, ensure that you've already installed the SDK and have the checkout instance ready.
Quick refresher on how to create the instance
- CDN
- NPM
<script
  type="text/javascript"
  src="https://checkout.freemius.com/js/v1/"
></script>

<script type="text/javascript">
  const checkout = new FS.Checkout({
    product_id: '1234',
  });
</script>
import { Checkout } from '@freemius/checkout';

const checkout = new Checkout({
  product_id: '1234',
});
Here is an example where we open the checkout popup when a user clicks a button.
Starting with a simple HTML button:
<select id="licenses">
  <option value="1" selected="selected">Single Site License</option>
  <option value="2">2-Site License</option>
  <option value="unlimited">Unlimited Sites License</option>
</select>
<button id="purchase">Buy Button</button>
Add the JavaScript code to handle the button click and open the checkout popup:
function getSelectedLicenses() {
  return document.querySelector('#licenses').value;
}

document.querySelector('#purchase').addEventListener('click', (e) => {
  e.preventDefault();

  checkout.open({
    name: 'My Awesome Product',
    licenses: getSelectedLicenses(),
    purchaseCompleted: (response) => {
      console.log('Purchase completed:', response);
    },
    success: (response) => {
      console.log('Checkout closed after successful purchase:', response);
    },
  });
});
This will open the Freemius Checkout popup when the user clicks the "Buy Button", using the selected number of licenses.
The exact code can be found under the Advanced Examples section below.
API
Both the constructor and the open method accept the official set of options supported by Freemius. You can also pass additional options as needed.
The open method
To display the checkout popup, use checkout.open();.
checkout.open({
  // plan
  plan_id: 9999,
  // number of sites
  licenses: 1,
  // billing cycles
  billing_cycle: 'annual',
});
The open() method returns a Promise that resolves when the
popup actually opens.
In most use cases, this is immediate, but if you call open() when document.body is not yet available (for example, directly from a script in the head), it will wait for the DOM to be ready before opening the popup.
If you need to perform an action immediately after the popup opens, you can await the promise:
async function main() {
  await checkout.open({
    plan_id: 9999,
    licenses: 1,
    billing_cycle: 'annual',
  });

  console.log('Checkout popup is now open');
}
The close method
To close the checkout popup programmatically, use checkout.close();.
Here's an example of closing the popup when navigating away in a single-page application (SPA) using some router:
$router.on('beforeRouteLeave', (to, from, next) => {
  checkout.close();
  next();
});
For backward compatibility, we also have a destroy method that behaves the same as close.
Additional options
In addition to the standard options, which are performed on the side of Freemius, the SDK also supports additional options that affect the behavior of the SDK itself.
Optional callback to trigger on exit intent. This is called only when the checkout iFrame is shown, not on global exit intent.
The URL of the image to display while the checkout is loading. By default a loading indicator from Freemius will be used.
The alt text for the loading image. By default 'Loading Freemius Checkout' will be used.
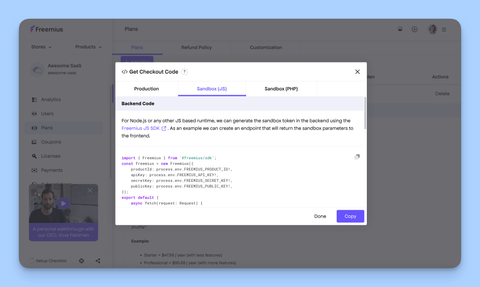
Sandbox Testing
To test the Freemius Checkout JavaScript SDK in the sandbox development environment, you need to generate a sandbox object. These values authenticate your requests in the sandbox environment.
To generate the required values:
- Go to the Freemius Developer Dashboard.
- Under Plans, click the "Get Checkout" button.
- Choose the "Overlay code" option.
- Open the Sandbox tab.
- Copy the code to generate the
sandboxobject and output them for the JavaScript to use.
Now you can use the generated sandbox object when creating the Checkout instance or calling the open method.
import { Checkout } from '@freemius/checkout';

const sandbox = await fetchSandboxObjectSomehow();

const checkout = new Checkout({
  product_id: '0001',
  sandbox, // <-- pass the sandbox object here
});
Use this only during development, and never publish the token and
context in production. You can use an .env file to store sandbox data.
You can use the generateSandboxParams method to generate the sandbox object easily.
Payment Update Flow (Dunning)
If you have enabled
custom URL for the Payment Recovery Flow
from the Developer Dashboard, call the restoreDunningIfPresent()
function to restore the dunning flow if it was previously initiated.
import { restoreDunningIfPresent } from '@freemius/checkout';

restoreDunningIfPresent();
Call restoreDunningIfPresent() as early as possible, typically on page load, to ensure the dunning flow is restored when needed.
The method returns a Promise that resolves to the Checkout instance if the
dunning flow was restored, or null if there was no dunning flow to restore.
If you are using the hosted CDN version, the dunning flow is automatically restored for you, so you do not need to call this function manually.
Listening for payment method update events
The restoreDunningIfPresent function accepts an optional object with
event handlers:
import { restoreDunningIfPresent } from '@freemius/checkout';

restoreDunningIfPresent({
  track(event, data) {
    console.log('Payment Method Update Event:', data, event);
  },
  success(data) {
    console.log('Payment Method Update Success:', data);
  },
});
If you are using the hosted CDN version, you can use the
paymentMethodUpdateEvents property on the FS global object, for example:
window.FS.paymentMethodUpdateEvents = {
  track(event, data) {
    console.log('Payment Method Update Event:', data, event);
  },
  success(data) {
    console.log('Payment Method Update Success', data);
  },
};
All the events from the CheckoutPopupEvents are supported.
Set this property before including the CDN script.
<script>
  window.FS = window.FS || {};
  window.FS.paymentMethodUpdateEvents = {
    track: (...args) => {
      console.log('Payment Method Update Event:', ...args);
    },
  };
</script>
<script src="https://checkout.freemius.com/js/v1/"></script>
Example usage with React
You can use our official React Starter Kit to integrate the Checkout JS SDK into your React applications.
Alternatively, you can manually integrate the SDK into your React app as follows:
Start by creating a small React hook, assuming the product_id is available in
some environment variable.
import { Checkout, CheckoutOptions } from '@freemius/checkout';
import { useState, useEffect } from 'react';

export const checkoutConfig: CheckoutOptions = {
  product_id: import.meta.env.VITE_FS_PLUGIN_ID as string,
};

export function useCheckout() {
  // create a Checkout instance once
  const [checkout] = useState<Checkout>(() => new Checkout(checkoutConfig));

  useEffect(() => {
    // close and destroy the DOM related stuff on unmount
    return () => {
      checkout.destroy();
    };
  }, [checkout]);

  return checkout;
}
Now, use it in your component.
import React from 'react';
import { useCheckout } from './checkout.ts';

export default function App() {
  const checkout = useCheckout();

  return (
    <button
      onClick={(e) => {
        e.preventDefault();
        checkout.open({
          plan_id: 1234,
          licenses: 1,
          billing_cycle: 'annual',
          success: (data) => {
            console.log(data);
          },
        });
      }}
    >
      Buy Plan
    </button>
  );
}
Advanced Examples
Here are some advanced usage examples:
Buy Button Code for a Multi-Plans Pricing Table
- HTML
- JavaScript
- CSS
<div class="container">
  <h1>Simple Pricing</h1>
  <p class="subtitle">Choose the plan that works best for you</p>

  <div class="license-section">
    <label class="license-label">Licenses</label>
    <select id="license-select" class="license-select">
      <option value="1">1 Site</option>
      <option value="5">5 Sites</option>
      <option value="10">10 Sites</option>
      <option value="0">Unlimited Sites</option>
    </select>
  </div>

  <div class="pricing-grid">
    <div class="plan">
      <h2 class="plan-name">Starter</h2>
      <span style="font-size: 1rem;">from</span>
      <div class="plan-price">$8.99</div>
      <div class="plan-period">per month</div>
      <ul class="plan-features">
        <li>Basic features</li>
        <li>Email support</li>
        <li>Community access</li>
      </ul>
      <button class="plan-button" data-plan-id="379">Get Started</button>
    </div>

    <div class="plan">
      <h2 class="plan-name">Pro</h2>
      <span style="font-size: 1rem;">from</span>
      <div class="plan-price">$12.99</div>
      <div class="plan-period">per month</div>
      <ul class="plan-features">
        <li>Advanced features</li>
        <li>Priority support</li>
        <li>API access</li>
      </ul>
      <button class="plan-button" data-plan-id="380">Get Started</button>
    </div>

    <div class="plan">
      <h2 class="plan-name">Business</h2>
      <span style="font-size: 1rem;">from</span>
      <div class="plan-price">$30.00</div>
      <div class="plan-period">per month</div>
      <ul class="plan-features">
        <li>All features</li>
        <li>24/7 support</li>
        <li>Dedicated account</li>
      </ul>
      <button class="plan-button" data-plan-id="384">Get Started</button>
    </div>
  </div>
</div>
const checkout = new FS.Checkout({
  product_id: '2',
});

const licenseSelect = document.getElementById('license-select');

document.querySelectorAll('.plan-button').forEach((button) => {
  button.addEventListener('click', function (e) {
    e.preventDefault();
    const planId = this.getAttribute('data-plan-id');
    const licenses = licenseSelect.value;
    checkout.open({
      plan_id: planId,
      licenses: licenses,
      billing_cycle: 'monthly',
    });
  });
});
:root {
  --e-global-color-primary: #6753ff;
  --e-global-color-secondary: #902af5;
  --e-global-color-text: #0e0e0e;
  --e-global-color-accent: #e62a97;
  --e-global-color-scale: #6753ff;
  --e-global-color-scale-light: #8491ff;
  --e-global-color-grow: #902af5;
  --e-global-color-launch: #e62a97;
  --e-global-color-cloud: #b4d2ff;
  --e-global-color-mint: #b7ffe1;
  --e-global-color-lovely: #fed6ff;
  --e-global-color-banana: #ffe896;
  --e-global-color-ice: #ffffff;
  --e-global-color-fog: #f0f0fa;
  --e-global-color-rain: #c6c6d0;
  --e-global-color-shark: #94949c;
  --e-global-color-grey: #4f4f4f;
  --e-global-color-darker: #393940;
  --e-global-color-darkest: #202024;
  --e-global-color-night: #0e0e0e;
}

* {
  margin: 0;
  padding: 0;
  box-sizing: border-box;
}

body {
  font-family:
    -apple-system, BlinkMacSystemFont, 'Segoe UI', Roboto, sans-serif;
  background: linear-gradient(
    135deg,
    var(--e-global-color-fog) 0%,
    var(--e-global-color-ice) 100%
  );
  padding: 60px 20px;
  min-height: 100vh;
  color: var(--e-global-color-text);
}

.container {
  max-width: 1000px;
  margin: 0 auto;
}

h1 {
  text-align: center;
  font-size: 2.5rem;
  margin-bottom: 20px;
  color: var(--e-global-color-text);
  font-weight: 300;
}

.subtitle {
  text-align: center;
  color: var(--e-global-color-shark);
  margin-bottom: 60px;
  font-size: 1.1rem;
}

.pricing-grid {
  display: grid;
  grid-template-columns: repeat(auto-fit, minmax(300px, 1fr));
  gap: 30px;
}

.plan {
  background: white;
  padding: 40px 30px;
  border-radius: 12px;
  box-shadow: 0 2px 12px rgba(0, 0, 0, 0.08);
  transition: all 0.3s ease;
  text-align: center;
}

.plan:hover {
  box-shadow: 0 8px 24px rgba(103, 83, 255, 0.2);
  transform: translateY(-4px);
}

.plan-name {
  font-size: 1.4rem;
  font-weight: 500;
  margin-bottom: 15px;
  color: var(--e-global-color-text);
}

.plan-price {
  font-size: 2.5rem;
  font-weight: 300;
  color: var(--e-global-color-primary);
  margin-bottom: 5px;
}

.plan-period {
  color: var(--e-global-color-shark);
  font-size: 0.9rem;
  margin-bottom: 30px;
}

.plan-features {
  list-style: none;
  margin-bottom: 30px;
  text-align: left;
}

.plan-features li {
  padding: 10px 0;
  color: var(--e-global-color-grey);
  border-bottom: 1px solid var(--e-global-color-fog);
  font-size: 0.95rem;
}

.plan-features li:last-child {
  border-bottom: none;
}

.plan-button {
  width: 100%;
  padding: 14px 24px;
  background: linear-gradient(
    135deg,
    var(--e-global-color-primary) 0%,
    var(--e-global-color-secondary) 100%
  );
  color: white;
  border: none;
  border-radius: 8px;
  font-size: 1rem;
  font-weight: 500;
  cursor: pointer;
  transition: all 0.3s ease;
}

.plan-button:hover {
  transform: scale(1.02);
  box-shadow: 0 4px 12px rgba(103, 83, 255, 0.4);
}

.plan-button:active {
  transform: scale(0.98);
}

.license-section {
  text-align: center;
  margin-bottom: 40px;
}

.license-label {
  display: block;
  margin-bottom: 12px;
  font-size: 1rem;
  font-weight: 500;
  color: var(--e-global-color-text);
}

.license-select {
  padding: 10px 16px;
  border: 2px solid var(--e-global-color-fog);
  border-radius: 8px;
  font-size: 1rem;
  color: var(--e-global-color-text);
  background-color: white;
  cursor: pointer;
  transition: border-color 0.3s ease;
}

.license-select:hover {
  border-color: var(--e-global-color-primary);
}

.license-select:focus {
  outline: none;
  border-color: var(--e-global-color-primary);
  box-shadow: 0 0 0 3px rgba(103, 83, 255, 0.1);
}
Selling Multiple Products
<script src="https://checkout.freemius.com/js/v1/"></script>

<button id="plugin1-purchase">Buy Plugin 1</button>
<button id="plugin2-purchase">Buy Plugin 2</button>

<script type="text/javascript">
  const plugin1Checkout = new FS.Checkout({
    product_id: '1234',
  });

  const plugin2Checkout = new FS.Checkout({
    product_id: '5678',
  });

  document
    .querySelector('#plugin1-purchase')
    .addEventListener('click', function (e) {
      plugin1Checkout.open({
        plan_id: 1111,
        licenses: 1,
        // You can consume the response for after purchase logic.
        success: function (response) {
          // alert(response.user.email);
        },
      });

      e.preventDefault();
    });

  document
    .querySelector('#plugin2-purchase')
    .addEventListener('click', function (e) {
      plugin2Checkout.open({
        plan_id: 2222,
        licenses: 1,
        // You can consume the response for after purchase logic.
        success: function (response) {
          // alert(response.user.email);
        },
      });

      e.preventDefault();
    });
</script>