Next.js Integration Guide with JavaScript SDK & Starter Kit
In this guide, we will walk you through the steps to build and monetize an application (or SaaS) using Next.js, the Freemius JavaScript SDK, and our React Starter Kit.
By the end of this guide, your application will include the following features:
- Paywall and Pricing Tables: To protect features and display pricing options to users.
- Purchase Processing: To handle purchases securely through Freemius.
- Customer Portal: To allow users to manage their subscriptions and account details.
- Webhook Handling: To process events from Freemius such as license updates and cancellations.
Video Tutorial and Advanced Example
You can view the complete sample application built in this guide in our GitHub repository. The example also demonstrates a credit-based system where users can spend credits to access certain features.
Prerequisites
Please make sure you have the following prerequisites before starting this guide:
Installing the Freemius SDK
We only ask that you have installed and configured the Freemius JavaScript SDK and have reviewed the common integration guide before starting this guide.
- npm
- Yarn
- pnpm
- Bun
npm install @freemius/sdk @freemius/checkout zod
yarn add @freemius/sdk @freemius/checkout zod
pnpm add @freemius/sdk @freemius/checkout zod
bun add @freemius/sdk @freemius/checkout zod
If you are in a hurry, you can use the following code snippet to create a basic freemius instance in your Next.js application.
Show Quick Integration Guide
Make sure to set the environment variables with your actual Freemius credentials.
import { Freemius } from '@freemius/sdk';

export const freemius = new Freemius({
  productId: process.env.FREEMIUS_PRODUCT_ID!,
  apiKey: process.env.FREEMIUS_API_KEY!,
  secretKey: process.env.FREEMIUS_SECRET_KEY!,
  publicKey: process.env.FREEMIUS_PUBLIC_KEY!,
});
You will also need a database table to store the user's license information. You can create a UserFsEntitlement table with the following model:
model UserFsEntitlement {
    id     String @id @default(cuid())
    userId String
    User   User   @relation(fields: [userId], references: [id], onDelete: Cascade)

    // The following matches the PurchaseDBData from Freemius Node SDK.
    // You can also use these fields as BigInt if you prefer, and in that case you will need to convert the String to BigInt in your application.
    fsLicenseId String            @unique
    fsPlanId    String
    fsPricingId String
    fsUserId    String
    type        FsEntitlementType
    expiration  DateTime?
    isCanceled  Boolean
    createdAt   DateTime

    // Add the index to optimize queries filtering by type (as needed for the JS SDK).
    @@index(type)
    @@map("user_fs_entitlement")
}
Setting Up the Starter Kit
You need to install the React Starter Kit in your Next.js application.
- npm
- Yarn
- pnpm
- Bun
npx shadcn@latest add https://shadcn.freemius.com/all.json
yarn dlx shadcn@latest add https://shadcn.freemius.com/all.json
pnpm dlx shadcn@latest add https://shadcn.freemius.com/all.json
bun x shadcn@latest add https://shadcn.freemius.com/all.json
This will install all available components from the Starter Kit. It uses shadcn/ui under the hood, so make sure you have it set up in your project. The theme is inherited from your Tailwind CSS configuration.
For the remainder of this guide, we will assume:
- You have a
freemiusinstance configured with your credentials and is available at./src/lib/freemius.ts. - You have the necessary database tables to create the entitlement related functions (as described in our integration guide). We will be giving examples for a prisma database client, but you can use any database client of your choice.
- You have a basic user management and authentication system in place. For the sake of this guide, we will assume you are using better-auth and have the relevant
userstable.
Additionally, you will need the public URL of the Next.js application. Conventionally, it can be set using the following environment variable:
NEXT_PUBLIC_APP_URL=http://localhost:3000
Creating Entitlement Functions
Next, we will create the following functions in the ./src/lib/user-entitlement.ts file to facilitate entitlement operations:
- A
processPurchaseInfofunction to process purchase information and update the user's entitlement in our database. - A
getUserEntitlementfunction to retrieve the user's entitlement from our database and validate it with the Freemius SDK. - A
getFsUserfunction to retrieve the Freemius user associated with our app user.
The implementation will differ based on your database and user management system. Below is a sample implementation using a prisma database client and the better-auth user system.
import { PurchaseInfo, UserRetriever } from '@freemius/sdk';
import { freemius } from './freemius';

import { prisma } from '@/lib/prisma';
import { UserFsEntitlement, User } from '@generated/prisma';
import { auth } from '@/lib/auth';

/**
 * Process the purchase info and update the local database.
 *
 * This function is called when a purchase happens with Freemius.
 */
export async function processPurchaseInfo(
  fsPurchase: PurchaseInfo
): Promise<void> {
  const user = await getUserByEmail(fsPurchase.email);

  if (!user) {
    // User not found, cannot process the purchase. Alternately you can create a new user here.
    return;
  }

  await prisma.userFsEntitlement.upsert({
    where: {
      fsLicenseId: fsPurchase.licenseId,
    },
    update: fsPurchase.toEntitlementRecord(),
    create: fsPurchase.toEntitlementRecord({ userId: user.id }),
  });
}

/**
 * Get the user's entitlement.
 *
 * @returns The user's active entitlement or null if the user does not have an active entitlement.
 */
export async function getUserEntitlement(
  userId: string
): Promise<UserFsEntitlement | null> {
  const entitlements = await prisma.userFsEntitlement.findMany({
    where: { userId, type: 'subscription' },
  });

  return freemius.entitlement.getActive(entitlements);
}

/**
 * Get the Freemius user for the current session.
 *
 * This is used by the Freemius SDK to identify the user.
 *
 * @returns The Freemius user or null if the user is not logged in.
 */
export const getFsUser: UserRetriever = async () => {
  const session = await auth.api.getSession({
    headers: await headers(),
  });

  const entitlement = session
    ? await getUserEntitlement(session.user.id)
    : null;
  const email = session?.user.email ?? undefined;

  return freemius.entitlement.getFsUser(entitlement, email);
};
The most important part of the above code is the processPurchaseInfo function, which is called whenever a purchase is made. It updates the local userFsEntitlement table with the latest license information from Freemius.
Later, in your SaaS application, you can use the getUserEntitlement function to retrieve the user's entitlement and check if they have access to certain features (by comparing it with the fsPlanId or fsPricingId).
The getUserEntitlement function also validates the license with the Freemius SDK to ensure that the license is still valid and has not expired or been canceled.
The Concept of Entitlement
In Freemius and SaaS applications, an entitlement is the set of rights or permissions a user gets based on their purchase or subscription. It defines what features or services the user can access.
For example, if you have three plans—Basic, Pro, and Enterprise—each offers different feature access. A Pro subscriber is entitled to all Pro features, while a Basic subscriber only gets Basic features.
The recommended way to check entitlements is to map the fsPricingId from Freemius to the features in your app. This lets you verify access by comparing the user’s fsPricingId with the required one for a feature.
Example:
export function canAccessFeatureX(
  entitlement: UserFsEntitlement | null
): boolean {
  if (!entitlement) return false; // No entitlement → no access

  const allowedPricingIdsForFeatureX = ['pricing_id_1', 'pricing_id_2'];
  return allowedPricingIdsForFeatureX.includes(entitlement.fsPricingId);
}
You can find pricing IDs in the Freemius Developer Dashboard.
Go to Plans → Select a Plan, and you’ll see the IDs for the different pricing options.
These are the only SaaS specific code you needed to create. For the rest of the integration we will see how the JS SDK and the React Starter Kit can be used to quickly add the necessary endpoints and components to your Next.js application so that you can start charging your users.
Creating Checkouts and Processing Purchases
Now, we will see how to create Overlay Checkout in any part of your application and process purchases.
The integration works as follows:
- We will have a Pricing table UI on the front-end which will open the Overlay Checkout when clicked.
- The Checkout will be configured to call a Next.js API endpoint when the purchase is completed.
- The API endpoint will process the purchase information and update the user's license in our database.
Creating the Checkout API Endpoint
Let's create and endpoint at api/checkout by using Next.js's App Router.
/**
 * This route handles the Purchase actions and sync actions coming from the Freemius React Starter Kit.
 */
import { freemius } from '@/lib/freemius';
import { processPurchaseInfo } from '@/lib/user-entitlement';

const processor = freemius.checkout.request.createProcessor({
  onPurchase: processPurchaseInfo,
});

export { processor as GET, processor as POST };
More information about what the various option does can be found here.
Creating the Checkout Provider
The React Starter Kit comes with a CheckoutProvider component that you can use to wrap your application or any part of it where you want to use the Checkout.
The component requires two props:
checkout: The checkout object created using thefreemius.checkout.createmethod.endpoint: The API endpoint that will handle the purchase and sync actions. In our case, it is/api/checkout.
To save us from configuring the Checkout multiple times, we will create a simple wrapper component called AppCheckoutProvider that will create the checkout object and wrap the CheckoutProvider component.
'use client';

import { CheckoutProvider } from '@/react-starter/components/checkout-provider';
import { type CheckoutSerialized } from '@freemius/sdk';
import * as React from 'react';
import { toast } from 'sonner';
import { useRouter } from 'next/navigation';

export default function AppCheckoutProvider(props: {
  children: React.ReactNode;
  checkout: CheckoutSerialized;
}) {
  const router = useRouter();

  const onAfterSync = React.useCallback(() => {
    toast.success(
      `Successfully updated your subscription! Now you can continue using the app.`
    );
    router.refresh();
  }, [router]);

  return (
    <CheckoutProvider
      onAfterSync={onAfterSync}
      checkout={props.checkout}
      endpoint={process.env.NEXT_PUBLIC_APP_URL! + '/api/checkout'}
    >
      {props.children}
    </CheckoutProvider>
  );
}
Notice that we're also using the onAfterSync prop to show a success message and refresh the page after a successful purchase or sync action. You will need to adjust this based on your application's requirements.
Creating the Pricing Table
Now we will use the Subscribe component from the React Starter Kit to create a pricing table. The Subscribe component will display all the plans that support subscriptions.
In this example, we have a /purchase page where we will display the pricing table.
import { auth } from '@/lib/auth';
import { headers } from 'next/headers';
import { redirect } from 'next/navigation';
import { freemius } from '@/lib/freemius';
import AppCheckoutProvider from '@/components/app-checkout-provider';
import { Subscribe } from '@/react-starter/components/subscribe';

export default async function PurchasePage() {
  const session = await auth.api.getSession({
    headers: await headers(),
  });

  if (!session) {
    redirect('/login');
  }

  const checkout = await freemius.checkout.create({
    user: session?.user,
    isSandbox: process.env.NODE_ENV !== 'production',
  });

  return (
    <AppCheckoutProvider checkout={checkout.serialize()}>
      <Subscribe />
    </AppCheckoutProvider>
  );
}
This will create a pricing table displaying only the plans that support subscriptions, as shown below.
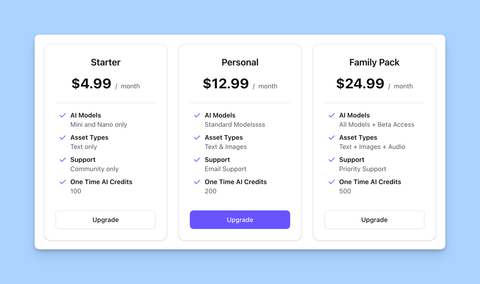
A complete example that triggers a confetti animation after a successful purchase can be found here.
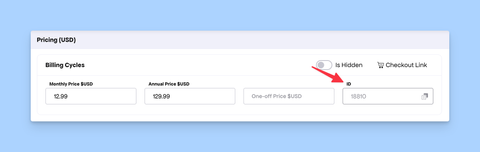
If you want to create a pricing table displaying one-off purchases, you can use the Topup component instead of the Subscribe component.
import { auth } from '@/lib/auth';
import { headers } from 'next/headers';
import { redirect } from 'next/navigation';
import { freemius } from '@/lib/freemius';
import { CheckoutProvider } from '@/react-starter/components/checkout-provider';
import { Topup } from '@/react-starter/components/topup';

export default async function PurchasePage() {
  const session = await auth.api.getSession({
    headers: await headers(),
  });

  if (!session) {
    redirect('/login');
  }

  const checkout = await freemius.checkout.create({
    user: session?.user,
    isSandbox: process.env.NODE_ENV !== 'production',
  });

  return (
    <CheckoutProvider
      checkout={checkout.serialize()}
      endpoint={process.env.NEXT_PUBLIC_APP_URL! + '/api/checkout'}
    >
      <Topup />
    </CheckoutProvider>
  );
}

The term Unit is configurable from the Freemius Developer Dashboard.
Once your application users click the button, they will see the Overlay Checkout as shown below.
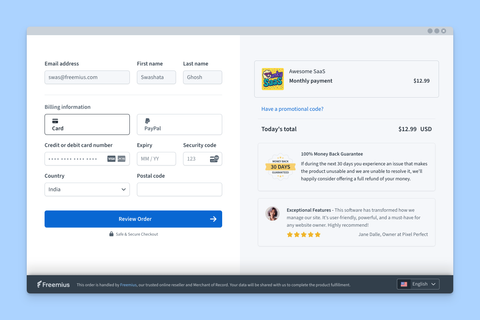
The checkout will be prepopulated with the user's billing information obtained from your app's session. After the purchase, the processPurchaseInfo function we created earlier will be called to update the user's license in your database.
Creating a Paywall
There are also use cases where you want to show a paywall to promote certain features of your application. The usual idea behind a paywall is that the UI of such features is not hidden, but when interacted with, a paywall is shown to the user.
The Freemius React Starter Kit makes it very easy to create such functionality. We will use the Paywall component and the usePaywall hook.
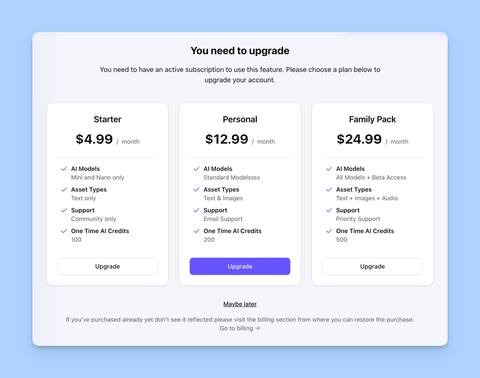
In this simple example, we have two buttons that trigger different paywalls. The first button triggers a paywall for a missing subscription or purchase, while the second button triggers a one-off purchase paywall useful for top-ups.
'use client';

import { Button } from '@/components/ui/button';
import { Paywall, usePaywall } from '@/react-starter/components/paywall';

export default function PaywallDemo() {
  const { state, showNoActivePurchase, showInsufficientCredits, hidePaywall } =
    usePaywall();

  return (
    <>
      <Paywall state={state} hidePaywall={hidePaywall} />

      <Button onClick={showNoActivePurchase}>No Active Purchase</Button>
      <Button onClick={showInsufficientCredits}>Insufficient Credits</Button>
    </>
  );
}
Please note that you must wrap the component with the CheckoutProvider as shown in the previous section for the paywall to work.
In a real-world implementation, you would likely make an API call when a certain feature is triggered to check if the user has access to that feature. If not, you would then show the paywall. You can find a real use case of this in our sample application.
In this example, we have a simple AI chat application. The API call checks whether the user has an active subscription and, if so, whether there are sufficient credits to make the AI call. Depending on the response, the appropriate paywall is shown if necessary.
Using the Hosted Checkout
If, for any reason, you do not want to use the Overlay Checkout component and prefer the Hosted Checkout, then you need to do the following:
Create Function to Process Redirects
In the user-entitlement.ts file, create a function called processRedirect.
import { CheckoutRedirectInfo } from '@freemius/sdk';

export async function processRedirect(
  info: CheckoutRedirectInfo
): Promise<void> {
  const purchaseInfo = await freemius.purchase.retrievePurchase(
    info.license_id
  );

  if (purchaseInfo) {
    await processPurchaseInfo(purchaseInfo);
  }
}
Modify the Checkout API Endpoint
Now, modify the endpoint to handle the redirection.
import { freemius } from '@/lib/freemius';
import { processPurchaseInfo, processRedirect } from '@/lib/user-entitlement';

const processor = freemius.checkout.request.createProcessor({
  onPurchase: processPurchaseInfo,
  proxyUrl: process.env.NEXT_PUBLIC_APP_URL!,
  onRedirect: processRedirect,
});

export { processor as GET, processor as POST };
Set up the Redirection from the Freemius Developer Dashboard
Finally, you need to set up the redirection URL by following our guide here.
In the redirection URL you need to specify the endpoint:
https://my-app.com/api/checkout
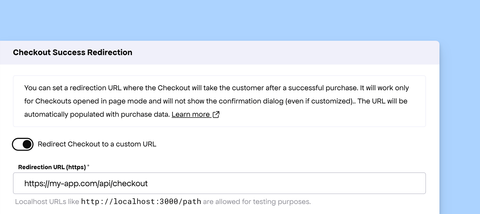
The SDK will take care of the rest. It will verify the signature and call the processRedirect function to update the user's license in your database. Once a purchase is processed, it will redirect back to the proxyUrl you specified in the endpoint.
If you wish to return a different response or redirect to a custom URL after processing the Checkout redirection, please read our guide here.
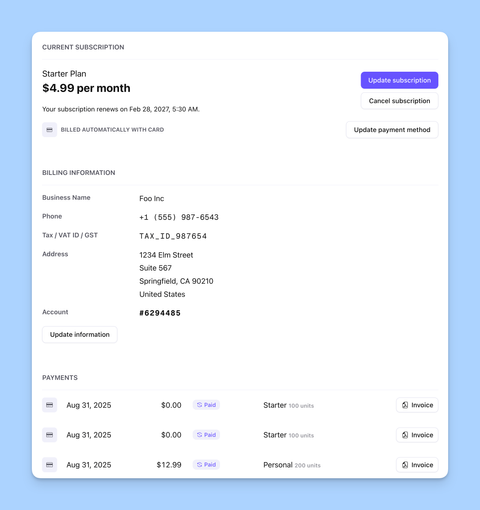
Embedding the Customer Portal
The Freemius React Starter Kit and JavaScript SDK come with a prebuilt Customer Portal component, which you can easily embed in your application. The Customer Portal allows your users to manage their subscriptions, view invoices, update billing information, and more.
You can find the conceptual overview of the Customer Portal in our JavaScript SDK Documentation. Here, we will see how to create the necessary API endpoint and embed the component in your Next.js application.
Creating the Customer Portal API Endpoint
We will create a new API endpoint at /api/portal to handle Customer Portal requests.
import { freemius } from '@/lib/freemius';
import { getFsUser, processPurchaseInfo } from '@/lib/user-entitlement';

const processor = freemius.customerPortal.request.createProcessor({
  getUser: getFsUser,
  portalEndpoint: process.env.NEXT_PUBLIC_APP_URL! + '/api/portal',
  isSandbox: process.env.NODE_ENV !== 'production',
  onRestore: freemius.customerPortal.createRestorer(processPurchaseInfo),
});

export { processor as GET, processor as POST };
More information about what the various options do can be found here.
Creating the Customer Portal On the Front-end
With the endpoint set, let's create a new /billing page to embed the Customer Portal component.
import { auth } from '@/lib/auth';
import { freemius } from '@/lib/freemius';
import { headers } from 'next/headers';
import { redirect } from 'next/navigation';
import { CustomerPortal } from '@/react-starter/components/customer-portal';
import AppCheckoutProvider from '@/components/app-checkout-provider';

export default async function Billing() {
  const session = await auth.api.getSession({
    headers: await headers(),
  });

  if (!session) {
    redirect('/login');
  }

  const checkout = await freemius.checkout.create({
    user: session?.user,
    isSandbox: process.env.NODE_ENV !== 'production',
  });

  return (
    <AppCheckoutProvider checkout={checkout.serialize()}>
      <CustomerPortal
        endpoint={process.env.NEXT_PUBLIC_APP_URL! + '/api/portal'}
      />
    </AppCheckoutProvider>
  );
}
And that's it. Now you have a fully functional Customer Portal embedded in your application.
Please see our example app in the GitHub Repository for a more real-world implementation.
Configuring Webhooks
Now that your Next.js application has monetization built in, you need to synchronize the license information in your database with Freemius. This is important because certain events, such as subscription renewals, subscription cancellations, payment failures, and license expirations, will happen outside of your application.
By configuring webhooks, Freemius will notify your application of such events, and you can then update your database accordingly.
First, we will create the callbacks needed for the webhooks.
import { prisma } from '@/lib/prisma';

export async function syncEntitlementFromWebhook(
  fsLicenseId: string
): Promise<void> {
  const purchaseInfo = await freemius.purchase.retrievePurchase(fsLicenseId);
  if (purchaseInfo) {
    await processPurchaseInfo(purchaseInfo);
  }
}

export async function deleteEntitlement(fsLicenseId: string): Promise<void> {
  await prisma.userFsEntitlement.delete({
    where: { fsLicenseId: fsLicenseId },
  });
}
Note that it uses the processPurchaseInfo function we already created to update the license information in your database.
Now, create the /webhook API endpoint to handle webhook requests.
import { freemius } from '@/lib/freemius';
import {
  deleteEntitlement,
  syncEntitlementFromWebhook,
} from '@/lib/user-entitlement';

const listener = freemius.webhook.createListener();

listener.on(
  [
    'license.created',
    'license.extended',
    'license.shortened',
    'license.updated',
    'license.cancelled',
    'license.expired',
    'license.plan.changed',
  ],
  async ({ objects: { license } }) => {
    if (license && license.id) {
      await syncEntitlementFromWebhook(license.id);
    }
  }
);

listener.on('license.deleted', async ({ data }) => {
  await deleteEntitlement(data.license_id);
});

const processor = freemius.webhook.createRequestProcessor(listener);

export { processor as POST };
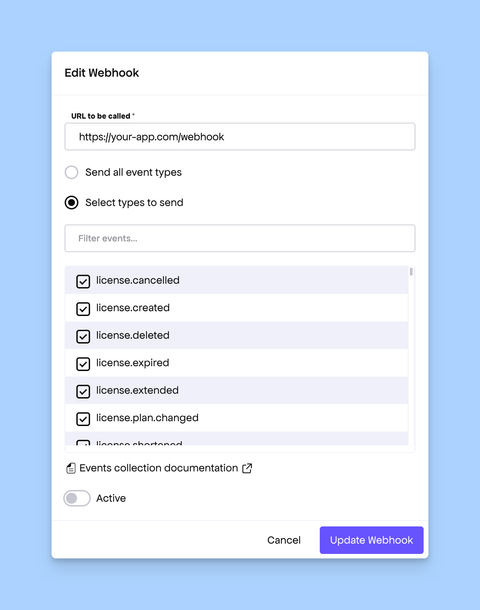
Finally, you need to set up the webhook in the Freemius Developer Dashboard. The webhook URL will be:
https://your-app.com/webhook
Please make sure you select all the relevant events we are listening for in the above code.
And that's it. Now your local entitlement information is kept in sync with Freemius.
Please see our example app in the GitHub Repository for a more real-world implementation.