Integrating License Key Activation
This guide covers software such as desktop apps (macOS or Windows), Chrome extensions, and SaaS products that rely on license key activation.
If you are integrating Freemius with a WordPress plugin, theme, or add-on, please follow the WordPress SDK integration guide.
Initial Steps
- Sign up for Freemius.
- Create a new SaaS or App product tailored to your needs.
- Go to the Plans and configure the plans and prices.
For pre-purchase registration, see the Checkout integration section in the SaaS Integration doc.
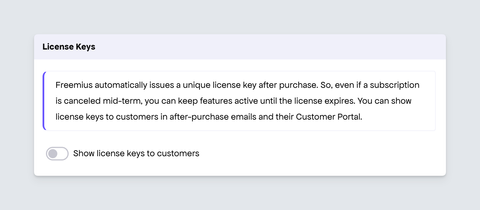
Revealing License Keys to Customers
This configuration is only relevant for SaaS products. For Apps, license keys are always shown to buyers.
Go to Settings and toggle on the switch to display license keys to customers:
Checkout Integration
Integrate the checkout with your buy buttons as a modal dialog triggered by JavaScript, or by using direct checkout links.
If you require registration prior to purchasing, check the Checkout integration section in the SaaS Integration doc.
License Key Integration
Create a license form in your app to validate the key.
License Activation
To activate a license key via the API:
POST https://api.freemius.com/v1/products/{product_id}/licenses/activate.json?uid={uuid}&license_key={license_key}
{uuid}– Must be replaced with a unique 32-character identifier (you need to generate it).- You can use
crypto.randomUUID().replace(/-/g, '')with JavaScript, which is now standard on all modern browsers and JS runtimes. Make sure to store it in the local storage where the license is activated (for Chrome extension use chrome.storage).
- You can use
{license_key}– The entered license key
If the license key is valid, the endpoint will return an object with install_id, install_api_token, and other useful properties.
- Make sure you store it in the local storage where the license is activated, as you'll need it for license validation and deactivation (for Chrome extension use chrome.storage).
- The
install_api_tokenis a bearer token that can be used to update the properties of theInstallentity. More information can be found here.
License Deactivation
To deactivate a license via the API:
POST https://api.freemius.com/v1/products/{product_id}/licenses/deactivate.json?uid={uuid}&install_id={install_id}&license_key={license_key}
{uuid}– Must be replaced with the stored install’s uuid{install_id}– Must be replaced with the stored install’s ID{license_key}– Must be replaced with the stored license key
License Validation
To validate a license, first fetch the activated license:
GET https://api.freemius.com/v1/products/{product_id}/installs/{install_id}/license.json?uid={uuid}&license_key={license_key}
{uuid}– Must be replaced with the stored install’s uuid{install_id}– Must be replaced with the stored install’s ID{license_key}– Must be replaced with the stored license key
If the license is activated on the specified install, the endpoint returns a License object that includes the expiration and is_cancelled properties (among others).
If is_cancelled is true, the license was canceled from the Developer Dashboard and is therefore invalid. If the license wasn’t canceled, expiration contains the license expiration date formatted as Y-m-d H:i:s (it can also be equal to null for lifetime licenses).
When sending any query parameter with a GET request, for example, the license key or the UUID, please make sure to encode the values. For example:
- PHP
- JavaScript
$url = "https://api.freemius.com...?license_key=" . url_encode($license_key);
const url = `https://api.freemius.com...?license_key=${encodeURIComponent(licenseKey)}`;
Distributing the Software
After integrating license key activation, the next step is to set up custom download links, where your customers can download the app files.