Sell Directly from Your Website with Freemius Checkout Overlay
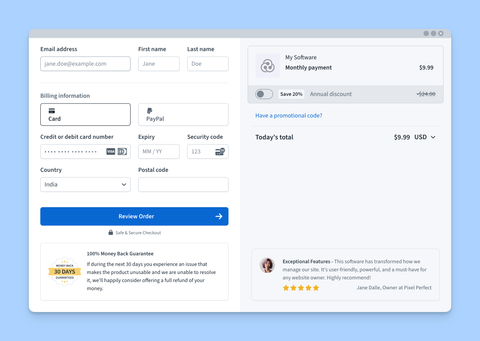
The Overlay Checkout is an embeddable checkout solution that allows you to sell your products directly from your website, without redirecting customers to an external page.
Getting the Checkout Overlay Code
- Go to the Plans section.
- Click the Get Checkout Code button.
- Click the Overlay Code button.
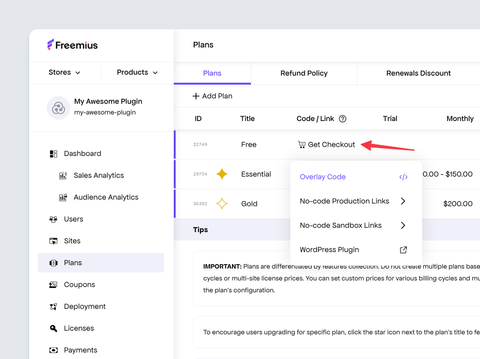
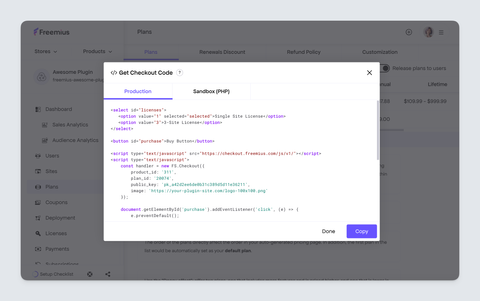
- You'll get a ready-to-use simple JavaScript snippet that you can embed on any website.
Just embed the code snippet into your website's HTML where you want the Buy Button to appear.
Click here to see a live demo of the Freemius Checkout Overlay integration with source code on CodePen.
Step by Step Integration Guide
If you want to do advanced integration with more customization options, follow the steps below:
-
Include the Freemius Checkout JS library in your website's HTML
<head>section:<script src="https://checkout.freemius.com/js/v1/"></script> -
Initialize the Checkout object with your product details:
<script>
  const checkout = new FS.Checkout({
    product_id: '<productID>',
    plan_id: '<planID>',
  });
</script>warningFreemius will attempt to recover the sale when a checkout is abandoned using an out-of-the-box Cart Abandonment Recovery mechanism. For this mechanism to properly work, make sure that
new FS.Checkout()is called right with the page loading. Otherwise, the links in the cart recovery email campaign won't automatically open the checkout in its saved state. -
Create a button or link that will trigger the checkout overlay when clicked:
<button id="purchase">Buy Now</button> -
Add an event listener to the button or link to open the checkout overlay:
<script>
  document
    .querySelector('#purchase')
    .addEventListener('click', function (e) {
      checkout.open({
        title: '<productTitle>',
        // Additional options can be added here
        success: function (response) {
          // Handle successful purchase
        },
      });
      e.preventDefault();
    });
</script>
Here's a simple example of the checkout code will look like for a plan that offers 3 multi-site prices:
<select id="licenses">
  <option value="1" selected="selected">Single Site License</option>
  <option value="5">5-Site License</option>
  <option value="25">25-Site License</option>
</select>

<button id="purchase">Buy Button</button>

<script src="https://checkout.freemius.com/js/v1/"></script>
<script>
  const checkout = new FS.Checkout({
    product_id: '<productID>',
    plan_id: '<planID>',
    public_key: '<productPublicKey>',
    image: 'https://your-plugin-site.com/logo-100x100.png',
  });

  document.querySelector('#purchase').addEventListener('click', function (e) {
    checkout.open({
      title: '<productTitle>',
      licenses: document.querySelector('#licenses').value,
      // You can consume the response for after purchase logic.
      success: function (response) {
        // alert(response.user.email);
      },
    });
    e.preventDefault();
  });
</script>
A more advanced example with multiple plans can be found in our CodePen Demo.
Customization & Callbacks
The Checkout Overlay can be customized using various options and you can also handle different events using callbacks.
You can find the full list of available options and callbacks in the Checkout API Documentation.
Using with JavaScript Frameworks
To install the Checkout JS library in your app, please refer to our Checkout JS SDK Documentation. The guide provides detailed instructions on using the library via CDN and NPM. It also covers advanced use cases, such as multi-plan and multi-site licenses.