WordPress Product Plans & Pricing
In this guide, we'll walk you through setting up pricing plans for your WordPress plugin or theme using Freemius. You can create multiple plans with different pricing options, features, and license counts to cater to various user needs.
For SaaS pricing setup, see set up SaaS.
Creating Your First Plan
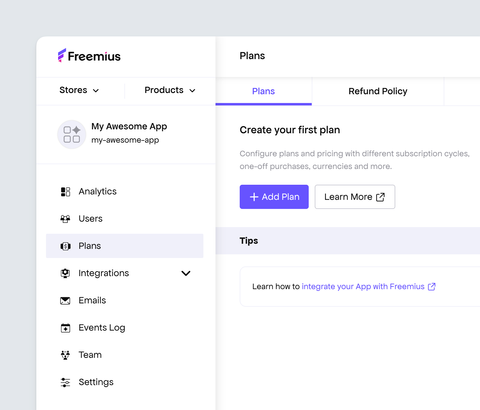
Go to the Plans page in the Developer Dashboard to create your first plan.
If you're adding a paid-only product, make sure to delete the Free plan. If it's your first commercial WordPress product, the freemium business model can greatly benefit you by giving you the opportunity to market your free product on WordPress.org, giving you access to a large number of potential users who can convert into paying customers. The WordPress SDK includes various sub-menu items that allow users to upgrade to your paid plans directly within the WP Admin dashboard (also known as "In-Dashboard Checkout").
Click Add Plan to create a new plan. Enter a unique name and specify a title. For example, 'pro' and 'Pro'.
Creating a new plan will immediately update the SDK’s integration snippet. For your convenience, the updated snippet appears in a pop-up window.
You can close the pop-up window for now, as this is covered in the Integration with SDK section. When you're comfortable with the integration steps, it's helpful to copy the updated snippet directly from the Plans page without having to go back to the SDK Integration page.
Setup Pricing for the Plan
Now we'll create different pricing options for the plan. A pricing option refers to a specific number of licenses or sites the configuration applies to. Each pricing option can have different billing cycles, such as monthly, annual, or lifetime.
For example, you can create a 5-Site pricing option, meaning that after purchasing it, users will be able to activate the product on up to 5 different WordPress sites. More information can be found in the License utilization guide.
To get started, enter information about the plan, such as pricing for the Single Site option.
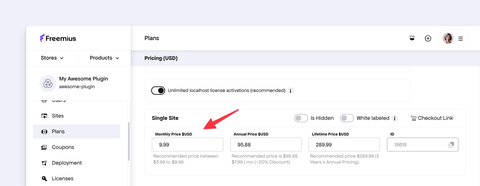
In the example above, you can see that we created pricing for monthly, annual, and lifetime billing cycles. You can choose to create pricing for any combination of these billing cycles.
You can also create pricing options for plans that offer more than one license activation for multiple sites. To do this, click Add Bulk and select the number of sites, then enter the relevant pricing options.
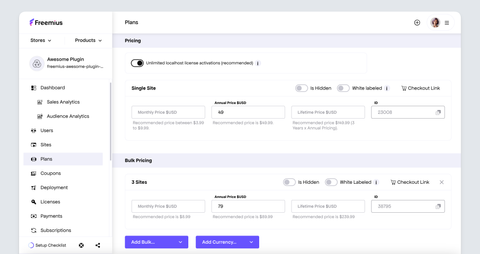
In the example above, we entered $49 as the price for an annual single-site license and added an additional option for a 3-site annual license at $79.
If you are new to pricing, we recommend checking out our guide on How to Price Your WordPress Plugin.
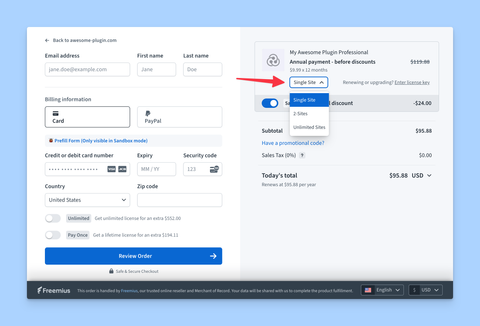
The pricing plans will be displayed in the Freemius Checkout when customers purchase your product, as seen here:
You can also customize your plans with additional settings, such as additional currency, free trials, support channels, and whether features are blocked after license expiration.
If you've been using Freemius to manage only the free version of your product without any paid plans, make sure to release the plans to users after creating your paid plans so that your users can see and purchase them.
Configure a Plan's Support Channels
Each created plan can enable support to your customers through a number of channels available in the Freemius Developer Dashboard.
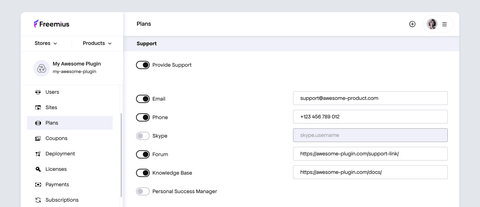
These can be set up by:
- Navigating to the Plans page.
- Click the relevant plan to edit its details.
- Scroll down to the Support section.
- Enable the appropriate channels.
- Set the corresponding link details.
The email address configured here will be included in the post-purchase emails sent to your product users as a support contact. For more reliable email delivery and management, we recommend setting up dedicated support email addresses.
Configure a Plan's Features
The plan's features can be listed in the Features section by scrolling down. Type the name of the feature and click the [+] button or press Enter to add it to the plan. Repeat this step until you've added all the required features.
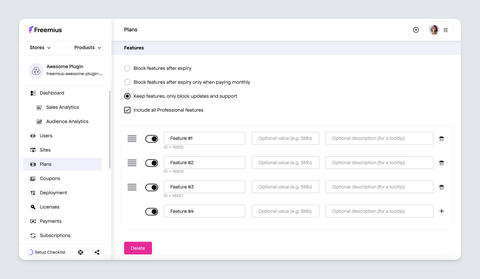
A typical freemium WordPress product contains a free and a pro plan, but you can create multiple plans if you wish.
If your plugin or theme contains a fixed number of features across all paid plans and the only difference is the number of licenses, this is best handled with a single plan.
Release the Plans to Users
Finally, to make sure your plans are visible to users for purchase and license activations, toggle the Release plans to users option at the top right of the Plans page.
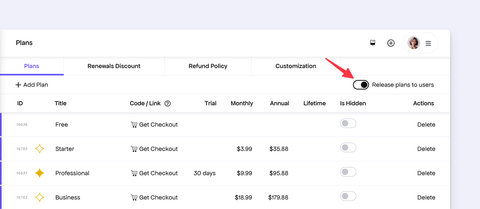
Having this option disabled will prevent your users from purchasing or activating licenses for your product. If you're testing Freemius integration with an existing product, you can keep this option disabled until you're ready to go live. In such cases, to test the purchase and license activation flows, you can put the SDK in testing mode.
Having this option disabled is also useful for products already in the wild. You can integrate your product with the Freemius SDK today and start deploying the code to your users without affecting their experience. Once you're ready to start selling, you can simply enable this option to make the plans available for purchase and license activations.