Selling Multiple WordPress Products as Bundles & Memberships
For WordPress plugin and theme makers, offering bundles and memberships can be a powerful way to increase revenue and provide more value to your customers. With Freemius, you can easily create and manage bundles and memberships, allowing you to sell multiple products together at a discounted price or offer ongoing access to a collection of products.
Bundle vs Membership: What Is the Difference?
A bundle license grants access only to the specific products that were included in the bundle at the time of purchase. If the product maker adds new products to the bundle later, the original license will not cover those additions.
A membership license is more dynamic and allows ongoing access. If the maker adds new products to the membership, existing licenses automatically gain access to those products. This model supports a continuously evolving product offering under a single license.
Learn how to configure a membership in Freemius.
Create a Bundle "Product" on Freemius
To demonstrate how you can start selling bundles, let’s assume that you have:
A freemium core plugin called Freemius Starter Bundle with two paid plans (Starter: $100 per year; Professional: $150 per year) and two add-ons:
- Catwalk Addon 1 - a freemium add-on with one Pro plan for $50 per year.
- Catwalk Addon 2 - a premium-only add-on for $50 per year.
For a customer to access the Freemius Starter Bundle Starter plan with the two paid add-on versions, the total annual price would be $200 per year. However, you can create a bundle of all three products (core + two add-ons) for $150, which is a $50 / 25% discount.
The Process
- Click the "+" button next to the profile avatar. Select New Product.
- Select the Bundle & Membership product type.
- Choose your store and input your bundle's product details like title (e.g. Freemius Starter Bundle) and featured icon.
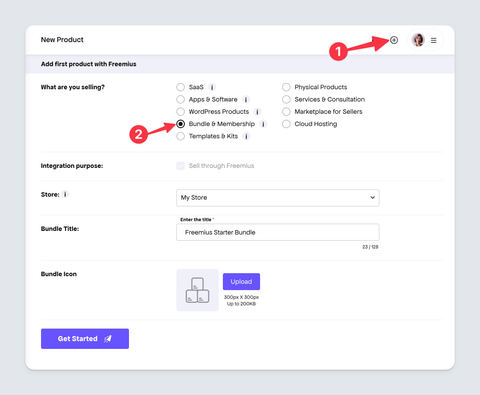
- Click the Get Started button. You’ll be automatically redirected to the Product’s checklist page.
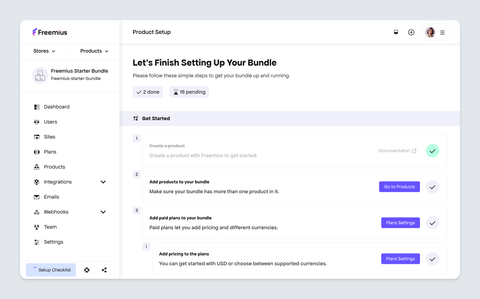
- Click the Go to Products button to open up the bundle's products management page.
- Click the Add product button and associate the add-on products you want to include in the bundle. Every bundle can include a subset of products.
- Once all the products are added, the Products page should look like this:

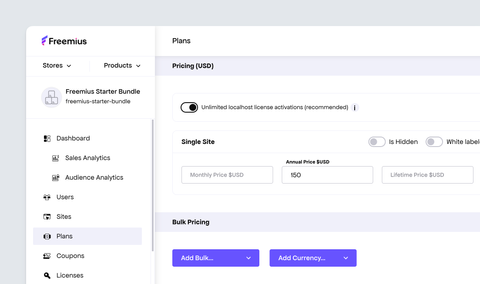
- In the left sidebar menu, navigate to the Plans page to set the bundle's plans and prices.
- Click the Add Plan button to create a new plan for the bundle. Add the plan name and slug. In this case "Premium" and "premium" respectively.
- Choose the products and their plans to include in the bundle’s plan from the dropdown. Click the Add button to add the product plan to the bundle plan.
- Finally, set up the pricing for the bundle plan. In this case, we want $150 for the annual billing cycle for the "Professional" plan.
That’s it. The bundle is ready for sale.
Next, set up a checkout link on any website or use the Buy Button JavaScript API.
Configuring a Membership
When you configure a membership, any existing subscriptions or licenses will automatically gain access to these products, regardless of when they were purchased.
This configuration is applied per plan within your bundle, offering greater flexibility in how you structure plans and pricing.
To enable this for a bundle:
- Navigate to the product’s plan.
- Click to edit the desired plan, and select the Membership option:
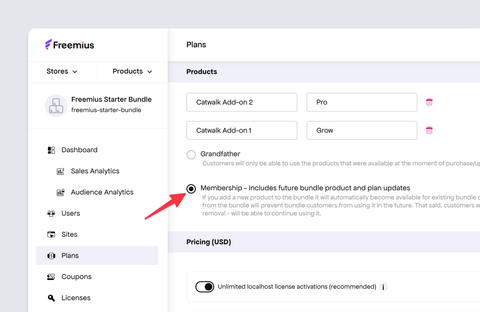
- The setting will be automatically saved, and the plan will be converted to a membership plan.
Selling Bundles from the WP Admin Dashboard
Integrating with Freemius WordPress SDK will automatically include a pricing page within the WP Admin of your users. By default, the rendered pricing page is associated with the plugin or theme the SDK integrated with.
If you're using the add-ons architecture and selling bundles or memberships for your add-ons collection, it is highly recommended to configure the SDK integration snippet to render the pricing of your bundle or membership with these parameters:
bundle_idbundle_public_keybundle_license_auto_activation: This setting saves customers the hassle of manually activating a bundle license for every add-on.
Here's how the WP SDK integration snippet could look like:
function my_fs() {
  global $my_fs;

  if ( ! isset( $my_fs ) ) {
    // Include Freemius SDK.
    ...

    $my_fs = fs_dynamic_init(
      array(
        ...// Other product key-value pairs,
        'bundle_id'                      => 12345,
        'bundle_public_key'              => 'pk_hrjss36joj632vgyy345ggv555',
        'bundle_license_auto_activation' => true
      )
    );
  }
}
If your core plugin/theme is free, make sure to add it in the bundle's Products section. Then update the SDK integration snippet by setting the value of 'has_paid_plans' => true for the pricing page to show up.
When a bundle is configured, it replaces the upgrade pricing view with the bundle pricing. You can either show the premium core product pricing options or bundles, but not both at the same time.
How Customers Can Upgrade from Individual Products to the Bundle
If a customer has already purchased an individual product that is included in a bundle, they can easily upgrade to the bundle without losing any of their existing benefits. This enables them to access all the products in the bundle at a discounted price while retaining their current license key and activations.
To start the upgrade from an individual product to a bundle, a customer needs to:
-
Open the Checkout of the bundle either through a hosted link or pricing buttons on your website.
-
Enter the current license key for the individual product.
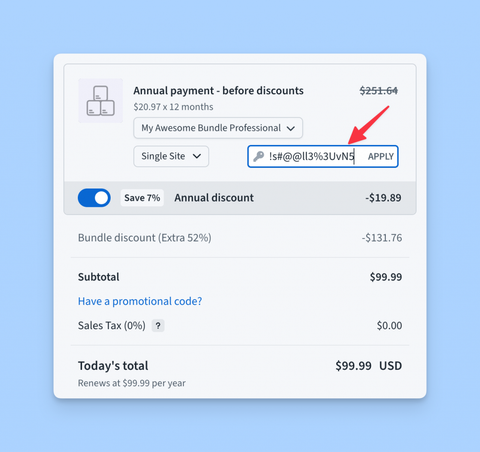
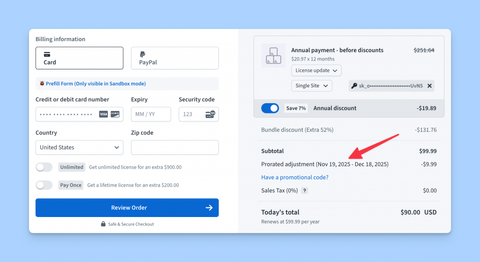
The checkout will automatically recognize the license as part of the bundle's offering and apply the appropriate prorated discount. This enables you to craft attractive upsell incentives by offering both bundle and plan upgrades in one step.
-
Complete the Checkout, and the upgrade process is done.
Upon upgrade, the license becomes a bundle license, unlocking all products included in that bundle plan.
All existing activations on the customer's website(s) remain intact. There is no need to re-activate anything.