Deploy New Product Version with Freemius
There are two main reasons why Freemius manages its own repository and deployment process:
- To be able to securely serve paid plugin/theme downloads and updates to customers who own a valid license.
- To simplify code management by allowing developers to maintain only one code base which contains all of their plugin/theme functionality. A free, WordPress.org-compliant version is automatically generated for them, using a custom PHP preprocessor.
Deploying to Freemius
Manual Deployment
- Zip your plugin's or theme’s root folder on your local machine. If you are using Windows or Windows-based archiving tools (e.g., PowerShell), please review the important notes below when creating the ZIP file.
- Log in to your Freemius Dashboard.
- Navigate to the Deployment page.
- Click the + Add New Version button to browse and upload the product ZIP.
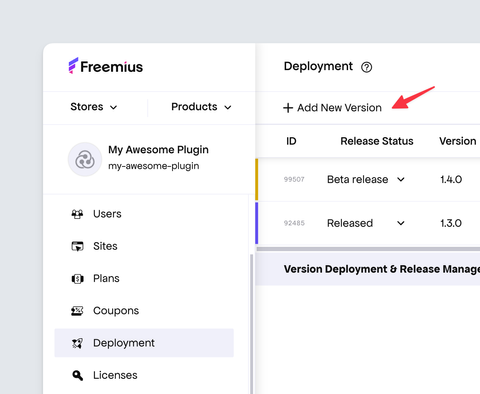
Once you're ready to make the new version available for download and update for your customers, make sure to change the release status from Unreleased to Released.
ZIP File Creation
We recommend the following methods for creating ZIP files for deployment.
Windows & macOS
Create the ZIP file using your system's native ZIP tool to ensure compatibility with our deployment system.
- Windows: Select the files or folders you want to compress, right-click, and choose Compress to... → ZIP File.
- macOS: Select the files or folders, right-click, and choose Compress.
On Windows, avoid using PowerShell or other PowerShell-based ZIP tools, as they may produce incompatible files.
Linux
Use the zip command in the terminal to create your ZIP archive and ensure compatibility with our deployment system.
# Create a ZIP archive
zip -r archive_name.zip folder_to_compress/
Deployment Automation
deploy-on-freemius: a GitHub Action for deployment and releasing a new product version via Freemius.
Credits: Created & maintained by Jasper Vriends / Buttonizer
freemius-suite: a Python-based Bash library for packaging, deploying, and releasing a new product version via Freemius.
Credits: Created & maintained by Daniele Scasciafratte
gulp-freemius-deploy: a nifty Gulp NPM library for packaging and deploying a new product version via Freemius.
Credits: Created & maintained by James Kemp
Freemius API: a PHP example of how to deploy programmatically using Freemius REST API.
What Happens When You Deploy: Free + Paid Packages
When your product follows the Freemium model, the processor will auto-generate two versions of your plugin/theme:
- A paid version: One that's identical to your uploaded version, which includes all of the code. Will be available for download ONLY for customers with a valid license (paid or trial).
- A free version: The same code, stripped from all of your paid features. This stripped-down version is what your users will be able to download first. In case your original plugin/theme is compatible with the official WordPress.org guidelines - the free version will also be compatible, as all paid code was stripped.
The paid version will not be available for download or update by your customers until you change the release status to Released. If you have a beta program, you can also flag the release as Beta release to make it only available for customers who are part of the beta program.
If you already developed free and paid versions that are fundamentally different, you can either merge the versions into a single code base or ignore the free version generated by Freemius. If you go with the 2nd option, make sure also to integrate the SDK into your free version and set the is_premium flag to false to indicate the SDK that it is running in the scope of the free version.
Free Version Auto Generation / Paid Logic Stripping / PHP Preprocessor
The deployment PHP Preprocessor will automatically strip out any paid code - based on the following rules:
Stripping Paid Only PHP Logic
All logic within the if statements containing usage of license related methods with the __premium_only suffix will automatically be stripped from the free version.
// This IF block will be auto removed from the Free version.
if ( my_fs()->is__premium_only() ) {
    // This IF will be executed only if the user is in trial mode or has a valid license.
    if ( my_fs()->can_use_premium_code() ) {
        // ... premium only logic ...
    }
}

// This "if" block will be auto removed from the Free version.
if ( my_fs()->is_plan__premium_only('starter') ) {
    // ... logic related to starter plan and higher plans ...
}
Stripping Paid Only CSS & JavaScript Logic
Simply wrap the code you'd like to exclude with the following meta comments:
(function ($) {
  /*! <fs_premium_only> */
  // ... my premium only code ...
  /*! </fs_premium_only> */
})(jQuery);
In the future, we'll provide a richer JavaScript SDK which will handle license-related logic in a similar manner to how our PHP SDK does it.
Developing a Gutenberg or JavaScript driven plugin with webpack?
To preserve Freemius meta comments from being stripped by webpack's uglifyjs, configure webpack.config.js as follows:
module.exports = {
  optimization: {
    minimizer: [
      new UglifyJsPlugin({
        uglifyOptions: {
          output: {
            comments: /<\/?fs_premium_only>/i,
          },
        },
        extractComments: true,
      }),
    ],
  },
};
Stripping Paid-Only PHP Functions
To add a function which will only be available in your paid version, simply add the __premium_only suffix to the function’s name. Make sure that all lines that call that method either directly, or by using hooks, are also wrapped in the premium only logic:
class My_Plugin {
    function init() {
        ...

        // This "if" block will be auto removed from the free version.
        if ( my_fs()->is__premium_only() ) {
            // Init premium version.
            $this->admin_init__premium_only();

            add_action( 'admin_init', array( &$this, 'admin_init_hook__premium_only' ) );
        }

        ...
    }

    // This method will be only included in the paid version.
    function admin_init__premium_only() {
        ...
    }

    // This method will be only included in the paid version.
    function admin_init_hook__premium_only() {
        ...
    }
}
Stripping Paid Only Files/Folders
There are two ways to exclude files from your free version:
- Add
__premium_onlyjust before the file extension. For example:functions__premium_only.phpwill only be included in the premium plugin/theme version. This works for all type of files, not only for PHP. - For plugins, add
@fs_premium_only(a special meta tag) to the plugin's main PHP file header. Example:
<?php
/**
 * Plugin Name: My Awesome Plugin
 * Plugin URI:  http://my-awesome-plugin.com
 * Description: Create and manage Awesomeness right in WordPress.
 * Version:     1.0.0
 * Author:      Awesomattic
 * Author URI:  http://my-awesome-plugin.com/me/
 * License:     GPLv2
 * Text Domain: myplugin
 * Domain Path: /langs
 *
 * @fs_premium_only /lib/functions.php, /premium-files/
 */

if ( ! defined( 'ABSPATH' ) ) {
    exit;
}

// ... my code ...
The file /lib/functions.php and the directory /premium-files/ will be removed from the free plugin version.
- For themes, add
@fs_premium_only, a special meta tag, to the theme's mainstyle.cssfile header. Example:
/**
 * Theme Name: My Awesome Theme
 * Theme URI:  http://my-awesome-theme.com
 * Description: Create and manage Awesomeness right in WordPress.
 * Version:     1.0.0
 * Author:      Awesomattic
 * Author URI:  http://my-awesome-theme.com/me/
 * License:     GPLv2
 * Text Domain: mytheme
 *
 * @fs_premium_only /premium-functions.php, /premium-files/
 */

body { ... }
span { ... }
Ignoring Folders Processing
If your product has a lot of code and/or many files, we created a special @fs_ignore meta tag to direct the PHP Preprocessor to ignore a given collection of files or folders that don't need processing. For example, if you have a vendors folder with 3rd party libraries that should remain untouched in both the free and paid versions, that folder would be a great candidate for the @fs_ignore tag.
For plugins, add @fs_ignore to the plugin's main PHP file header.
For themes, add @fs_ignore to the theme's style.css stylesheet.
This is similar to the @fs_premium_only example above).
Handling Premium readme.txt
In case you have a paid-only product (without a free version), the WordPress SDK will fetch it from our API instead of WordPress.org. For freemium plugins and themes, just like you only need to maintain a single version of your product, we've built a special markdown-friendly syntax to control which pieces of your readme.txt will show up on either the free or the premium version, or on both.
Paid-only readme.txt Content
If you wish to add content to appear only for the paid version, use the following syntax in your readme.txt:
[//]: # fs_premium_only_begin
Whatever goes in here will only appear in the paid readme
[//]: # fs_premium_only_end
Free-only readme.txt Content
For content to appear only inside the free version use the following syntax in your readme.txt:
[//]: # fs_free_only_begin
Whatever goes in here will be only in the free readme
[//]: # fs_free_only_end
Common readme.txt Content
For content to appear on both the free and the paid readme.txt files, you do not need to wrap it in any syntax.
Example of a Freemium readme.txt
If you deploy a freemium product with the following readme:
=== My Awesome Product ===
Requires at least: 3.0
Tested up to: 4.9
Stable tag: 3.1.0
License: GPLv2 or later

== Description ==

This is the best product ever!

== Installation ==

1. Upload the product to your blog.
2. Activate it.
[//]: # fs_premium_only_begin
3. Enter the license key you received after the purchase and activate it.
[//]: # fs_premium_only_end

== Change Log ==

[//]: # fs_premium_only_begin
= 1.0.0 =
* New: New premium feature!
[//]: # fs_premium_only_end
[//]: # fs_free_only_begin
= 1.0.0 =
* New: New free feature!
[//]: # fs_free_only_end
The free readme.txt will look like this:
=== My Awesome Product ===
Requires at least: 3.0
Tested up to: 4.9
Stable tag: 3.1.0
License: GPLv2 or later

== Description ==

This is the best product ever!

== Installation ==

1. Upload the product to your blog.
2. Activate it.

== Change Log ==

= 1.0.0 =
* New: New free feature!
The paid readme.txt will look like this:
Requires at least: 3.0
Tested up to: 4.9
Stable tag: 3.1.0
License: GPLv2 or later

== Description ==

This is the best product ever!

== Installation ==

1. Upload the product to your blog.
2. Activate it.
3. Enter the license key you received after the purchase and activate it.

== Change Log ==

= 1.0.0 =
* New: New paid feature!
Troubleshooting Issues
Whenever you encounter deployment issues, our Developer Dashboard provides a detailed error message and a link to our documentation to help you troubleshoot. Below are some common issues you may encounter during deployment and how to resolve them.
Corrupted ZIP Files
Please ensure that you've created the ZIP file using a supported method as outlined in the ZIP File Creation section above.
Missing readme.txt File
Freemius requires a readme.txt file in the root of your plugin/theme ZIP. It is used to extract the product description and other metadata displayed during automatic updates.
Create a readme.txt file in the same manner as you would for a WordPress.org plugin/theme, following the WordPress.org guidelines. You can also use a tool like Plugin Readme Generator.
uninstall.php File
When deploying a plugin with Freemius, you cannot include an uninstall.php file. Freemius tracks the uninstall event, and due to a WordPress limitation, if this file is present, uninstall data, including feedback from the user, will not be sent.
To resolve this, move the logic from uninstall.php into a function and delete the file. Hook the function to the Freemius uninstall action, which executes after the uninstall event is reported to the server:
<?php
function my_uninstall_cleanup() {
    // Clean up logic goes here, for example:
    delete_option( "my_plugin_option" );
}
// Not like register_uninstall_hook(), you do NOT have to use a static function.
my_fs()->add_action( "after_uninstall", "my_uninstall_cleanup" );
Missing WordPress SDK
Our deployment system requires the WordPress SDK to be included in your plugin or theme. Ensure that you have integrated the SDK correctly by following our WordPress SDK integration guide.
If you have a reason not to include the WordPress SDK, please contact our support team to discuss your specific use case and explore possible solutions.