Opt-in Screen
The Freemius SDK comes with a default opt-in screen that has gone through many improvement iterations to maximize clarity and optimize conversion rate while adhering to the standard WP Admin UI styles.
As every plugin/theme is unique, you may want to customize the opt-in screen to better match your product's style/tone/brand and audience. You can leverage one or more of the opt-in hooks actions & filters to achieve that.
Default Opt-In Messages
The opt-in message consists of a header and a message and varies according to the state of the admin.
Here’s the default opt-in message that new users that activate your product will see:
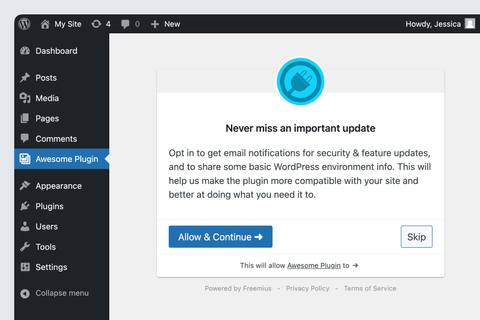
Never miss an important update Opt in to get email notifications for security & feature updates, and to share some basic WordPress environment info. This will help us make the
{product_type}more compatible with your site and better at doing what you need it to.
The default opt-in message that your existing users (people who have already had your product activated, prior to updating to Freemius-integrated version) will see is:
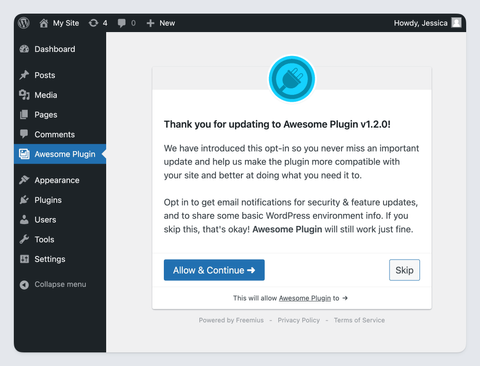
Thank you for updating to Awesome Plugin v
{product_version}! We have introduced this opt-in so you never miss an important update and help us make the{product_type}more compatible with your site and better at doing what you need it to. Opt in to get email notifications for security & feature updates, and to share some basic WordPress environment info. If you skip this, that's okay!{product_title}will still work just fine.
Opt-In Message Customization
To customize either of these default messages - simply use the following filters we’ve created:
connect-header_on-updateandconnect_message_on_updateto override the default message existing users will seeconnect-headerandconnect_messageto override the default message new users will see
Here’s an example of how that can be done:
function my_fs_custom_connect_header_on_update( $header_html ) {
    $user = wp_get_current_user();
    return sprintf( __( 'Thanks %s for updating to our latest release!', 'my-text-domain' ), $user->user_firstname );
}
my_fs()->add_filter( 'connect_header_on_update', 'my_fs_custom_connect_header_on_update' );

function my_fs_custom_connect_message_on_update( $message, $user_first_name, $product_title, $user_login, $site_link, $freemius_link ) {
    return sprintf( __( 'Please help us improve %2$s! If you opt-in, some data about your usage of %2$s will be sent to %5$s. If you skip this, that\'s okay! %2$s will still work just fine.', 'my-text-domain' ), $user_first_name, '<b>' . $product_title . '</b>', '<b>' . $user_login . '</b>', $site_link, $freemius_link );
}
my_fs()->add_filter( 'connect_message_on_update', 'my_fs_custom_connect_message_on_update', 10, 6 );
Opt-In Icon Customization
When you are running your plugin or theme on a localhost environment, if your product is hosted on WordPress.org, the SDK will automatically attempt to download the featured profile icon from WordPress.org and store it in /freemius/assets/img/{slug}.{png|jpg|gif|svg}. If it works, all you need is to deploy the zip with the downloaded file and you are good.
If you don't have a free product version on WordPress.org or would like to load an alternative icon, the best way is to use the plugin_icon filter:
function my_fs_custom_icon() {
    return dirname( __FILE__ ) . '/local/path/to/your/icon.{png|jpg|gif|svg}';
}
my_fs()->add_filter( 'plugin_icon', 'my_fs_custom_icon' );
Opt-In Button Labels Customization
You can easily customize the button labels by using Freemius i18n override function. Example:
if ( function_exists( 'fs_override_i18n' ) ) {
    fs_override_i18n( array(
        'opt-in-connect' => __( 'Ok - I am in!', 'your-text-domain' ),
        'skip' => __( 'Maybe later', 'your-text-domain' ),
    ), 'your-slug' );
}
This will set the primary opt-in button label to Ok - I am in! and replace the default skip label with Maybe Later.
Opt-In Permissions Customization
In addition to the message, the opt-in screen lists in detail all the permissions that will be granted to the product upon an opt-in.
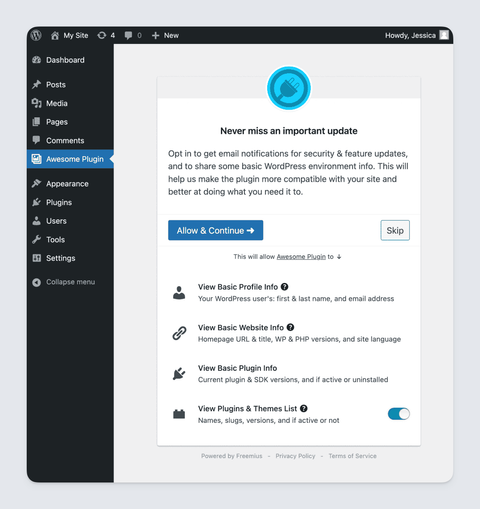
If you'd like to track additional events/data or require additional permissions that are relevant to your product, you can leverage the permission_list filter to add custom permissions.
Here's an example that shows how to add custom Newsletter permission:
function add_helpscount_permission( $permissions ) {
    $permissions['helpscout'] = array(
        'icon-class' => 'dashicons <yourIconClass>',
        'label' => my_fs()->get_text_inline( 'Help Scout', 'helpscout' ),
        'desc' => my_fs()->get_text_inline( 'Rendering Help Scout\'s beacon for easy support access', 'permissions-helpscout' ),
        'priority' => 16,
    );
    return $permissions;
}
my_fs()->add_filter( 'permission_list', 'add_helpscount_permission' );
The 'priority' parameter determines the visual order of the permission on the permissions list. The default permissions priorities are: 5, 10, 13, and 20. So when using 15, the SDK will add the permission just before the last one (between permission 13 and 20).
License Activation Screen
While the default opt-in screen is shown for the free version of your product, the SDK displays a license activation screen for the premium version. This screen is very similar to the opt-in screen, with the key difference being the inclusion of a license key field and an "Activate License" button.
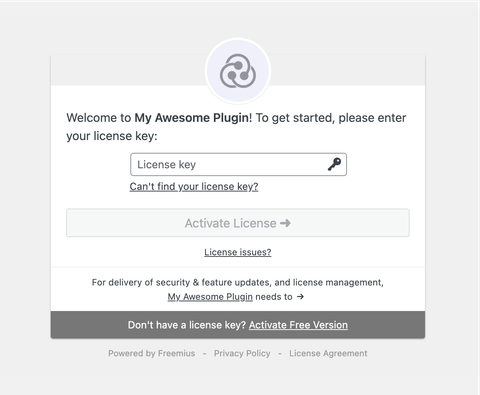
The license activation screen supports the same customization options as the opt-in screen, allowing you to use the same filters. It also shares the same template files.
Advanced Opt-In Customization Actions
The SDK now supports a collection of advanced actions to allow you to inject text and visual components at various stages of screen rendering. All actions receive a single associative array argument with the opt-in state (check the example below).
connect/before
For adding text or visual elements before/above the opt-in container.
function add_custom_header( $activation_state ) {
    if ( $activation_state[ 'is_license_activation' ] ) {
        // The opt-in is rendered as license activation.
    }
    if ( $activation_state[ 'is_pending_activation' ] ) {
        // The user clicked the opt-in and now pending email confirmation.
    }
    if ( $activation_state[ 'is_network_level_activation' ] ) {
        // A network-level opt-in after network activation of the plugin (only applicable for plugins).
    }
    if ( $activation_state[ 'is_dialog' ] ) {
        // The opt-in is rendered within a modal dialog (only applicable for themes).
    }
    return '<div id="my_custom_header"><img src="/path/to/icon.png" /> Awesome Plugin</div>';
}
my_fs()->add_filter( 'connect/before', 'add_custom_header' );
connect/after
For adding text or visual elements after/below the opt-in container.
connect/before_message
For adding text or visual elements before/above the opt-in message header (within the opt-in container).
connect/after_message
For adding text or visual elements after/below the opt-in message (within the opt-in container).
connect/before_actions
For adding text or visual elements before/above the opt-in action buttons.
connect/after_actions
For adding text or visual elements after/below the opt-in action buttons.
Additional Customization
If the customization options above are still insufficient for your goals, you can leverage the templates/connect.php filter, which enables you to filter the HTML of the opt-in screen.
If you want to take the customization further, the opt-in template is located under /freemius/templates/connect.php. The WordPress SDK is an open-source project, so you are free to modify the file as you wish. However, we strongly recommend you refrain from doing that. Here are some good reasons as to why:
- The current opt-in UI and behavior was officially approved and is compliant with the WordPress.org guidelines. If you change it, the compliance with the guidelines is under your responsibility.
- We ran many experiments to optimize the opt-in CTR (Click Through Rate) until we achieved this enhanced variation. There's a good reason why it looks like an OAuth screen - most users have already connected their Facebook or Google to 3rd party services before and are familiar with this UI concept.
- Freemius is running on hundreds of plugins and themes. Therefore, there's a good chance that a user that installs your product had come across our opt-in before and recognizes the Freemius icon. It's easier to trust a UI people are already familiar with.
- You'll need to make those modifications again whenever you want to update to a new version of the SDK.