Contributing to the Freemius WordPress SDK
This guide is intended to help new Freemius SDK developers get up and running quickly. It contains step-by-step instructions on how to effectively contribute to the SDK via the git command line and GitHub.
Prerequisites
For some aspects of development you may need npm and Node JS installed on your system in order to run build scripts. The easiest way to do this is via the Node installer which installs both npm and Node via a single installation process.
Who is This Guide For?
This guide is primarily intended for both new Freemius developer core team members, and Freemius partners, looking to set up their local development environment for the first time. It's important that this is done correctly to ensure it's inline with recommended best practices.
It's also also useful to refer back to this guide even if you've contributed to the Freemius SDK previously. You may need to review the workflow process from time to time if it's been a while since your last commit, or just to make sure nothing has changed.
Ways to Contribute
To contribute to the Freemius SDK codebase you typically fork the main GitHub repository, and then clone this locally to make the required code changes. The following sections cover the whole process in detail.
There are various types of code edits that can be made, including:
- Adding new features.
- Updating existing features.
- Bug and typo fixes.
- Adding, or updating, comments.
Workflow Overview
Freemius uses the Gitflow branching model for managing contributions to the Freemius SDK repository. In this workflow the main development work is done solely via the develop branch. Each new development task is created in a 'feature' branch that is branched directly from develop.
When a feature branch is ready for review, submit a pull request and wait for feedback. If approved, the pull request will then be merged into the develop branch. Otherwise, it is rejected and the feature branch can be modified as required and submitted again, or deleted. Periodically the develop branch of the SDK will be merged into the master branch and a tag will be created to mark the release.
In this guide we'll only be using the command line to work with the Freemius SDK repository but you can use a Git GUI if you prefer. Popular choices are Sourcetree (free) and Fork.
Setting Up For the First Time
Before you can clone the Freemius SDK locally you'll need to decide on the location. You have a couple of choices depending on how you plan on working with the SDK.
The recommended way is to clone the Freemius SDK repository to a local folder on your hard drive, and then either link to it from each of your plugins/themes, or copy it over via an automated script.
To link to the SDK use symlinks as these can be used to map any folder to any location on your local computer and are supported via the command line on macOS, Windows, and Linux operating systems.
If you're on Windows and are having issues with setting up symlinks then try using the Link Shell Extension utility. Basic usage is described here (see the 'How to Create Symbolic Links with a Graphical Tool' section).
The advantage of using symlinks is that it's very easy to always make sure you include the latest version of the SDK with your WordPress products. Every time the local SDK repository is updated it will also be updated (automatically) in each of the plugins/themes that are associated with it (via symlinks).
However, if 'sharing' the SDK among several different plugins/themes via symlinks then don't rely on the plugin icon stored in /freemius/assets/img. Instead, we recommend using the Freemius 'plugin_icon' filter to override this with the correct icon path.
You could also just download the latest release of the SDK, extract it, and add it manually to each plugin/theme. However, this is rather inefficient and the SDK can quickly become out of date as new versions are released.
Local WordPress Development Setup
When developing with the Freemius SDK as part of an existing plugin or theme you'll need to be running a local WordPress site for testing purposes. There are many different ways you can set up a local live WordPress site but perhaps the easiest all round solution is Local by Flywheel, which offers a feature-rich free version.
Whatever local WordPress server you use it's recommended that you set it up so that it's easy to debug as follows:
- Create a new WordPress site only for working on the Freemius SDK.
- Add these PHP constants to your wp-config.php file:
define( 'WP_DEBUG', true );
define( 'SCRIPT_DEBUG', true );
define( 'COMPRESS_SCRIPTS', false );
define( 'FS_METHOD', 'direct');
define( 'WP_FS__DEV_MODE', true );
- Install and activate the Query Monitor and Gutenberg plugins. And if you're developing themes then also install the Theme Check plugin.
- For maximum compatibility always make sure you have the latest version of WordPress, and Gutenberg plugin, installed.
Cloning the Freemius SDK
To be able to submit your own custom contributions you'll need to clone it to a suitable location on your local hard drive:
git clone [path to repository]
If you don’t have commit permissions to the repository, you'll first need to fork the SDK into a separate repository under your own GitHub account as you won't have write permissions to access the SDK repository directly.
The forked repository is referred to as the main 'remote' repository, and is usually labelled 'origin' by default during the cloning process. You'll also need to add a reference to the original repository that you created the fork from to be able to keep your local repository up-to-date with the latest changes as they are merged into the codebase.
git remote add upstream https://github.com/Freemius/wordpress-sdk.git
This additional remote is typically given the label 'upstream' to clearly identify it from the forked repository. You should now have two git remotes set up to allow you to push changes to the forked repository (in order to make pull requests), and to pull changes from the upstream repository (to sync with the latest changes).
You can check what remotes are available at any time via the following command:
git remote -v
Create a Freemius Product via the Developer Dashboard
To fully test all aspects of the SDK you'll need to integrate it into a working WordPress plugin or theme. This can be very basic though as you're only using it to test the SDK codebase. To complete the integration process you'll not only need to set up the plugin code locally, you'll also have to create the associated WordPress product in the Freemius developer dashboard.
Tip: If you don't have a specific plugin ready to integrate the Freemius SDK with then you can use the Freemius Hello Dolly sample plugin as a ready-to-go starter plugin.
General Workflow Steps
This section details the main workflow steps from start-to-finish when contributing to the Freemius SDK.
Before submitting any code please make sure your work adheres to the following requirements:
- All code should conform to WordPress coding standards and best practices.
- Any development work should always be based off the
developbranch (via a feature branch). - After a pull request has been submitted it may be approved, rejected, or approved subject to modifications being made. Each pull request is reviewed and assessed individually.
- The less code changes a pull request contains, the quicker it will be reviewed and merged (if accepted).
General Set Up
Let's take a look now at getting the Freemius GitHub repository set up.
- Clone Freemius WordPress SDK locally to a suitable location on your local hard drive.
- By default you'll be in the
masterbranch but you'll be creating feature branches directly from thedevelopbranch so dogit branch developandgit checkout developto create a local branch and switch to it.
Developing via a Feature Branch
- Locally create and switch to a new feature branch, created directly off the develop branch, to work on a new feature/issue.
git checkout developgit branch features/123-bug-fix. Prefix the branch name withfeature/and include the GitHub issue ref. number where relevant.git checkout features/123-bug-fix
- First thing to do is to update the SDK version number in the feature branches /freemius/start.php file. Base this on the existing version number in start.php of the current develop branch on GitHub. For example, if it’s currently 2.4.1, then the version in the new feature branch should be 2.4.1.1, but the version in your documentation comments should be the next release version number (@since 2.4.2).
- Make changes in the newly created feature branch. When finished do not merge back into the develop branch.
- Instead, add your changes to the staging area and commit to the feature branch in the local repository. e.g.
git commit -am "new commit message" - Then, push the updated feature branch changes to the remote SDK repository.
- e.g.
git push -u origin feature/123-bug-fix - Note: The
-uflag (alias of--set-upstream) is important here as it allows the remote GitHub repository to track changes. It makes it very easy to update pull requests and submit changes.
- e.g.
- Important: Before creating a pull request make sure you've included the latest changes that may have been merged into the upstream
developbranch since the feature branch was first created. This will help to avoid merge conflicts for development branches that have become stale. (see step 3. in the next section for more details) - Go to the main page of the GitHub repository you just pushed to and select the feature branch. You should see a message similar to 'This branch is x commit(s) ahead, x commits behind Freemius:master'.
- Click either the Compare & pull request button or the Pull request link and add details about the pull request code changes in the description box on the next page.
- Important! Make sure that you select to merge into the
developbranch and notmaster. Note: If you accidentally select themasterbranch and submit the pull request, you can edit the target branch at any time by opening the pull request in GitHub and clicking the Edit button (top right of the pull request).
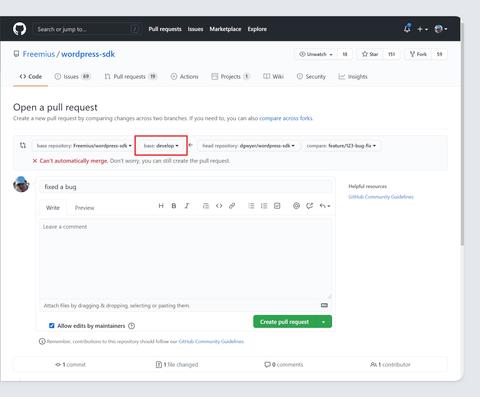
- Create the pull request and assign it to Leo on GitHub. Also, select Leo as the reviewer (you may need elevated permissions to be able to do this). Leo or Vova will eventually review and approve/reject the pull request.
- If the pull request needs more work then make the required code locally and push again to the remote repository to automatically update the pull request. a. To do this, check out the feature branch again locally and make the required changes. b. Commit changes locally and push to the remote repository as before. c. The pull request will automatically update to include the new changes.
- Once the pull request has been resolved then repeat the steps above to create a new feature branch to work on a new issue/feature. Make sure to delete old feature branches that are no longer needed in both the local and remote repositories to keep your development workspace clutter free.
Keeping in Sync With the SDK Repository
Whenever a feature branch pull request is approved it's then merged into the develop branch of the main SDK repository. In reality this actually happens quite often and means that the develop branch (and all feature branches) on your local repository soon become out-of-sync, or stale.
You can always check the status of the develop branch on the remote (forked) GitHub repository as a quick way to see if it is behind the upstream develop branch.
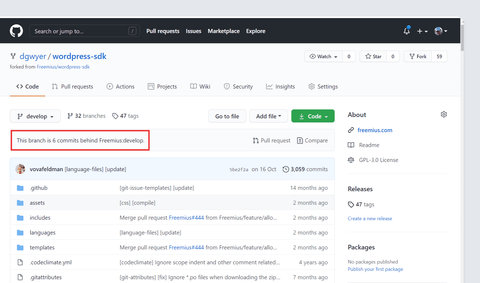
Follow these steps to keep your local develop branch up to date with all recent changes to the develop branch of the main SDK repository.
- In your local repository run these git commands to get the recent changes and update your local repository. Note: If there are no changes received by
git fetchupstream then there's no need to apply step c.git checkout developgit fetch upstreamgit reset --hard upstream/develop
- Whenever the local
developbranch has been updated with changes to the main GitHub repository then you need to add these changes to each of your active feature branches as follows. Old unmaintained (stale) feature branches don't need to be updated.git checkout feature/123-bug-fixgit merge develop
Making Code Changes
When committing code changes make sure to add meaningful commit messages. We have a very specific structure for commit messages, specifically:
- It needs to be English sentences, properly capitalized, with correct grammar and punctuation. Including a dot "." at the end of each sentence.
- We also have a “tagging” system to give a clear context for the commit. For example, if there's a commit related to the license activation logic the commit should look like:
- "[license-activation] Explanation goes here."
- If it's a bug fix that is related to license activation:
"[license-activation] [bug-fix] Explanation goes here." - If it's a new feature related to license activation:
"[license-activation] [new] Explanation goes here." - For enhancement:
"[license-activation] [enhancement] Explanation goes here." - For optimization:
"[license-activation] [optimization] Explanation goes here." - If it's a minor/major bug fix:
"[license-activation] [bug-fix] [major] Explanation goes here." - If the commit is only including documentation:
"[license-activation] [php-doc] Explanation goes here."
Basically, by looking at the tags the reader should be able to get the context of the logic, the purpose of the commit, and its scope or severity.
There are many different tags used in commit messages but you can get a good idea of the ones we use most frequently by browsing through the recent commits history.
Here are a few more tag examples used in commit messages:
[refactor][cleanup][localization][code-convention][enrich][new][revert][bug-fix][fix][ui][ux][testing][debug]
Always update the associated GitHub issue you're working on to explain recent changes. This will help to keep everyone working on the pull request up-to-date with progress.
Add proper comment blocks for new classes/functions with your name. Always comment new code, and add missing comments to existing code whenever you come across it. If you're not sure what it does then add a placeholder comment such as "@todo Add comment here".
Discovered a Bug/Issue?
While working on a particular feature you may from time-to-time come across an unrelated bug or issue in the code. If so then create a new issue in GitHub so it can be worked on via a separate feature branch.