|
|
The moment people are ready to pay, your AI app stops being just a prototype. Now comes the part that feels riskier than shipping the product itself: adding payments without turning a working product into a fragile billing system.
Charging users is more than a checkout button. It brings in the moving parts behind paid access: subscriptions, permissions, failed payments, taxes, and edge cases that only reveal themselves once real customers are involved.
In a prototype, those details are easy to ignore. In a live product, they become the difference between a smooth upgrade and a support problem: a paid user stays locked out, a cancelled account keeps access, or a private key ends up where it should never be. One founder lost $2,500 after exposed Stripe keys were used to charge 175 customers.
For AI-built apps, the safer setup is to keep payments outside the parts of the product you do not want to maintain by hand.
The payment platform owns the transaction: checkout, card details, tax, invoices, retries, and billing events. Your app owns the response: read the customer’s status and unlock the right access.
TL;DR: How to add payments to an AI app without breaking the backend
- Keep payments outside your app: Use hosted checkout, overlay checkout, or an AI-builder integration instead of building a custom payment flow.
- Let a payment platform handle the billing layer: Checkout, tax, invoices, refunds, disputes, renewals, failed payments, and customer billing should sit outside your AI app and be handled by the payment platform.
- Let your app handle product access: Your app only needs to know who paid, which plan they are on, and which features, credits, or limits they can use.
- Choose the setup based on who owns the compliance: Use a payment processor like Stripe if you have engineering support and someone handling tax; use a merchant of record like Freemius if you want tax, billing, and subscription lifecycle management handled outside your app.
- Test the full lifecycle before launch: Purchase, cancellation, failed payment, upgrade, downgrade, expiry, refund, and customer portal access all need to work.
How to connect payments to your AI app
The process for connecting payments to your AI app follows the same four-step pattern regardless of which platform you use — Stripe, Freemius, Lemon Squeezy, or built-in options like Lovable Payments.
- Decide what users are paying for
- Create the product or plans
- Connect checkout to product access
- Test the full billing lifecycle before launch
Step 1 — Decide what users are paying for
Before you create a single plan or price, you need to know exactly what changes when someone pays: whole-app access, specific features, usage limits, credits, or team seats. Everything downstream depends on this.
| Payment model | Example | What your app needs to control |
| Whole-app access | An AI legal brief summarizer where nothing works until you pay | Whether the user has access at all |
| Specific features | A coding assistant where free users can generate, but only paid users can debug and refactor | Which features are available on each plan |
| Usage limits | A voice cloning tool where free users get 10 minutes of output per month | How much usage each plan allows |
| Credit bundles | A real estate listing generator where agents buy packs of 50 property descriptions | How many credits the user has left |
| Paid workflows | A contract analyzer where free users can summarize a document, but the paid workflow flags risks and suggests redlines | Which workflow steps are free vs. paid |
| Team plans | A recruitment screener where solo recruiters pay $59/month and agencies pay $299/month | Seats, shared access, and team limits |
If you’re unsure of where to begin, start with one free plan, one paid plan, and one clear paid feature.
But do not enable checkout before you know what users are paying for. That leads to vague pricing, unclear tiers, and a billing setup you may need to rebuild later.
Roland Jakob, founder of Praxica.io, built his app using Claude Code and Cursor and had a functional product quickly, but payments were held up by the pricing model, not the code.
I had two very different things to charge for: a credit-based system for usage and a tiered flat-rate structure for service packages. Getting clear on those two models took longer than the technical work.
David Hunt, COO of Versys Media, ran into the same issue. What helped him push past the delay was narrowing the scope of what he was selling.
What finally closed it was forcing myself to put a paywall in front of one very clear, high-value workflow instead of trying to price the entire platform.
For a deeper dive into these pricing choices, read our guide to AI app pricing models.
Step 2 — Create your products and plans
Once you know what users are paying for, build it into your payment platform. Create your products, plans, prices, and billing cycles — and lock in the access rules now, because changing them after your first paying customer is messier than it sounds.
For a simple AI app, this might be one paid monthly plan. For a more advanced app, it might include feature tiers, usage limits, credits, or team seats.
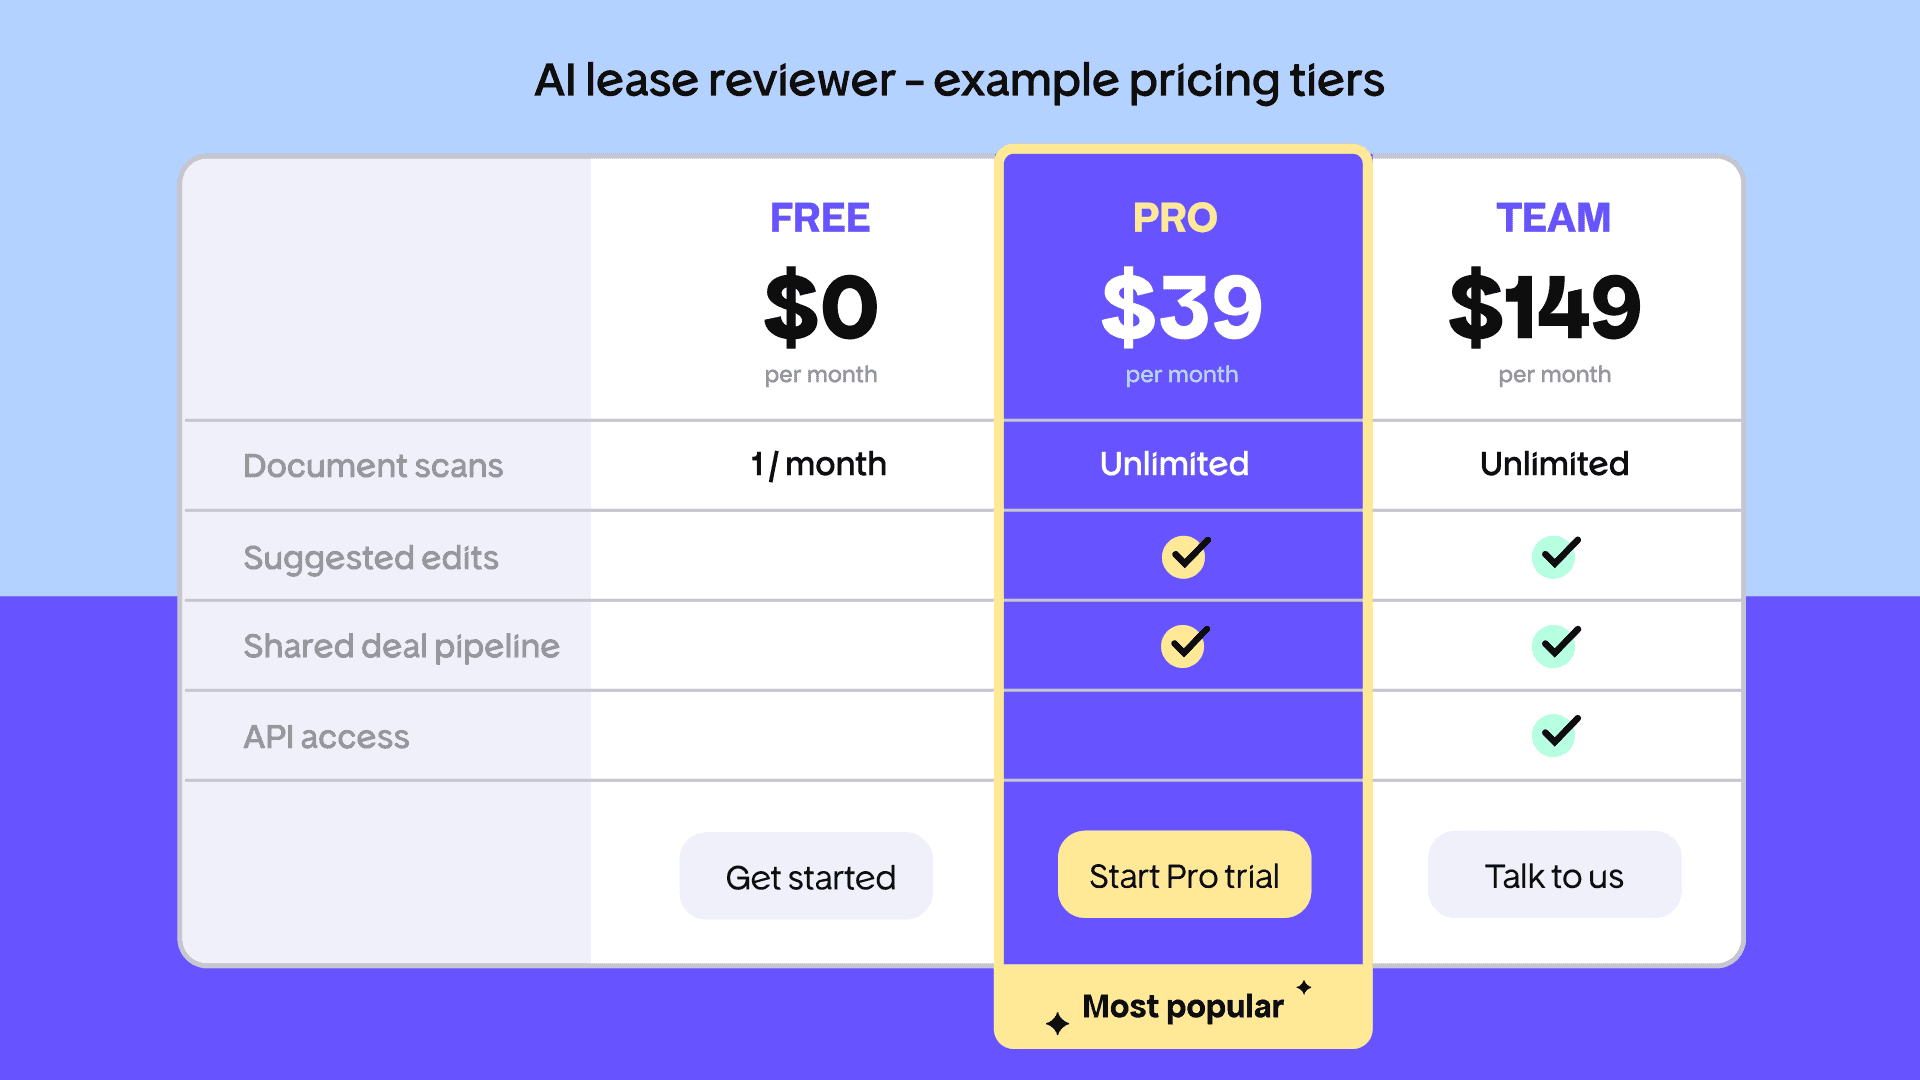
For example: an AI lease reviewer might offer a Free tier (one scan per month), Pro at $39/month (unlimited scans, clause flagging, suggested edits), and Team at $149/month (shared deal pipeline, API access).
That’s three products, three price points, and a set of feature rules your app enforces for each plan.
This step will look different depending on which AI builder or payment platform you use:
- In a hosted checkout tool, you can create a payment link or subscription product but that’s largely the extent of the configuration
- With a merchant of record, you configure the checkout alongside invoices, customer portal access, plan features, lifecycle rules, and tax settings
- In Stripe, you’ll have to configure products and prices, then build the server-side logic that keeps your app in sync
If you’re considering Stripe, it’s worth understanding what Stripe’s transaction fees actually cost once refunds, failed payments, and currency conversion are factored in. In addition, this payment processor traps guide covers 15 problems that only reveal themselves after launch.
Step 3 — Connect checkout to product access
The checkout method you choose determines how much backend logic your app needs to own. There are five paths, each with a different surface area:
- Hosted checkout link
- Embedded checkout
- Overlay checkout
- Built-in builder integration
- Direct API and webhook setup
Whichever path you choose, your app still needs to know what changed after payment and be able to answer:
- Is this user free, trialing, paid, past due, cancelled, or expired?
- Which plan are they on?
- Which features, credits, or limits should they have?
- What should change after an upgrade, downgrade, failed payment, cancellation, refund, or expired subscription?
If you’re using an AI builder like Lovable or Bolt, prompt the agent around the outcome rather than the payment mechanics. For example:
“Add subscription state management. When a user’s payment status changes, update their plan and gate access to [feature]. Check whether the user is free, trialing, paid, past due, cancelled, or expired before allowing access.”
That prompt tells the AI agent what the app should do with payment status — it is not a substitute for your payment platform’s integration instructions.
The agent can build the access logic, but one test payment will not show how it behaves across the full billing lifecycle, as David Hunt learned:
I first tried a no-code payment layer on top of the existing app using a generic checkout/portal product. It looked great, but once we tried to link subscription status to feature access, it fell apart.
The failure point was syncing: users could pay, but their entitlement in the app sometimes did not update, so some people paid and still saw a ‘free’ experience. That was a non-starter.
For Hansjan Kamerling, founder of Adaptify AI, the complexity was never the checkout — it was the rules behind it. At $499 and $999 a month for agency plans, entitlement logic was the difficult part.
If an agency adds 3 sites, removes one, upgrades later, or needs white labelling, the hard part is making billing match product access without creating support chaos. A payment event is useless unless the product immediately knows what the customer bought.
Step 4 — Test the full payment lifecycle before launch
One successful test payment is not enough. Go live only when checkout, billing status, and product access all behave correctly across every state your app will encounter in production.
Payment lifecycle test checklist for AI apps
Before switching to live credentials, confirm each of these works end-to-end:
- Completed purchase: Access unlocks immediately after payment confirmation
- Cancellation: Access follows your cancellation rules (typically active until end of billing period)
- Failed payment: Access updates according to the payment status, retry rules, or grace period
- Plan upgrade: Access moves to the new tier at the correct time
- Plan downgrade: Access changes at the end of the current billing period
- Expired subscription: Access revokes cleanly with no manual intervention
- Refund: Access updates if the refund should remove paid access
- Customer portal access — users can manage their subscription without contacting you
Roland Jakob found the sandbox setup in Stripe more disorienting than expected, even using Claude Code with real engineering control.
Stripe runs a sandbox environment and a production environment, and they behave differently. Claude Code had me set up both, which is correct, but switching between them while testing was disorienting.
You’re looking at two dashboards, two sets of keys, and you have to be disciplined about which one you’re actually testing against. It’s obvious in hindsight but it cost me time.
This discomfort extended to the billing logic itself.
The webhook handling and subscription state logic touched the backend. It was uncomfortable because I hadn’t written that code myself, so I couldn’t always tell if a change was safe.
When payments fail, that’s not a situation you want to be debugging inside a black box.
Much of what Roland had to test manually — cancellation behavior, rebilling rules, subscription state — is handled at the platform level by some payment platforms. The complexity does not disappear, but the surface area your app needs to own shrinks significantly.
That legal question (who actually owns the sale) is the most important decision in this setup. Is it your app, with a payment processor handling the transaction? Or a platform that becomes the legal seller and takes on the responsibility behind it?
Payment processor vs. merchant of record for AI apps
The most important decision in your payment setup is who becomes the legal seller of your product.
A payment processor like Stripe helps you collect payment. Tax compliance, invoices, refunds, disputes, and subscription lifecycle management are yours to own. This is manageable with engineering support and someone owning compliance. It’s far more difficult when your backend is generated or hard to safely modify.
A merchant of record (MoR) like Freemius becomes the legal seller and takes on the full commercial layer not handled by payment processors.
Liran Blumenberg, founder of Multigroup Poster, made the decision between the two before writing a line of integration code:
The code I could read and test. Tax liability in 30 jurisdictions I could not. That’s why I knew I needed a merchant of record, not just a payment API.
For AI app builders like Liran, the MoR tradeoff — slightly less direct control over payment data, in exchange for not owning the compliance and billing infrastructure — is worth it. For a full comparison of MoR platforms, see our guide to merchant of record platforms for software developers.
Next, we’ll look at why Liran chose Freemius as his merchant of record, and how it helps AI-built apps take care of payments in practice.
How Freemius handles AI app payments and feature access
If you don’t want to own the billing backend — and for most AI app builders, you shouldn’t — Freemius handles it outside the generated parts of your app.
That includes the parts most likely to catch you in production: checkout, subscription states, failed payments, refunds, chargebacks, invoices, global tax calculation and remittance across 100+ countries.
For your AI app, that means the backend does not need to manage payment logic directly. Freemius handles the commercial layer, while your product reads the customer’s status and unlocks the right features.
How you connect Freemius depends on where your app is built:
- Lovable apps can use the native Freemius integration to generate a pricing page, overlay checkout, gated premium features, and an integrated accounts page from a single prompt
- Bolt apps can use the Freemius Bolt integration to connect checkout, pricing, gated features, and account management through AI-ready prompts
- Sticklight apps can use Freemius’s Sticklight integration path to add subscription-based feature access and billing lifecycle management without custom backend work
- For apps built with Cursor, Claude Code, Replit, Base44, or another web-based tool, you can add Freemius Overlay Checkout to the frontend with a single snippet, then connect payment status to product access through Freemius’s customer and subscription APIs.
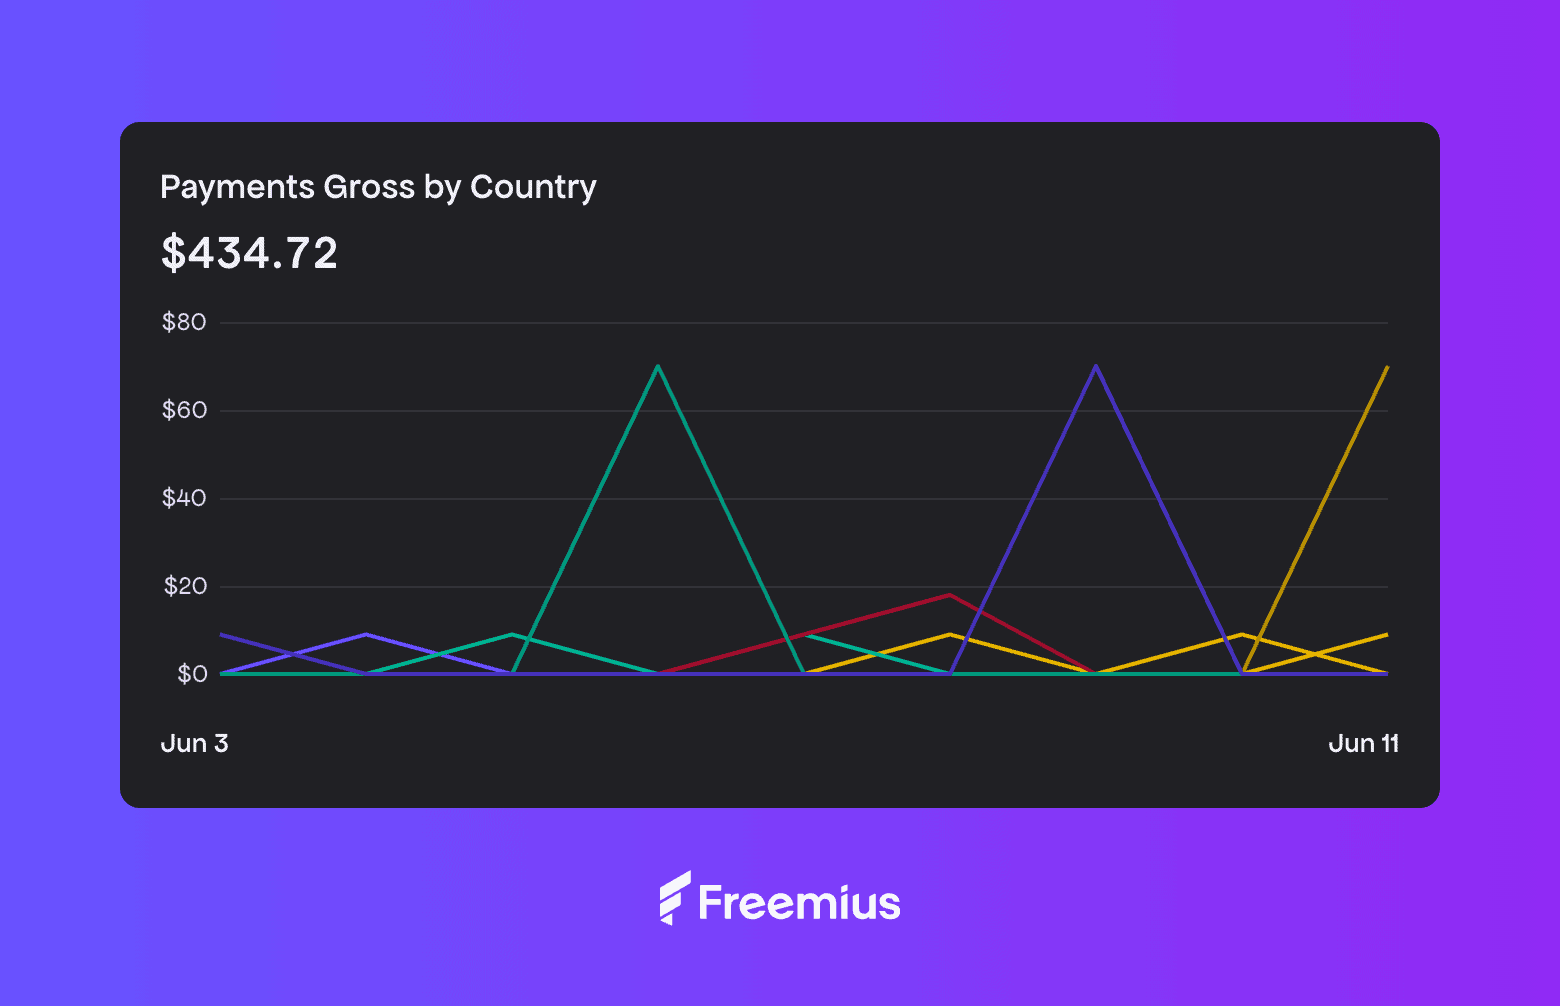
Liran launched Multigroup Poster on Freemius from day one and had his first paying customer four hours after going public.
One week in, he had 28 paying customers and $434 in collected payments, with plans at $8.99/month or $69.99/year.
The payments integration, like the rest of the codebase, was written by Claude Code from plain-English descriptions. He never wrote a line of it himself.
The code was never the blocker, and with AI tools it definitely isn’t anymore. The blocker is fear of the business side: taxes, compliance, chargebacks.
Pick a merchant of record like Freemius so that fear belongs to someone else, ship the checkout, and find out if anyone pays. Until someone pays, you don’t have a business, you have a project.
No code needed: Add payments to your AI app with Freemius
A quick payment link may be enough to validate demand. But if your AI-built app needs feature gating, subscriptions, global payments, and compliance, Freemius handles the billing backend so your app doesn’t have to.
Your app only needs to read customer status and unlock the right features. Freemius handles the entire commercial and monetization layer behind it, giving you a cleaner path from first sale to sustainable revenue to scaling business (with a decreasing revenue-share model that lowers your rate as you grow).
Start selling today with a payment setup built to scale with you.
Frequently Asked Questions
Do I need a merchant of record for my AI app?
For most AI app builders, a merchant of record is the safer path. A payment processor like Stripe lets you collect payment, but tax compliance, invoices, refunds, disputes, and subscription lifecycle management remain your responsibility. A merchant of record takes on the legal seller role and handles those layers for you. If you do not have engineering support and someone owning compliance, an MoR platform like Freemius is usually the better starting point.
Will adding payments break my AI-built app?
Not if you use a hosted checkout or MoR integration. The payment flow runs on the provider’s infrastructure and connects to your app through a status signal. The checkout and the AI app are separate layers.
Do I need to handle VAT and sales tax myself?
Not if you use a merchant of record. Solutions like Freemius collect and remit tax on your behalf as the legal seller. With Stripe alone, you’re responsible for compliance in every jurisdiction where you have customers.
What payment methods can I accept for an AI app?
Most payment platforms support credit cards, debit cards, and bank transfers as standard. Merchants of record like Freemius support payments via credit and debit cards, PayPal, and iDeal, across nearly every country not under US sanctions.
What happens when a subscription expires or a payment fails in my AI app?
Failed payments trigger retry and dunning sequences. Expired or cancelled subscriptions should update access based on the rules configured in your payment platform and app. If you’re not managing these states manually — and you shouldn’t be — a merchant of record handles the retry logic, grace periods, and access updates at the platform level. Your app just reads the status.
How do I add payments to a Bolt, Replit, or Cursor app?
Every payment option in this article except Lovable Payments works with any AI app regardless of how it was built. Freemius’s Overlay Checkout snippet works on any web-based frontend. Dodo Payments and Lemon Squeezy offer hosted payment links that work anywhere.
Do I need a registered company to start accepting payments?
No. Most MoR platforms including Freemius allow you to start as an individual. Business registration is a decision for later and doesn’t require migrating your payment setup.
Can I switch payment providers later without rebuilding my app?
You can, but it’s not simple. Migrating active subscriptions, customer data, and payment methods takes real work. Choosing the right tool from the start avoids a painful migration when your subscriber base is large enough that errors have real consequences.
How do I charge differently for specific features rather than the whole app?
You need feature-level gating: a way to map specific features to specific plans and make your app enforce those rules. Freemius supports this natively. With other platforms, check whether feature-level entitlements are supported or whether you will need to build that logic yourself.
What if I just want a flat fee for whole-app access?
Any option on this list handles it. A Stripe link will get you there fastest. Freemius is worth the extra setup if you anticipate needing feature gating, multiple tiers, or a complete subscription lifecycle.
How long does setup actually take?
With a hosted payment link from Lemon Squeezy, the first version can be very quick. With Freemius integrations for Lovable, Sticklight, and Bolt, the payment stack can be generated with AI-ready prompts.
Don’t wait until the product feels “ready.” Payments always take longer than expected, edge cases reveal themselves quickly, and paying customers give you the feedback loop you need to decide what to build next.
Can I use Stripe with an AI app builder like Lovable, Replit, or Bolt?
Yes, but Stripe Direct works best when you understand and maintain the backend that handles webhooks, subscription state, and feature access. If your app was generated by an AI builder and you don’t own that backend confidently, a merchant of record like Freemius or hosted checkout path is usually safer.
Can I add payments to a mobile app built with AI tools?
It depends on how the app is distributed. For web apps and progressive web apps, yes — hosted checkout or overlay checkout can work on mobile devices. For native iOS or Android apps distributed through app stores, check app-store payment rules before using external checkout. Apple and Google have specific requirements about in-app purchase handling that can affect external payment providers.