Customize the Opt-in and License activation Screens
The Freemius SDK comes with a default opt-in screen that has gone through many improvement iterations to maximize clarity and optimize conversion rate while adhering to the standard WP Admin UI styles.
However, we understand that you might want to match your brand look and voice, that is why we have several options to help with the customization process of Opt-in and License activation screens.
The opt-in and license activation screens support the same customization options allowing you to use the same filters. They also share the same template files.
Opt-In Message Customization
To customize either of these default messages seen by your users, you can use the following filters:
For New Users
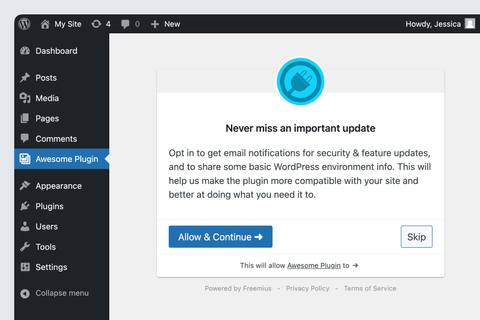
To change the default opt-in message that new users who activate your product will see i.e.:
Never miss an important update
Opt in to get email notifications for security & feature updates, and to share some basic WordPress environment info. This will help us make the
{product_type}more compatible with your site and better at doing what you need it to.
Use the following filter hooks:
For Existing Users
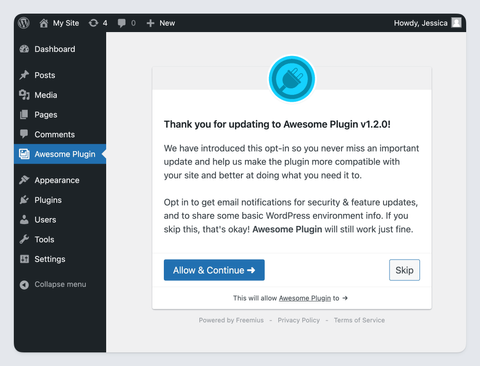
To change the default opt-in message that existing users (people who have already had your product activated, prior to updating to Freemius-integrated version) who activate your product will see i.e.:
Thank you for updating to Awesome Plugin v
{product_version}!We have introduced this opt-in so you never miss an important update and help us make the
{product_type}more compatible with your site and better at doing what you need it to.Opt in to get email notifications for security & feature updates, and to share some basic WordPress environment info. If you skip this, that's okay!
{product_title}will still work just fine.
Use the following filter hooks:
Opt-In Icon Customization
If your product is hosted on WordPress.org and you are running your plugin or theme on a localhost environment, the SDK will automatically attempt to download the featured profile icon from WordPress.org then store it as /freemius/assets/img/{slug}.{png|jpg|gif|svg}. If it works, all you need is to deploy the zip with the downloaded file and you are good.
If you don't have a free product version on WordPress.org or would like to load an alternative icon, the best way is to use the plugin_icon filter.
Opt-In Button Labels Customization
You can easily customize the button labels by using Freemius i18n override function.
Opt-In Permissions Customization
In addition to the message, the opt-in screen lists in detail all the permissions that will be granted to the product upon an opt-in.
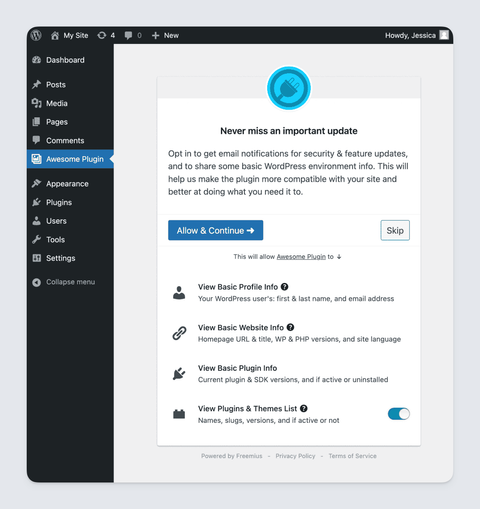
If you'd like to track additional events/data or require additional permissions that are relevant to your product, you can leverage the permission_list filter to add custom permissions.
Advanced Opt-In Customization Actions
The SDK now supports a collection of advanced actions to allow you to inject text and visual components at various stages of screen rendering. All actions receive a single associative array argument with the opt-in state.
Here are the available actions:
connect/before: For adding text or visual elements before/above the opt-in container.connect/after: For adding text or visual elements after/below the opt-in container.connect/before_message: For adding text or visual elements before/above the opt-in message header (within the opt-in container).connect/after_message: For adding text or visual elements after/below the opt-in message (within the opt-in container).connect/before_actions: For adding text or visual elements before/above the opt-in action buttons.connect/after_actions: For adding text or visual elements after/below the opt-in action buttons.
Additional Customization
If the customization options above are still insufficient for your goals, you can leverage the templates/connect.php filter, which enables you to filter the HTML of the opt-in screen.
The WordPress SDK is an open-source project, so you are free to modify the file as you wish. If you want to take the customization further, the opt-in template is located under the Freemius SDK /templates/connect.php file.
However, we strongly recommend you refrain from doing that because:
- The current opt-in UI and behavior was officially approved and is compliant with the WordPress.org guidelines. If you change it, the compliance with the guidelines is under your responsibility.
- We ran many experiments to optimize the opt-in CTR (Click Through Rate) until we achieved this enhanced variation. There's a good reason why it looks like an OAuth screen as most users have already connected their Facebook or Google to 3rd party services before and are familiar with this UI concept.
- Freemius is running on hundreds of plugins and themes. Therefore, there's a good chance that a user that installs your product had come across our opt-in before and recognizes the Freemius icon. It's easier to trust a UI people are already familiar with.
- You'll need to make those modifications again whenever you want to update to a new version of the SDK.