Freemius offers two ways for users and customers to manage their account:
- WP Admin Product Account page
- External Customer Portal also known as the “Members Dashboard”.
Freemius automatically generates an external “Customer Portal” which will be accessible for users and customers of your products and store.
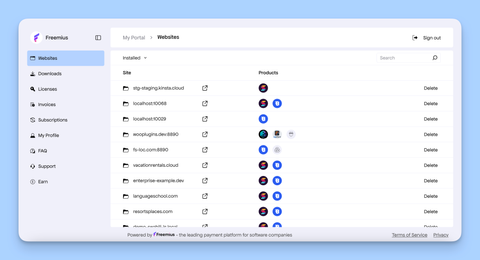
 Customers will receive their login credentials after their first purchase, and for security reasons, will have to update their auto-generated password upon their first login.
Adding a Link to The Customer Portal on Your Store
If you have a website, we recommend adding a direct link to the portal to make it easier for your customers to access their account. The URL to your portal is:
https://users.freemius.com/store/<storeID>
You can find your store ID under the Stores settings; accessible in your Freemius Developer dashboard by:
- Clicking Stores in the top-left panel under the Freemius logo.
- Choose your store by name.
- Scroll to the bottom of the menu on the left and select the Settings.
- In the keys section (you might need to click the dropdown arrow to expose the keys), you will find the store ID.
Embedding The Customer Portal In Your Store
Alternatively, you can embed the portal directly on your site. We invested a lot of resources designing the customer portal to work for that exact use-case to keep the user on your store and make the portal “native” on your store.
Embedding Into a WordPress Website
- Install and activate this plugin.
- Create a new page on your website. We recommend using one of the following slugs:
users
,account
,members
. - Go to the Stores settings. Scroll to the Customer Portal section.
- Paste the URL address of the page that you created in step 2 above into the Customer Portal URL setting. Make sure that the protocol (HTTP or HTTPS) is accurate, otherwise, the portal will not load!
- Copy and replace the
<storeID>
with your store ID,<storePublicKey>
with your store’s public key, and<headerHeight>
with your site’s header height in the following shortcode:[fs_members store_id="<storeID>" public_key="<storePublicKey>" position="fixed" left="0" right="0" top="<headerHeight>px" bottom="0"]
If your site’s header height is responsive, you can customize the dashboard’s position with media queries by styling the iframe’s
<div id=”fs_dashboard_container”>
container as follows:#fs_dashboard_container { top: {headerDesktopHeight}px; } @media screen and(max-width: 600px) { #fs_dashboard_container { top: {headerMobileHeight}px; } }
- Add the new shortcode to your newly created page.
Customizing the Customer Portal
Following the instructions above to embed the Customer Portal in your website, you can make your user experience more uniform by adding CSS styles to the Customer Portal embed to match your current website styles such as:
Here are the steps to achieve that:
- Go to the Stores settings. Scroll to the Customer Portal section.
- Paste the URL address of the custom style sheet into the Customer Portal CSS stylesheet setting. Ensure that the protocol (HTTP or HTTPS) is accurate, otherwise, the custom styles will not load!
You need to keep watching for any changes in the Customer Portal HTML changes to avoid breaking your styles.