1. Home
  2. Documentation
  3. Getting Started with Freemius

Getting Started with Freemius

Welcome to Freemius

Please accept our warmest welcome to Freemius!

You’re probably here because you’re interested in selling WordPress plugins or themes through Fremius.

Our goal is to help your business grow as much as possible by taking away all the complexities of licensing, payments, subscriptions, and more out of selling your WordPress products, leaving you with more time to focus on product development and marketing.

We’re extremely proud of the results we achieve for plugin and theme businesses, and we believe in our platform 200%. Many of our partners end up seeing 2X (or greater) increases in revenue within just one year after starting to sell with Freemius because of all the automated tools we offer in the Developer Dashboard, like Cart Abandonment Recovery (which is just the tip of the iceberg!).

We’re constantly optimizing all aspects of the platform to maximize conversion rates and increase your sales, so you don’t have to! The reason for this is that we only make money when you make money, so we genuinely care about the success of your business, and we do our best to help you increase your sales.

This guide is intended to get you up to speed as quickly as possible when getting started with Freemius and integrating our WordPress SDK into your WordPress product(s).

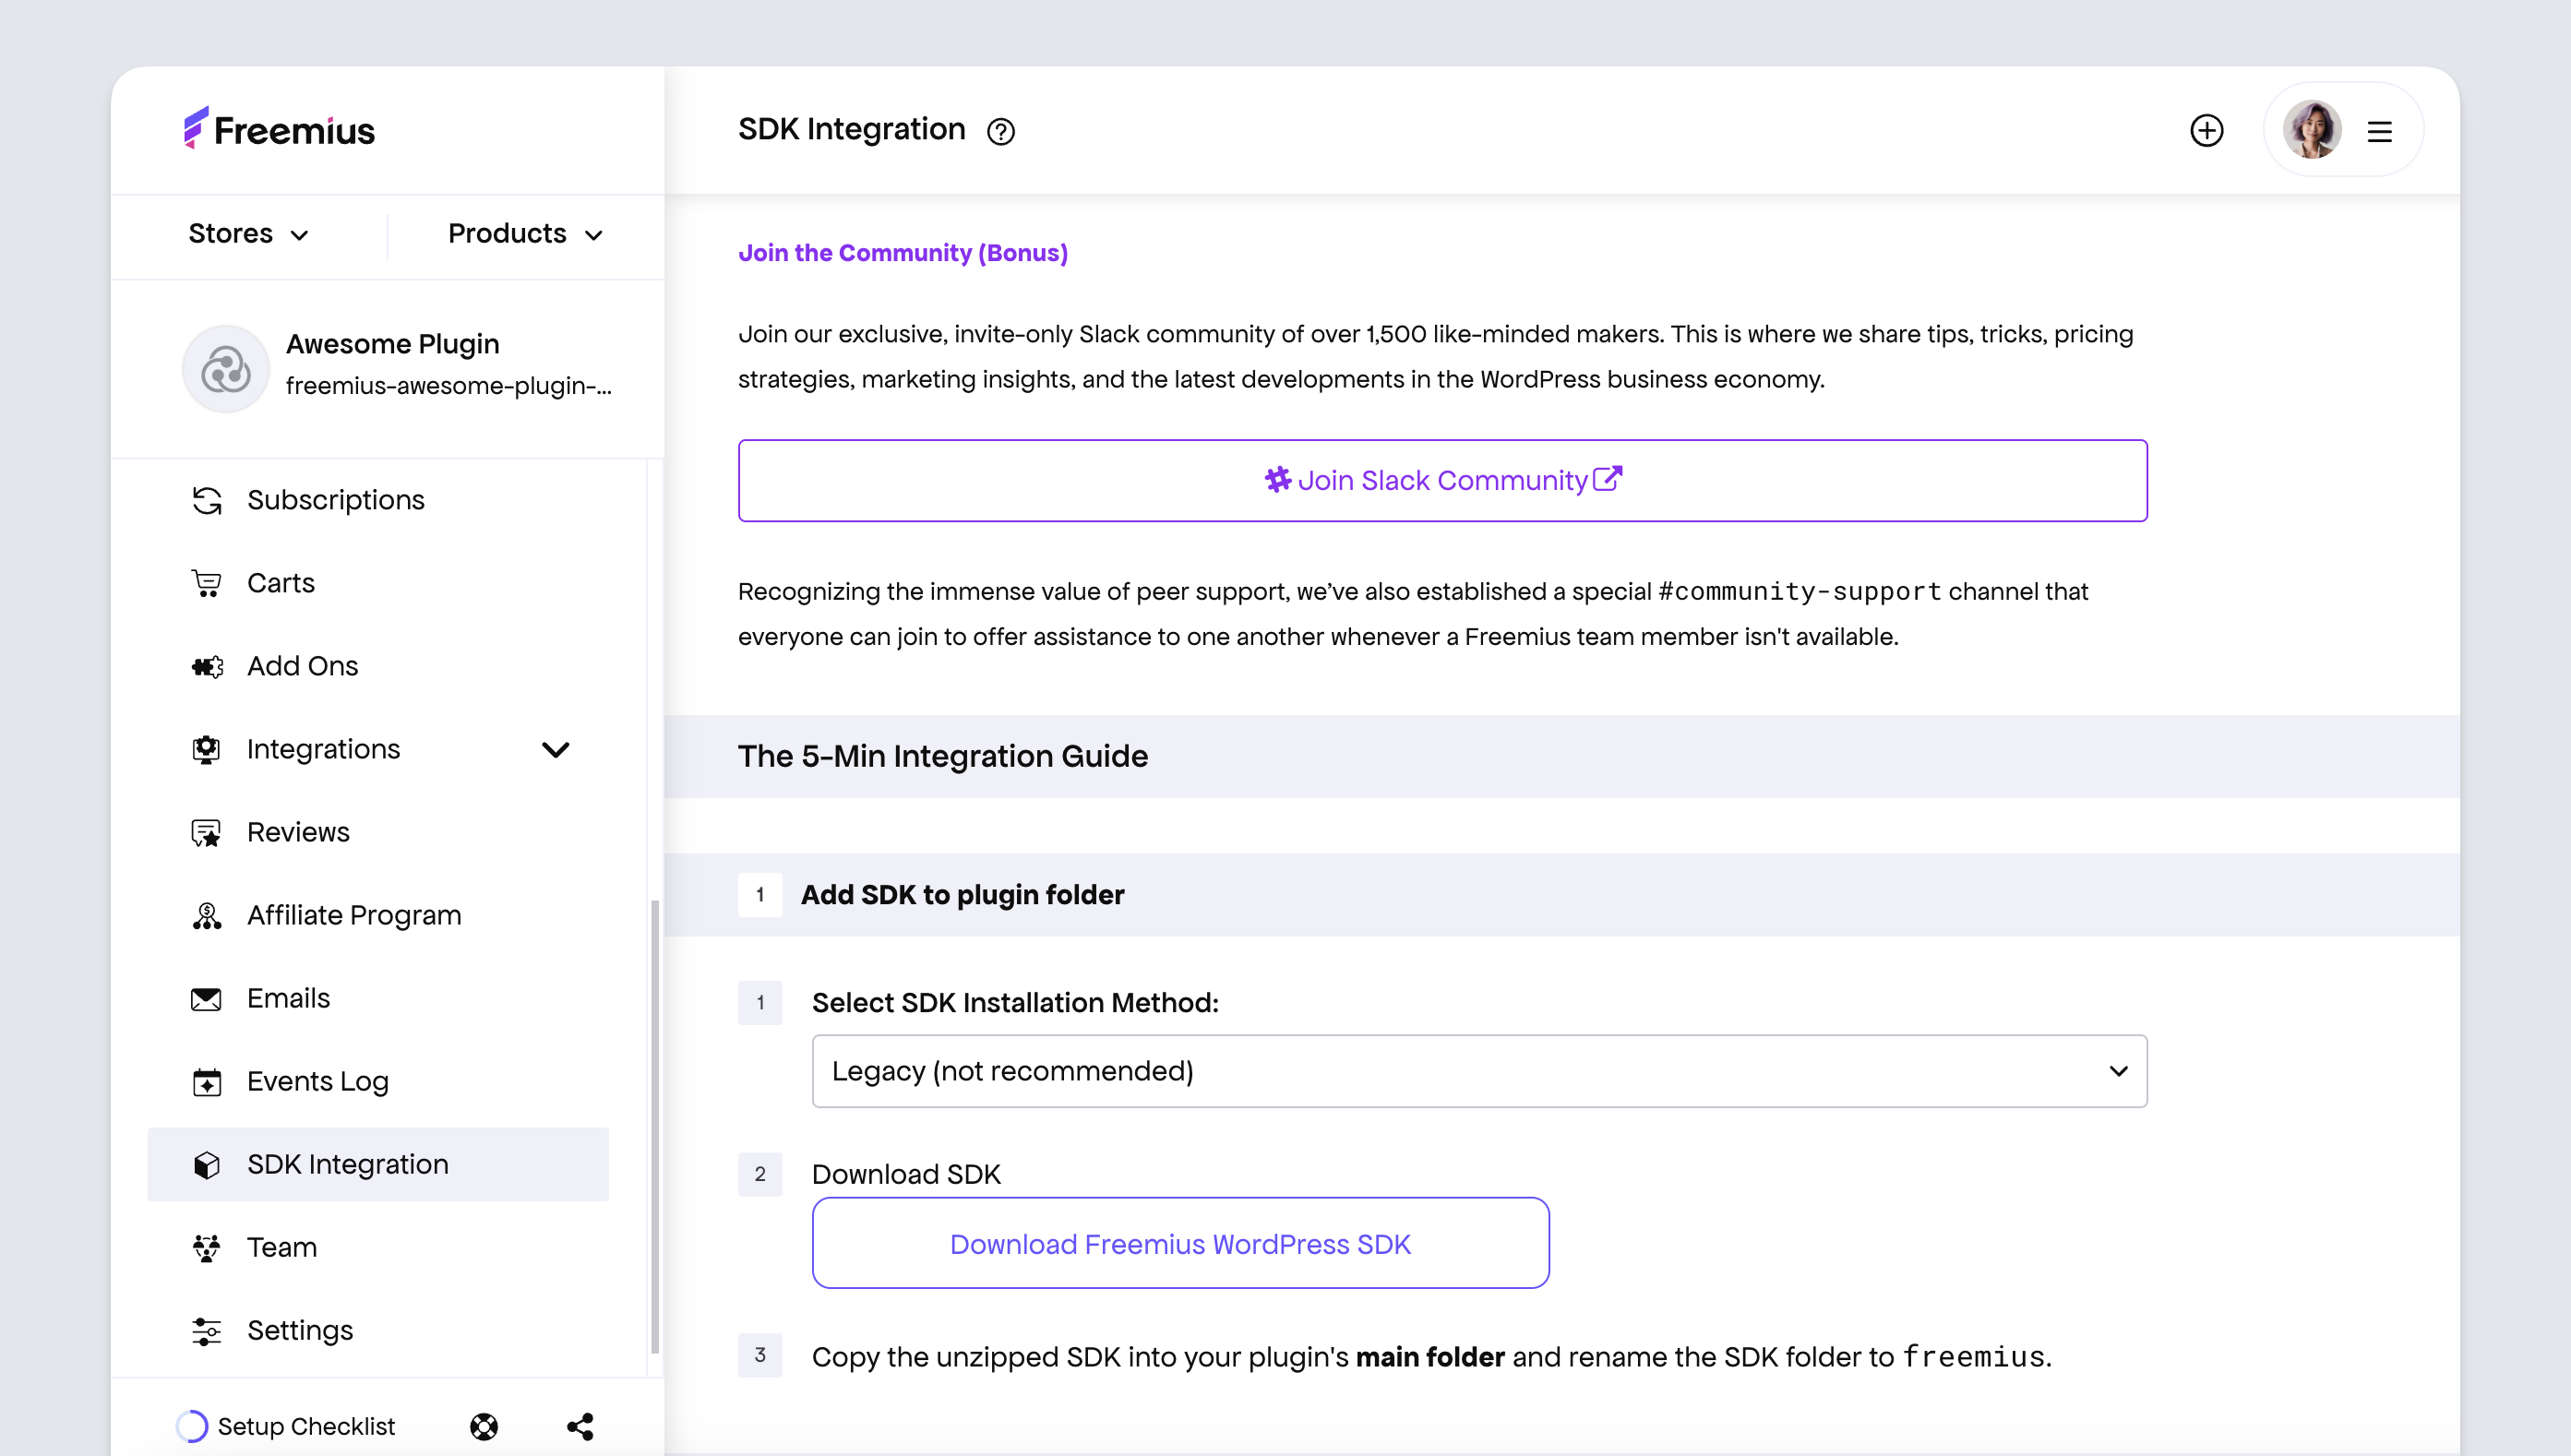
When you’re ready, feel free to join our DEV Slack community. You can find an invitation in the SDK INTEGRATION section of the Developer Dashboard after registering an account and creating your first product.

This DEV Slack an invite-only community of hundreds of other plugin and theme developers just like you who are all learning and sharing ideas about the best practices of growing their product businesses. You can tap into the #integration and #community-support channels to ask questions about integrating your product and using the platform.

Freemius Dashboard - SDK Integration

We are also always here to help, so if you ever get stuck just reach out and we’ll get you back on track as soon as possible! You might get your answer faster in the DEV Slack though, since there are many active developers on a daily basis.

Here’s what will be covered in this Quick Start Guide so you can easily navigate around as needed:

Creating an Account

The first step is to create an account for Freemius through the Developer Dashboard. It’s completely free to get started!

Register for a Freemius Account

The next steps are to integrate your product, set up your pricing plans, and deploying your product to Freemius.

Integration & Deployment Process

It’s surprisingly easy to integrate Freemius into a WordPress plugin or theme, with a typical integration taking just a few minutes to complete.

Once you’ve repeated the process a few times, it will become almost second nature. Let’s walk through the initial integration steps together to get a better understanding of the workflow.

  1. Add a New Plugin, Theme, or Bundle.
  2. Add the latest WordPress SDK into your Product.
  3. Fill out the SDK Integration Form.
  4. Create Your Pricing Plans.
  5. Insert the Auto-Generated SDK Integration Snippet.
  6. Designate Your Premium Only Code
  7. Deploy to Freemius

1. Add a New Plugin, Theme, or Bundle

Once you’ve registered an account with Freemius and logged in to the Developer Dashboard, the first thing to do is add a new plugin or theme.

Click the ADD PLUGIN / THEME / BUNDLE menu link on the left-hand side of the page to begin adding a new product.

Freemius Dashboard - Add new plugin, theme, or bundle

Here, you can choose whether to create a plugin or theme based product. You can even create bundle or membership type products here too.

Enter a product title and slug. You can optionally upload a product icon, although, this doesn’t have to be done right away. You can update the product icon at any time in the settings later on. Hit the CREATE NEW button to finish.

Freemius Dashboard - Add new product

2. Add the latest WordPress SDK into your Product

The Freemius WordPress SDK contains an impressive set of features to help you sell your plugins and themes, and it’s regularly updated with new features and improvements.

To get notified about new SDK releases it is recommended to Watch the GitHub repository. You can also Star the repository to bookmark it on your GitHub account.

Freemius WordPress SDK -Watch and star GitHub repo

As soon as you’ve added your plugin or theme, you’ll automatically be taken to the SDK INTEGRATION page.

Freemius Dashboard - SDK Integration

This part of the integration process involves adding Freemius specific code to your plugin or theme. This is split into three parts:

  • Add the core Freemius WordPress SDK.
  • Add an auto-generated snippet of code to your product’s main PHP file.
  • Wrap premium only code with the proper logic.

In this section, we’ll focus on adding the core Freemius WordPress SDK. The other two steps are covered in the following sections.

Download the latest version of the WordPress SDK and extract the zip file.

Rename the wordpress-sdk-master extracted folder to freemius and copy the entire folder as-is to the root folder of your WordPress plugin or theme.

3. Fill out the SDK Integration Form

With the WordPress SDK in place in your plugin or theme, fill out all the form fields in the Init SDK section. It’s pretty straightforward as each field is self-explanatory, but if you have questions, please email us or ask for details in the #integration channel in our DEV Slack.

Freemius Dashboard - plugin SDK Integration

Note: This is the SDK integration page for a plugin. The theme SDK integration page is very similar, as you can see in the screenshot below.

Freemius Dashboard - theme SDK Integration

Once you have filled out all form fields, a product-specific snippet of code will be auto-generated, which can then be added to your plugin or theme.

Don’t copy the code just yet, as when you create your pricing plans (in the next section) this will update the auto-generated SDK snippet. So, to save you from having to copy the SDK integration snippet twice, hold off until you’ve created your pricing plans. We’ll come back to this later.

Note: You might have noticed that there is no save button on the SDK integration page. This is actually deliberate because changes are auto-saved when any field is edited, which regenerates the SDK code snippet on demand.

4. Create Your Pricing Plans

Next, you’ll want to create pricing plans for your users to choose from. Each plan can differ in the number of licenses and features associated with it.

Go to the PLANS page in the Developer Dashboard to create your first plan.

Freemius Dashboard - Plans

Note: A Free plan is automatically created for you. If you are adding a premium-only product make sure to delete the Free plan. The reason why we automatically generate a Free plan for you is because we believe the freemium pricing model can benefit your WordPress business by giving you the opportunity to market your free product on WordPress.org, giving you access to a large number of free users who can convert into paying customers. The WordPress SDK includes various sub-menu items that allow users to easily upgrade to your paid options (which we call “In-Dashboard Upgrading”), manage their account, and so on.

No features are added to the default Free plan, but it is recommended to add the features available in the free version of your plugin or theme, if you offer one. After you include the free features, they will show up on the WP Admin pricing table in addition to the other plans and features you offer.

More details about “In-Dashboard Upgrading” and the WP Admin pricing table will be covered later.

Click ADD PLAN to create a new plan. Enter a unique name in lowercase and specify a title. e.g. ‘pro’, and ‘Pro’ (without the quotes).

Creating a new plan will update the auto-generated SDK code snippet. For your convenience, the updated snippet appears in a pop-up window.

Freemius Dashboard - SDK integration snippet

Pro Tip: This is why we mentioned earlier that you should wait until the pricing plans have been created to save you having to copy the SDK integration snippet into your plugin more than once. You can close the window for now, as this is covered in the next section. In the future though – when you’re comfortable with the integration steps – it’s handy to be able to copy the updated snippet directly from the PLANS page without having to go back to the SDK integration page.

Enter information about the plan such as pricing for the Single Site option.

You can offer pricing options for plans that offer more than 1 license activation for multiple sites. To do this click Add Bulk and select the number of sites, and enter the relevant pricing options.

Freemius Dashboard - pricing plans

Here we entered $49 as the price for an annual single-site license and added an additional option for an annual 3-site license at $79.

You can see that Freemius offers recommendations for your pricing plans based on our experience analyzing hundreds of plugin and theme businesses over the years.

The pricing plans will be displayed in the Freemius Checkout when customers purchase your product, as seen here:

Freemius Checkout

There are other settings you can fill out to customize your plans, such as additional currencies, free trial length, support, and whether or not features are blocked after license expiration.

Toward the bottom of the screen is where you can add plan features. Simply type the name of the feature and press enter to add it to the plan. Continue until you’ve added all the required features.

Freemius Dashboard - plan features

A typical Freemius product contains a free and premium plan but you can create multiple plans if you wish. It’s recommended that you only create tiered plans that offer additional features from your lower priced plans.

E.g. – If your plugin contains a fixed number of features and you want to offer a different number of licenses for access to these features then this is best handled via a single plan.

If you’re creating multiple plans, you only need to check the box that says “Include all (plan name) features”. This will ensure your higher priced plans don’t repeat the same features over again and, instead, includes text on the pricing table that says “Includes all (plan name) features”.

5. Insert the Auto-Generated SDK Integration Snippet

Once you’ve filled out the fields on the SDK integration page and you’ve created your pricing plans, the next step is to add the auto-generated SDK integration snippet to the main plugin or theme file.

Note: For themes, this will be in the root functions.php file.

Freemius Dashboard - SDK integration code snippet

6. Designate Your Premium Only Code

The last step in the integration process is to designate sections of your code that are premium only so that Freemius knows what features are associated with each plan.

The benefit of this is that you can manage a single codebase and use the deployment feature to effectively “strip” premium-only features out of your Free version for easy deployment on WordPress.org. This way, you don’t have to manage two versions of your product separately.

There are various methods available to specify your premium code. For PHP, JavaScript and CSS code you can wrap specific sections of code with the corresponding premium logic.

This is usually in the form of conditional statements for PHP code and special meta comments for JavaScript and CSS. You can also choose to exclude entire files and folders from specific plans. This gives you a lot of flexibility in how to define premium-only features in your plugin or theme.

In addition, you can selectively ignore individual files and entire folders that should be included in all plans. This is ideal if your WordPress product contains vendor-specific code (e.g. 3rd party libraries) that should always be included in all your plans.

You can view the full range of functionality for designating premium-only sections of code with Freemius logic here.

Once completed, this step forms the full, premium version of your plugin or theme. This deployment logic is a powerful tool that results in a very efficient workflow, allowing you to maintain a single codebase.

This tool is core to the Freemius concept, enabling a natural workflow of development and release cycles for both free and premium versions of your product.

If you already developed free and premium versions that are fundamentally different, you can either merge the versions into a single code base or ignore the free version generated by Freemius. If you go with the 2nd option, make sure also to integrate the SDK into your free version and set the is_premium flag to false to indicate the SDK that it is running in the scope of the free version.

7. Deploy to Freemius

With the integration process completed, you’re ready to Deploy your plugin or theme to the Freemius Developer Dashboard.

To deploy a plugin or theme, simply compress (Zip) the root folder of your product and upload it to begin the deployment process by clicking the ADD NEW VERSION button. The product code will then be parsed and checked before the final free/premium versions of the product are generated and compressed into production ready Zip files.

Freemius Dashboard - Deployment

For products that have a free plan defined, Freemius generates both free and premium versions of your WordPress product directly from the Zip you upload. Code wrapped in premium-only conditional logic (in the previous step) will only be included in the premium version. It will be stripped out entirely from the free version.

The free version can be downloaded manually and uploaded to WordPress.org via SVN. The premium version, along with all future updates, will be served directly from the Developer Dashboard to paying customers with an active license (they’ll see update notifications via the WP Admin).

Once you’ve integrated your WordPress product with Freemius and deployed it, you’re ready to start selling! But first, let’s get to know the Developer Dashboard a bit.

Quick Introduction to the Developer Dashboard

The Developer Dashboard is your main portal to the Freemius platform. From here, you can track important statistics, such as plugin and theme sales and user opt-ins, manage products, licenses, customers, and much more!

You’ll be managing many aspects of your plugin or theme business in the Developer Dashboard, so we recommend taking some time to familiarise yourself with it as much as possible so you feel comfortable navigating around the various pages.

Each of your products or bundles has its own dedicated Dashboard. To access each one, click the small arrow to the right of the product name underneath the Freemius logo on the top left corner, as seen here:

Freemius Dashboard - Switch between products

You’ll probably visit the main Dashboard page for each product the most. Here you can see a breakdown of recent sales and activity, as well as other useful insights.

Freemius Dashboard - Analytics and Insights

If you take a look at the left-hand menu for each plugin dashboard, you’ll notice that there are a lot of pages.

Important: To unlock all of the menu items and features of the Developer Dashboard, you’ll need to have made at least one sale of your product through Freemius. Before making a sale, you’re considered to be on the FREE PLAN. After you’ve made a sale, you’ll automatically be upgraded to the REVENUES PLAN. More details in the Pricing section below.

Freemius Dashboard - Main menu options

Don’t be overwhelmed by all these menu items and features. Here’s a breakdown of what each page does:

  • USERS – Lists all the customers who have purchased the product and all users opted-in to your free version.
  • SITES – Lists all the sites that are using the free or premium plugin.
  • PLANS – Manage pricing plans and features.
  • COUPONS – Create and manage product coupon codes.
  • DEPLOYMENT – Deploy your premium product and download your free/premium versions.
  • LICENSES – View product licenses for all purchased plans.
  • PAYMENTS – List all payments for a specified time period.
  • SUBSCRIPTIONS – List all subscriptions for a given time. period, and status (active, expired etc.).
  • CARTS – Details of shopping cart activity on your checkout page.
  • ADD ONS – View active add-ons for your product.
  • INTEGRATIONS – View 3rd party integrations for Help Scout, Mailchimp, and custom webhooks.
  • REVIEWS – View customer reviews of your product.
  • AFFILIATION – View details about your affiliate program if enabled. Note that this feature is still in beta.
  • EMAIL ADDRESSES – View admin email addresses used for various support requests. Can define different emails for different roles (general, sales, technical etc.).
  • EVENTS LOG – Detailed list of all Freemius activity.
  • SDK INTEGRATION – Instructions for setting up the WordPress SDK.
  • SETTINGS – Update product settings such as title, slug, icon, team members etc.

Finally, to access your account profile information, store details, and overall earnings for each product, click your profile picture at the top right of the Developer Dashboard.

Freemius Dashboard - Account profile and store details

Pricing

Before we get to making your first sale, it’s important to know what it will cost to use Freemius. Even though you may have checked out our Pricing page, we want to make sure it’s crystal clear.

You only start paying for anything when you start monetizing with Freemius – meaning you’ve made at least one sale through our platform. At that point, all the features in the Developer Dashboard become available, including the Affiliate Platform and many other useful tools. Once you’ve made a sale, you’re no longer on the FREE plan – you’ll automatically move up to the REVENUES plan.

Freemius is based on a revenue sharing model. A small percentage is taken for each successful transaction. It breaks down like this:

  • On your first $1,000 in sales, our share is 27%.
  • Between $1,000 – $5,000, our share is 17%.
  • After $5,000, our share is 7% + gateway fees.

Keep in mind that these thresholds are for lifetime revenue and not monthly revenue, and they are for your entire account, whether you sell a single product or 20 of them through Freemius. Once you pass $5,000 in sales of your product(s), the revenue share goes down to 7% for life. Freemius doesn’t charge anything more than the 7% revenue share + gateway fees after you $5,000 in lifetime revenue.

Gateway fees may vary. However, because we process a high sales volume on behalf of all the products sold with Freemius, we’re constantly negotiating the best rates possible with our payment gateway partners so you don’t have to worry about a thing.

When it comes to gateway fees, Freemius doesn’t make anything on them. We negotiate the best payment gateway fees for our selling partners simply because we want your business to be as successful as possible.

You might be wondering why we charge 27% on your first $1,000 and 17% on the next $4,000 in revenue. That’s because we tend to find that the support load is significantly higher for new partners joining Freemius. As you gain more experience using our platform, you’ll generally need less support, so the revenue share is set up accordingly.

We don’t offer negotiated pricing under any circumstances, however, if your monthly average sales volume surpasses $60,000/month, you can contact support, and we may discuss a rates review.

If you choose not to monetize (make sales) with Freemius, you can still use our Analytics & Insights, which allows you to collect useful data about your plugin or theme users.

That service is available for free for side projects (with limitations on the amount of data that is available), and you can get expanded access with a monthly subscription. We’ve made our platform pricing flexible based on the needs of the WordPress plugin and theme community, so you can choose to proceed as you wish 🙂

Making Your First Sale with Freemius Checkout / Buy Button

Once the SDK integration process has been completed, your plugin or theme users can purchase the paid version of your product in 3 places:

  • Directly from the WP Admin
  • Hosted Freemius Checkout pages
  • A Buy Button that can easily be integrated into any website.

Upgrading in the WP Admin

Your free plugin will automatically include a pricing table and purchase button so that your customers can purchase directly from the WP-Admin (we call this In-Dashboard Upgrading).

The prices and features included on this pricing table automatically sync with the pricing and features your designate in the PLANS section of the Developer Dashboard.

Freemius - In-dashboard Upgrading

Pro Tip: If you don’t want to display one of your plans in the WP Admin pricing table, you can choose to “hide” them using the “Is Hidden” switch in the PLANS section. This, along with custom Buy Buttons for each plan, allows you to experiment with different pricing options really easily.

Freemius Dashboard - Hide pricing plan

Hosted Freemius Checkout Pages

Next to each plan, you’ll notice buttons that say “Checkout Link”

Freemius Dashboard - Checkout link

These buttons link directly to hosted Freemius Checkout pages for Sandbox / Testing payments and Production / Live payments.

These hosted Checkout pages are really useful for a number of reasons:

  • If you want to link directly to the hosted checkout pages from WordPress.org instead of linking to your website’s pricing page.
  • If you want to share checkout links with specific affiliates (which requires a unique parameter added to the checkout link).
  • If you want to send direct license upgrade links to customers you can easily create a link with the relevant license key and the target update plan and billing cycle.
  • For testing and viewing your Checkout page to see how it works and how your pricing plans are laid out.

Buy Button

To integrate the Buy Button on any website, simply grab the auto-generated HTML / JavaScript code for any pricing plan from the GET CHECKOUT CODE buttons.

Freemius Dashboard - Checkout code

A pop-up will display that allows you to easily copy the code and embed it anywhere you want.

Freemius Dashboard - Copy the JavaScript checkout code

Pro Tip: The checkout code snippet is just generic HTML / JavaScript so it can be used on ANY site. That means you don’t even need to be running a WordPress website to sell your products. You can share this code with any external partner who is willing to put a buy button for your product on their site.

One major advantage of the Buy Button is that it’s super-easy to create a fully functional eCommerce website for any plugin or theme.

Perhaps your product is expanding rapidly and you want a dedicated presence for it. Simply build your new site using whatever web technologies you wish and drop-in your checkout code. Done! You now have licensing, payments, subscriptions, and much more available for your product sales.

Other existing eCommerce solutions for selling WordPress products, like WooCommerce or Easy Digital Downloads, rely on you running WordPress and their associated plugins on your site. Not only that, all your important data is stored in your WordPress site’s database, making it difficult and time-consuming to separate out a specific plugin or theme to a separate site.

Freemius is very flexible in this regard and frees you from any such constraints.

See the official Checkout / Buy Button documentation for more details, and how you can customise the checkout links even more (e.g. automatically apply coupon codes or attach the checkout to specific affiliates).

User Dashboard

One of the most important aspects of selling a plugin or theme is allowing your users to manage their relationship with you.

Freemius provides a fully-featured User Dashboard that can easily be embedded on your site using a custom plugin from Freemius. For instructions on how to set up the User Dashboard on your site, click here for details.

The User dashboard provides access to multiple useful features. Once logged in, customers can:

  • Download their purchased products.
  • Access license keys (upgrade/downgrade plans)
  • Update payment information.
  • View order history (including invoices).
  • Edit their personal profile.
  • View renewals and billing information.

Freemius User Dashboard

The User Dashboard can help reduce the number of support requests for common tasks relating to downloading products, accessing license keys, invoices, updating payment information, etc. This is a huge time saver for any plugin or theme business.

Next Steps

You now have all the information needed to get started with Freemius!

It’s time for action: Open an account if you haven’t already done so and you can start integrating. Before you know it, you’ll have the Freemius platform working with your own WordPress plugin or theme.

Let’s recap the steps for a successful integration:

  1. Open a Freemius account.
  2. Add a new plugin, theme, or bundle.
  3. Create your pricing plans.
  4. Add the auto-generated SDK snippet and the core Freemius WordPress SDK to your plugin or theme.
  5. Wrap premium only code in Freemius’ conditional logic or use special meta comments.
  6. Deploy your WordPress product to the Developer Dashboard.
  7. Release the auto-generated free/premium versions to your users.

Once your new product has been released, there are a few more things to consider that may prove useful in ensuring a successful product launch.

  • Introduce yourself to the Freemius community via the DEV Slack channel – and announce your first integration and product launch. We have special #product-launches and #upvoters-mafia channels to help get the word out and celebrate!
  • Get started on marketing and promoting your product. Our Blog has plenty of useful advice, tips, and tricks to help you on your road to success.
  • Make sure to read the remaining sections where we talk about where to get help, advanced topics, and other essential resources.

Where to Get Help

Occasionally, everyone needs a little support. Here’s a rundown of the best places to get help with any challenges you might have in using Freemius.

Freemius Slack Channel

This is a great way to meet fellow plugin and theme developers who already have a wealth of knowledge using Freemius. Some developers have been using Freemius for years, so they know the platform inside out and have some great tips and tricks to share.

There are some very interesting channels dedicated to #general-dev topics, #integration, and #marketing to name a few – so it’s well worth checking out this great resource. A good place to start is the #general channel as it has the most users.

Documentation

Freemius boasts an impressive set of documentation covering almost every aspect of integration, deployment, and using Freemius. A lot of effort goes into keeping the documentation updated, and new topics are added on a regular basis with new features added to the platform and answers to questions we get from the community.

It’s highly recommended that you set aside some time to study the documentation in detail. New users will find this particularly beneficial to get up to speed as quickly as possible.

Once you’re familiar with the platform we hope you’ll find the documentation useful as a reference guide. It has been structured with this specific purpose in mind.

Email Support

If you need support and would like a guaranteed reply (as members of the DEV Slack may not always give you the answers you need on a timely basis), then we recommend emailing us directly at [email protected]. This is the best way to get guaranteed support for any issue you’re experiencing with Freemius

Freemius Blog & YouTube Videos

We regularly release blog posts and YouTube videos to help you get the most out of the platform and increase your sales and conversion rates. Both channels are a fantastic resource, so if learning with reading or video is your thing, you’ll definitely want to check out some of the latest updates.

A whole range of topics are covered, such as how to price your WordPress products, SEO tips for the WordPress.org repository, the SaaS business model, choosing what features should be free/premium, and many more!

Advanced Topics

Once you’ve completed the integration process, you’ll no doubt want to find out more about the advanced features available with Freemius.

This section covers some common advanced topics likely to be of interest.

Updating the WordPress SDK

Freemius is continuously (and rapidly) evolving with new features being added all the time. Just take a look at the WordPress SDK release archive to see how much has been added in recent versions.

However, this means that the core Freemius WordPress SDK included with your plugin or theme will be out of date when new versions get released.

It’s not always critical that you update immediately, but it’s good practice to keep an eye on the release schedule and update as necessary. If there are urgent security upgrades or bug fixes, we will usually send an email suggesting you to update your product as soon as possible. You’ll want to maintain your product with the latest WordPress SDK to ensure that you and your users can take advantage of all the new features that become available.

When a new SDK version is released, you can easily update your WordPress product by swapping out the freemius folder with the latest version that is always available on GitHub.

Debugging

Debugging is an essential part of any project, and Freemius makes it as easy as possible to identify integration issues.

To enable debugging, simply add a new constant to your WordPress config file:

define( 'WP_FS__DEV_MODE', true );

This adds a new Freemius Debug admin menu item located directly underneath the Settings menu in the WP Admin. Click this to go to the Freemius debug page to discover any issues going on with the SDK and/or your integration

Freemius debug in the WordPress admin

Sometimes, issues can be solved just by clearing the Freemius API cache, which you can do via the debug page.

If you don’t have debugging enabled, then you can reach this page by manually navigating to:

/wp-admin/admin.php?page=freemius

Freemius API

The Developer Dashboard provides you with a comprehensive product, license, and customer management interface. However, there are still times when you might need to interact with the powerful Freemius API directly.

We’ve developed two dedicated SDKs to help you interact with the API more easily. You can check them out here:

  • PHP SDK – For interacting with the Freemius API via PHP.
  • Node SDK (in beta) – For interacting with the Freemius API via JavaScript / Node.

Selling Add-ons & Extensions

Freemius fully supports the selling of add-ons or extensions for core products. Please review our documentation about Selling Add-ons / Extensions for details.

Affiliate Platform

Setting up an affiliate program is a great way to boost sales for your WordPress products. Freemius includes a fully featured affiliate platform out-of-the-box. There are no setup fees whatsoever, as it’s all included in the Freemius revenue share pricing.

Our documentation covers the full details of the Freemius affiliate platform here.

3rd Party Integrations

Freemius offers out-of-the-box 3rd party integrations with some very useful tools such as Help Scout and Mailchimp. Other 3rd party integrations can be easily set up using Custom Webhooks with platforms like Zapier, HubSpot, customer.io, segment.io, and many other solutions.

Integrating these platforms can help take your business to the next level!

Useful Resources

Here are some useful links to Freemius resources you can use for reference.

Come find us on social media and say hello!

A Final Word

We’re here to help.

If you’re still struggling and in need of assistance, then please let us know. Help us keep improving this guide for you and other Freemius partners.

We want you to get the most out of Freemius, and we hope this guide helps you take that first step. We’re confident that Freemius will enable you to grow your plugin or theme business in new and exciting ways.

Welcome to the start of a fantastic new journey!

The Freemius team