App Integration
This guide covers integrating an application that includes a license activation flow. Examples include desktop apps (macOS or Windows), Chrome extensions, Electron apps, and more.
Initial Steps
- Sign up for Freemius
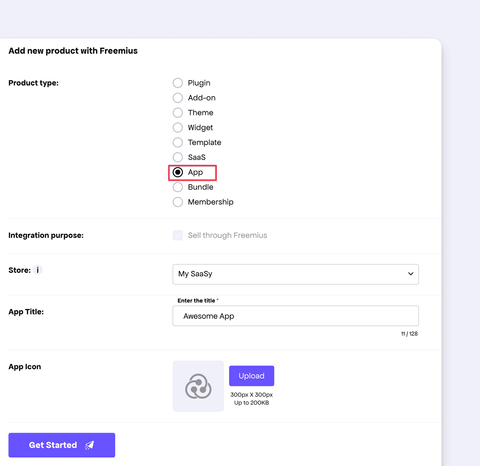
- Create a new App product
- Configure your plans and pricing in the Plans section
The unit label is customizable. Learn more
Checkout Integration
There are multiple ways to integrate Checkout within your marketing page or directly within your app.
Marketing or Pricing Page
Use the Freemius Checkout JavaScript SDK or Buy Button to embed the checkout. The flow is as follows:
- Buyers purchase from your website.
- Freemius sends them a license key.
- They use the license key to activate your app.
In-App Purchase
If your app is web-based, you can use the same Buy Button API. We also provide an NPM package to load the Checkout.
For other cases, you can open the Freemius Checkout directly. To generate checkout links, go to the Plans page and click on the "Get Checkout" button. Here’s an example link:
https://checkout.freemius.com/app/{product_id}/plan/{plan_id}/
Testing Checkout Integration
Freemius allows you to make sandbox purchases. If you just want to make a purchase:
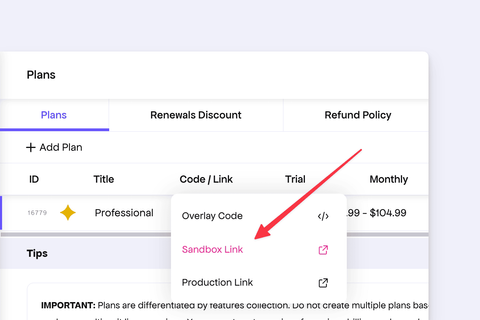
- Go to Plans and click on "Get Checkout" button.
- Select the Sandbox link.
- Fill the form and use any test card or test PayPal account.
- Make sure to use an email address you have access to.
- Once the purchase is made you will receive an email with a license key in it.
If you want to test sandbox payments within your application, then you can use the following logic to generate the sandbox token.
import crypto from 'crypto';

const productId = '<<productID>>';
const planId = '<<planID>>';
const productPublicKey = '<<publicKey>>';
const productSecretKey = '<<secretKey>>';
const timestamp = Math.floor(Date.now() / 1000);

const sandboxToken = crypto
  .createHash('md5')
  .update(
    `${timestamp}${productId}${productSecretKey}${productPublicKey}checkout`
  )
  .digest('hex');

// If using direct links
const checkoutLink = `https://checkout.freemius.com/app/${productId}/plan/${planId}/?sandbox=${sandboxToken}&s_ctx_ts=${timestamp}`;
console.log(checkoutLink);

// If using the Buy Button API
fsCheckout.open({
  sandbox: {
    token: sandboxToken,
    ctx: timestamp,
  },
});
Integrating Users
If you already have the user's email address from your app or website, pass the following parameters in the Buy Button SDK:
user_email: The user's email addressreadonly_user: true
For a direct checkout link, add these parameters as query strings:
https://checkout.freemius.com/app/{product_id}/plan/{plan_id}/?user_email={email}&readonly_user=true
The checkout will enforce the provided email address when the user makes a purchase.
License Activation
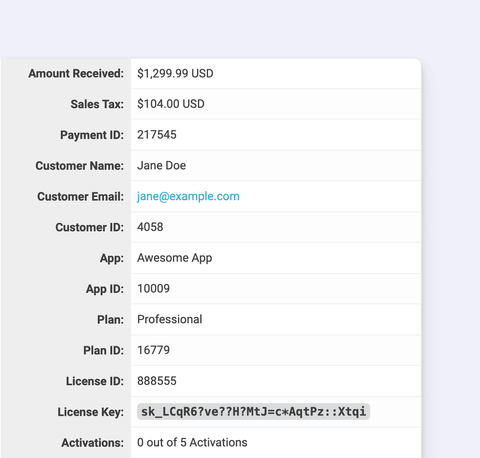
Upon purchase, Freemius sends the buyer a license key via email.
- If using in-app Checkout integration, you can auto-activate the license after purchase.
- Otherwise, provide a UI for users to enter their license key manually.
Once the key is entered, follow this guide to learn how to activate and manage licenses from your app.
Synchronizing Application State with Freemius
When a license is activated, Freemius creates an Install entity and increases the license’s activation counter by 1. The Install entity contains several useful properties that you can update from your application to keep it synchronized with Freemius. Keeping these details up to date allows Freemius to display accurate analytics in the Developer Dashboard.
Updatable Properties
You can update the following properties of the Install entity:
version– The version of your application.title– A descriptive identifier for the activation, such as[email protected] - Windows 10.country_code– A two-letter ISO 3166-1 alpha-2 country code.language– The language in which your application is used, e.g.,en-GB.platform_version– The platform version, preferably in semantic versioning format. For example, in the case of Chrome:134.0.6998.sdk_version– If your app uses an SDK, you can track its version here using semantic versioning.programming_language_version– If your app depends on the client’s programming language version (e.g., Node.js for a CLI app), specify it here.is_beta- Indicates whether the user has agreed to install a beta version of your app. Use this to determine whether to push beta or stable updates.
Updating Install Properties via API
To update these properties, you need the install_id and install_api_token received when the license was first activated from your app.
Make a PUT request to the Freemius API with a JSON body containing the updated properties. Use the install_api_token as the Bearer authentication token.
PUT /v1/installs/{install_id}.json
Host: api.freemius.com
Content-Type: application/json
Authorization: Bearer {install_api_token}

{
  "version": "1.2.3",
  "title": "[email protected] - Windows 10",
  "country_code": "US",
  "language": "en-US",
  "platform_version": "134.0.6998",
  "sdk_version": "2.1.0",
  "programming_language_version": "18.16.0"
}
To avoid hitting rate limits, ensure responsible API usage. We recommend updating the Install entity once a day or only when a significant event occurs, such as a new version installation.
Handling License Upgrades
Freemius allows your users to upgrade their plan or quota at any time. The upgrade process will go through Freemius Checkout again, which collects up-to-date information and, once successful, updates the existing license.
There are two methods for generating license upgrade links:
Upgrade link using the License Key
If your app stores the license key, generating the upgrade link is straightforward. The URL structure is:
https://checkout.freemius.com/product/{product_id}/plan/{new_plan_id}/?license_key={license_key}&pricing_id={pricing_id}
You can use either the same or a different plan ID when generating the URL. Make sure to URL-encode any query parameters. You can find the plan and pricing IDs in the Developer Dashboard → Plans page.
Upgrade link via the Freemius API
To get upgrade links from Freemius API, you'll need to make one authenticated request. Our recommended approach is:
- Have your app send a request to your server with the license information to generate the upgrade link.
- Your server makes an API call to Freemius and sends the upgrade URL back to your app.
- Your app then opens the upgrade link in a browser or an integrated modal.
Below is the API endpoint and an example of how to call it:
POST /v1/products/{product_id}/licenses/{license_id}/checkout/link.json HTTP/1.1
Host: api.freemius.com
Content-Type: application/json
Accept: application/json
Authorization: Bearer 123
Content-Length: 127
{
  "plan_id": "planID",
  "billing_cycle": "annual",
  "quota": 1,
  "currency": "usd"
}
The API will return an object with a url property — the link to Freemius Checkout — and a settings property containing the modal Checkout configuration.
Once the upgrade is complete, you can leverage the webhook mechanism to synchronise the license.
Webhook Integration (Optional)
For more advanced workflows you can integrate with Freemius’ Webhook. There are endless number of things you can do with webhooks, here are a few examples:
Auto activate license
- A user makes a purchase from your application.
- Your webhook receives a
license.createdevent with the license and buyer details. - Your webhook sends a push to the relevant connected application.
- The application gets and activates the license.
Sync license with application
- Your webhook receives a
license.plan.changed,license.extended,license.shortened,license.expired,license.deleted,license.cancelledevent. - It sends a push to the relevant connected application.
- The application synchronises the license.
Send payment notification
- Your webhook receives a
payment.createdevent. - It sends a relevant push notification to your app.
- Your app shows a notification to your user that a payment was received.
Here’s some sample integration code that you can use to make your own workflow.
import crypto from 'crypto';
import express from 'express';
import bodyParser from 'body-parser';

const app = express();
const PRODUCT_SECRET_KEY = '<PRODUCT_SECRET_KEY>';

app.post('/webhook', bodyParser.raw({ type: '*/*' }), (req, res) => {
  const input = req.body.toString('utf8');
  const hash = crypto
    .createHmac('sha256', PRODUCT_SECRET_KEY)
    .update(input)
    .digest('hex');
  const signature = (req.headers['x-signature'] as string) || '';

  // Verify the signature and authenticity of the webhook event.
  const isValid = crypto.timingSafeEqual(Buffer.from(hash, 'hex'), Buffer.from(signature, 'hex'));

  if (!isValid) {
    res.status(200).send();
    return;
  }

  const fsEvent = JSON.parse(input);

  processEvent(fsEvent);
});

app.listen(3000, () => {
  console.log('Server is listening on port 3000');
});

function processEvent(fsEvent) {
  let appInstances;

  switch (fsEvent.type) {
    case 'license.created':
      appInstances = myApp().findByExternalUser(fsEvent.objects.user);

      // Send push to the app to auto activate the license
      myApp().pushService(appInstances).sendActivationNotice( fsEvent.objects.license );
      break;

    // Synchronize license
    case 'license.plan.changed':
    case 'license.extended':
    case 'license.shortened':
    case 'license.expired':
    case 'license.deleted':
    case 'license.cancelled':
      appInstances = myApp().findByExternalLicenseId(fsEvent.objects.license.id);

      myApp().pushService(appInstances).sendSyncSignal();
      break;

    case 'payment.created':
      appInstances = myApp().findByExternalLicenseId(fsEvent.data.license_id);

      // Send push to the app to update the payment status
      myApp().pushService(appInstances).sendPaymentNotice(fsEvent.objects.payment);
      break;
  }
}
Do check our JS SDK Webhooks Documentation for an easier integration.
Other Integrations
- For Customer Portal, see this guide.
- To customize the style of the Checkout please follow this guide.
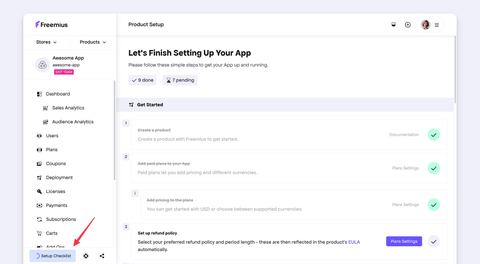
You can always navigate to the Setup Checklist page to find out what you need to do next to set up your application. If you have any questions, please feel free to contact our support.