Hosted Checkout
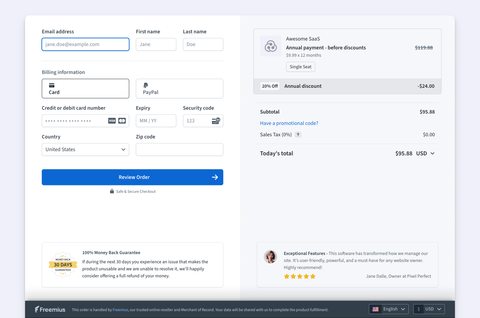
The Hosted Checkout is a secure, hosted checkout page that allows you to redirect your customers to a specific URL to complete their purchase.
In addition to the Overlay Checkout, this features makes your Checkout more robust with simple links that you can share anywhere, including:
- Your own website
- Social media platforms
- Emails and in-app notifications
Here is an example.
Setting Up Hosted Checkout
You can generate hosted checkout links directly from the Freemius Developer Dashboard. No code is required.
Generating Checkout Links for Plans
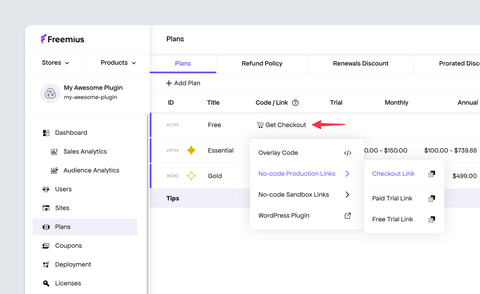
- Start by going to the Plans page.
- Click the Get Checkout Code button.
- Click the Overlay Code button.
- Hover over the No-code Production Link. You'll find several links depending on how you've configured your plan.
Generating Checkout Links for Pricing
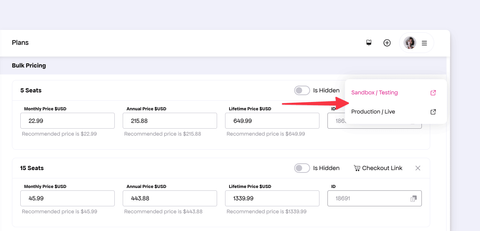
You can also set different pricing options inside an individual plan page. If you want a link to a specific pricing option:
- Under the Plans page. Select the desired plan by clicking its name under the Title column.
- Scroll down to the Pricing section.
- Click the Checkout Link button on the specific pricing box.
Programmatically Generating Checkout Links
If you want to programmatically generate Checkout URLs for your product, here is the URL schema
https://checkout.freemius.com/product/{product_id}/plan/{plan_id}/[licenses/{number|'unlimited'}]/[currency/{'usd'|'eur'|'gbp'}]
Given your product ID is 1234 and plan ID is 5678, here are some valid examples:
- Pre-select the single license pricing:
https://checkout.freemius.com/product/1234/plan/5678/ - Preselect the 10 licenses pricing:
https://checkout.freemius.com/product/1234/plan/5678/licenses/10/ - Preselect the EUR pricing of single license:
https://checkout.freemius.com/product/1234/plan/5678/currency/eur/ - Preselect the EUR pricing of 10 licenses:
https://checkout.freemius.com/product/1234/plan/5678/licenses/10/currency/eur/
Additionally every configuration you see in the Buy Button API can be passed as URL query parameters. For example:
https://checkout.freemius.com/product/1234/plan/5678/?title=Awesome%20Product
Please be sure to URL encode the parameters when constructing the URL. Here is an example:
- JavaScript
- PHP
function generateCheckoutLink(productId, planId, email, otherParams = {}) {
  const baseUrl = `https://checkout.freemius.com/product/${productId}/plan/${planId}/`;
  const params = new URLSearchParams({
    user_email: email,
    readonly_user: 'true',
    ...otherParams,
  });

  return `${baseUrl}?${params.toString()}`;
}
function generateCheckoutLink($productId, $planId, $email, $otherParams = []) {
  $baseUrl = "https://checkout.freemius.com/product/{$productId}/plan/{$planId}/";
  $params = array_merge([
    'user_email' => $email,
    'readonly_user' => 'true',
  ], $otherParams);

  $queryString = http_build_query($params);

  return "{$baseUrl}?{$queryString}";
}
To add a coupon to a URL, so your customers automatically arrive to the Freemius Checkout page with a coupon activated, all you need to do is add ?coupon=12345 to the end of the URL. 12345 should be replaced with the coupon code.
Configuring the Back Button

A back button can be shown to a hosted Checkout. Here's how it works:
- If a valid
cancel_url=...is set in the URL query parameters, Checkout will use that URL. - If the above is not present but there’s a valid HTTP referrer, it will be used.
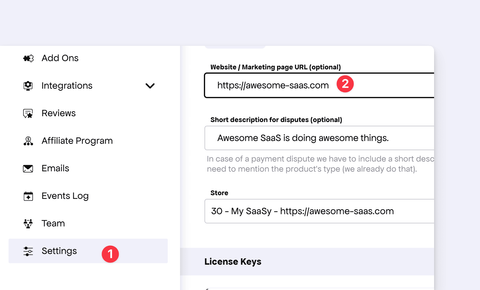
- If neither of the above is available and you've set a Website / Marketing Page URL under your product settings, that URL will be used instead.
The button's icon is generated automatically from the favicon of the website. However, you can customize it by passing a valid image URL using the cancel_icon parameter.
Here’s an example of a Checkout URL with both parameters:
https://checkout.freemius.com/product/{product_id}/plan/{plan_id}/?cancel_url=https%3A%2F%2Fexample.com&cancel_icon=https%3A%2F%2Fexample.com%2Flogo.png
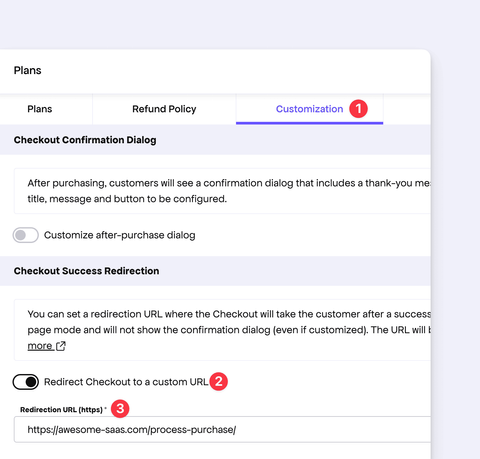
Redirection After a Successful Purchase
You can configure a redirection URL after a successful purchase via the Developer Dashboard.
- Go to Plans → Customization.
- Enable the Redirect Checkout to a custom URL toggle.
- Then, enter a valid HTTPS URL in the input field.
After a successful purchase (including license or payment method updates), buyers will be redirected to the specified URL. The following purchase data will be appended as query parameters:
user_id– The ID of the buyer.plan_id– The ID of the purchased plan.email– The buyer's email address.pricing_id– The ID of the pricing (not present for one-off purchases).currency– The currency code associated with payment (e.g.,usd,eur,gbp).subscription_id– The ID of the subscription (not present for one-off purchases).billing_cycle– The subscription billing frequency (not present for one-off purchases).amount– The net amount paid by buyer.tax– The tax amount paid by buyer.payment_id– The ID of the one-time payment (only for one-off purchases).license_id– The ID of the associated license.expiration– The license expiration date (not present for one-off purchases).quota– The quota associated with the license.action– The type of action that was performed. It can bepurchase,license_update,payment_method_updateortrial.trial– In case of a trial, this will have value eitherfreeorpaidexplaining the type of the trial.trial_ends_at– In case of a trial, this will have aYYYY-MM-DD HH:MM:SSdate explaining when the trial ends.signature– A hashed value to verify the authenticity of the request (see the verification instructions below).
Verifying the Data
When redirecting to the success URL, Freemius Checkout appends a signature query parameter that allows you to verify the authenticity of the request.
Here's the algorithm to verify the signature:
- Take the full absolute URL.
- Remove the
&signature=...from the end of the URL. - Calculate the SHA-256 hash of the resulting string.
- Compare it with the value of the signature parameter.
Below you can find examples of how to implement this in different programming languages.
- JS SDK
- PHP
const currentUrl = somehowGetTheCurrentUrl(); // e.g., request.url
const redirectInfo = await freemius.checkout.processRedirect(currentUrl);

if (redirectInfo) {
  // Handle successful checkout
  console.log('Redirect Info:', redirectInfo);
} else {
  // Handle errors or incomplete checkout
  console.error('Invalid or missing redirect info');
}
For more information check our JavaScript SDK Documentation.
const FS_PRODUCT_SECRET_KEY = 'sk_productSecretKey';

// Get the current absolute URL
$protocol = (!empty($_SERVER['HTTPS']) && $_SERVER['HTTPS'] !== 'off') ? "https" : "http";
$host = $_SERVER['HTTP_HOST'];
$current_url = $protocol . "://" . $host . $_SERVER['REQUEST_URI'];

// Remove the "&signature=..." part using string slicing
$signature_pos = strpos($current_url, '&signature=');
$clean_url = substr($current_url, 0, $signature_pos);

// Calculate the HMAC hash
$calculated_signature = hash_hmac('sha256', $clean_url, FS_PRODUCT_SECRET_KEY);

// Compare the calculated signature with the provided one
$signature = $_GET['signature'] ?? null;

if ($signature && hash_equals($calculated_signature, $signature)) {
    echo "✅ Signature is valid.";
} else {
    echo "❌ Invalid signature.";
}
Please make sure the URL you enter does not redirect in your server. Otherwise the signature validation will fail following the algorithm. Also if you want to redirect to the root of the server, kindly add a /, for example https://example.com/, as browsers will do that when URL parameters are added.
Next Steps
You're now ready to start sharing your hosted checkout links!
To go further:
- Learn how to customize the Checkout style to match with your brand
- Integrate the Overlay Checkout for an embedded purchase flow
- Explore Webhooks for post-purchase automation
If you run into any issues or have questions, don't hesitate to contact our support by clicking the Help button on the bottom right of the screen.