iOS In-App Purchase Integration
In this guide, you will learn how to use the Freemius Hosted Checkout to provide an in-app purchase experience from your iOS apps without using Apple Checkout.
Getting Started
To get started with Freemius Checkout integration, you need to do the following:
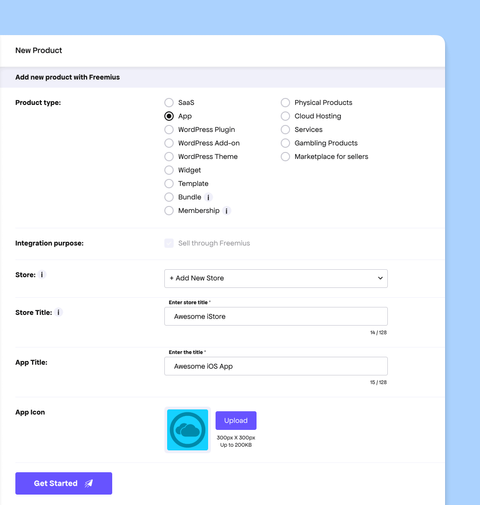
- Register to Freemius as a maker.
- Created an App product.
- Configure your plans and pricing from the Dashboard.
Integration with No-Code Checkout Links
The easiest way to integrate Freemius Checkout with your app is by using the links generated from the Freemius Developer Dashboard.
- Navigate to the Plans tab of your product.
- Select the Plan you want to use.
- Next to each Pricing, click the Checkout Link button and copy the Production/Live link.

You can then use your preferred method to open the link in your app, such as using a WKWebView or opening it in Safari.
For more advanced integrations, continue reading the sections below.
Prerequisites for iOS Checkout Integration
- You have all the IDs of your plans. You can find them in the Freemius dashboard under the Plans tab of your product.
- You have the Bearer Token Auth for communicating with the Freemius API.
- You have created a Webhook Listener.
Checkout Integration Using WebView
We will use the Freemius Hosted Checkout links to provide an in-app purchase experience to your buyers without using Apple Checkout.
At any point in your app, you can use the following high-level flow to open the Freemius Hosted Checkout link:
- Generate the Checkout URL: Use your
productID,planID, andcurrencyto construct the URL. - Create a Button: Add a button to your app's UI that triggers the checkout process.
- Open the URL in a WebView: When the button is tapped:
- Create a
WKWebView. - Load the
checkoutURLin the WebView.
- Create a
Additionally, you can also use the Freemius Checkout SDK to create a pricing page on your website and open your own pricing page from your app.
Scoping the Checkout to Your Authenticated User
If your app collects the user's email address or has a user account system, you can scope the checkout to the authenticated user by passing additional parameters to the checkout URL.
We recommend including the following parameters:
user_email: The email address of the authenticated user.user_firstname: The first name of the authenticated user.user_lastname: The last name of the authenticated user.readonly_user: Set totrueto prevent the user from changing their email address during checkout.
Here is an example of a checkout URL with these parameters:
https://checkout.freemius.com/product/<PRODUCT_ID>/plan/<PLAN_ID>/?user_email=<USER_EMAIL>&user_firstname=<USER_FIRSTNAME>&user_lastname=<USER_LASTNAME>&readonly_user=true
Setting Up Redirects
To ensure a smooth user experience, you need to set up redirects for the Freemius Hosted Checkout links.
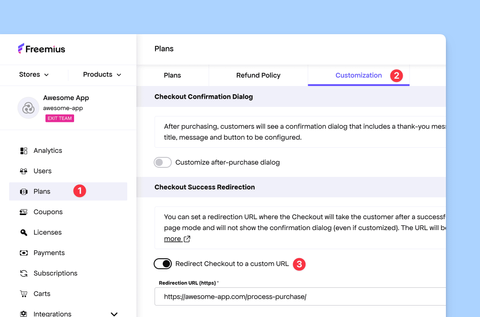
- Go to the Freemius Developer Dashboard and under the Plans page, go to the Customization tab.
- Enable the Checkout Success Redirection and enter a URL that will handle the success response from Freemius.
- From the URL you provided, you can do post-processing and finally redirect the user to your application (for example, using a deep link).
Please read more about Redirects in the Hosted Checkout documentation.
Syncing Purchases and Subscriptions
Once the user has completed the purchase, you might want to:
- Activate the license in your app.
- Sync the purchase with your backend.
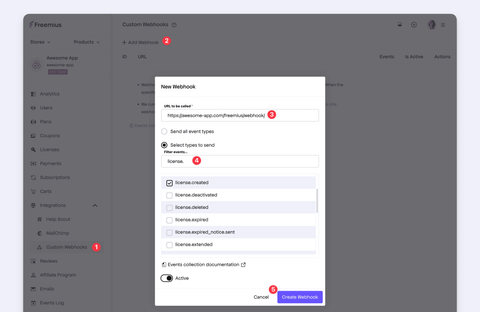
To do this, please create a webhook listener from the Freemius Developer Dashboard.
We recommend using the license.* events to sync the purchase with your backend. Then your backend can send the license information to your app using a push notification or any other method you prefer.
We are giving an example below with a simple backend using Node.js and Express:
import crypto from 'crypto';
import express from 'express';
import bodyParser from 'body-parser';

const app = express();
const PRODUCT_SECRET_KEY = '<PRODUCT_SECRET_KEY>';

app.post('/webhook', bodyParser.raw({ type: '*/*' }), (req, res) => {
  const input = req.body.toString('utf8');
  const hash = crypto
    .createHmac('sha256', PRODUCT_SECRET_KEY)
    .update(input)
    .digest('hex');
  const signature = (req.headers['x-signature'] as string) || '';

  // Verify the signature and authenticity of the webhook event.
  if (hash !== signature) {
    res.status(200).send();
    return;
  }

  const fsEvent = JSON.parse(input);

  processEvent(fsEvent); });

  app.listen(3000, () => {
    console.log('Server is listening on port 3000');
  });

  function processEvent(fsEvent) {
    let appInstances;

    switch (fsEvent.type) {
      case 'license.created':
        appInstances = myApp().findByExternalUser(fsEvent.objects.user);

        // Send push to the app to auto-activate the license
        myApp().pushService(appInstances).sendActivationNotice( fsEvent.objects.license ); break;

      // Synchronize license
      case 'license.plan.changed':
      case 'license.extended':
      case 'license.shortened':
      case 'license.expired':
      case 'license.deleted':
      case 'license.cancelled':
        appInstances = myApp().findByExternalLicenseId(fsEvent.objects.license.id);

        myApp().pushService(appInstances).sendSyncSignal();
        break;
    }
}
Here, the myApp() is a placeholder for your app's backend service. More information about the webhook listener can be found here.
License Activation Through UI
After the purchase, Freemius will send an email to the buyer with the license key. From your app, you can also provide a UI to enter the license key and activate it.
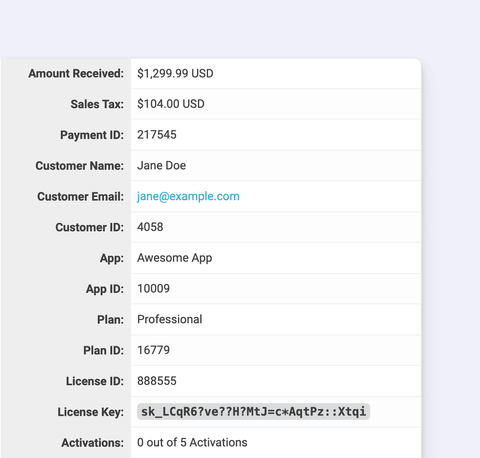
Our API provides several endpoints to activate licenses and check their status. Please refer to the License Key Activation guide for more details.
Advanced Concepts
Here are some advanced concepts you might want to consider:
Dynamically Listing Plans
If you want to dynamically list the plans available for your product, you can use the Freemius API to fetch the plans and their details. The API endpoints are protected by authentication, so we recommend using a server-side proxy to fetch the plans and then send them to your app.
const PRODUCT_ID = '<YOUR_PRODUCT_ID>';
const BEARER_TOKEN = '<YOUR_BEARER_TOKEN>';

app.get('/api/plans', async (req, res) => {
  try {
    // Fetch plans from Freemius API
    const response = await fetch(
      `https://api.freemius.com/v1/products/${PRODUCT_ID}/plans`,
      {
        headers: {
          Authorization: `Bearer ${BEARER_TOKEN}`,
        },
      }
    );

    if (!response.ok) {
      return res
        .status(response.status)
        .json({ error: 'Failed to fetch plans' });
    }

    const data = await response.json();

    // Extract plan ID and title
    const plans = data.plans.map((plan) => ({
      id: plan.id,
      title: plan.title,
    }));

    res.json(plans);
  } catch (error) {
    console.error('Error fetching plans:', error);
    res.status(500).json({ error: 'Internal server error' });
  }
});
Now, from your iOS app, you can call this endpoint to get the list of plans and their details. Please find the API reference for more details.
License Upgrade Flow
If your buyer has purchased a license already, you can use the Freemius API to generate upgrade links.
- Your app should call your backend to generate the upgrade link.
- Your app will send the authenticated user ID and the license ID to your backend.
- Your backend will call the Freemius API to generate the upgrade link.
Here is an example of how to generate the upgrade link:
app.get('/api/upgrade-link/:licenseId/:planId', async (req, res) => {
  const { licenseId, planId } = req.params;
  // Get authenticated user from the session or token
  const { userId } = getAuthenticatedUser(req);

  // IMPORTANT: Authorize the request to ensure that the user has access to this license.
  userLicenseGatekeeper(userId, licenseId);

  try {
    // Fetch the upgrade link from Freemius API
    const response = await fetch(
      `https://api.freemius.com/v1/products/${PRODUCT_ID}/licenses/${licenseId}/checkout/link.json`,
      {
        method: 'POST',
        headers: {
          Authorization: `Bearer ${BEARER_TOKEN}`,
        },
      }
    );

    if (!response.ok) {
      return res
        .status(response.status)
        .json({ error: 'Failed to fetch upgrade link' });
    }

    const data = await response.json();
    res.json(data.url);
  } catch (error) {
    console.error('Error fetching upgrade link:', error);
    res.status(500).json({ error: 'Internal server error' });
  }
});
This will return the URL of the hosted checkout page, which you can open in your app. More information can be found in the API reference.
Next Steps
You have now successfully integrated Freemius Checkout links into the iOS app. From here, you can explore more about:
- Freemius Checkout SDK to create a pricing page on your website.
- App Integration to learn deeply about various integration methods.
- Checkout Customization to customize the checkout with your own branding.
- Freemius API - Reference to our REST API.
If you have any questions, please feel free to reach out to us using the Help button in the bottom right corner of this page.